The Rock Climber’s Training Manual is now available order yours here!
This legendary article was originally posted on Rockclimbing.com in 2006. It has since received nearly 100,000 page views, helped countless climber’s improve beyond their wildest dreams, and planted the seed for The Rock Climber’s Training Manual. The original article follows in it’s entirety. However, the Rock Prodigy Training method has recently been extensively evaluated and updated. The Rock Climber’s Training Manual incorporates the countless improvements we’ve made to this training method over the past decade, with all the details needed to become the next rock prodigy!
The Making of a ‘Rockprodigy’
Foreward
Lest you think I developed these theories myself, I originally came up with my training program after thorough study of Performance Rock Climbing by Dale Goddard and Udo Neumann, and Fingers of Steel, a video by Tony Yaniro. Since then, I have made minor modifications, but they deserve the credit for first revealing these ideas.
I first started training in January, 1998. I had spent the previous fall “stuck” at 5.11, despite several years of climbing, and I felt I needed a boost. I read the seminal Performance Rock Climbing (PRC) by Dale Goddard and Udo Neumann, and realized that targeted training could help me achieve my goal of climbing 5.12. These days, for most climbers, I would suggest that 5.12 is very attainable without training. However, it requires the climber be able to climb regularly, preferably 4-5 times per week. At that time in my life, I was a Cadet at the US Air Force Academy in Colorado Springs. Even if I had the time to climb that much, I wasn’t allowed to leave campus except on the weekends, so getting outside, or to a good gym was out of the question. I realized that targeted training would give me the benefit of climbing a lot, without the time requirement.
The first season I trained, I was blown away by the results! The previous season, my best “send” was 5.11b. After my first 3 month training cycle, I did my first 5.12a, followed shortly by my first 5.12b, then my first 5.12a on-sight! All this with only 3 months of hard work! However, I realized I had opened “Pandora’s Box”. I knew that once I had experienced the power of “training”, I would no longer be satisfied to wallow in mediocrity…I would have to train forever, and continue to improve. Since then, I have had ups and downs, but I’ve always experienced long term steady improvement. I have pushed into the mid-5.13 range in the last seven years, with multiple 5.12+ on- sights. This may seem unremarkable to many “young-guns” who boulder V8 after six months, but I am not one of those people. I have no talent as a climber, besides my willingness to work hard. I had to struggle to climb my first V2, so to progress as far as I have, is impressive to me.
So what is training anyway? I don’t care what the dictionary says, to me, climbing training is “a systematic, disciplined approach to improve climbing performance.” I hear a lot of climbers say they are “training”, but if I probe them about the specifics, there aren’t any. They just “climb” or “boulder” every other day, or when they have time. That is not training. Training is a pre-meditated routine that is planned intelligently with the hope of attaining some tangible goal. It should be designed deliberately to transform your body towards what ever end you have in mind, then it should draw from the body of knowledge available by using specific exercises to create the gains that are desired.
Currently, climbing as a sport is in its infancy. There is a limited body of knowledge available to climbers, and most of what is available has merely been adapted from other, similar sports. Unfortunately, there isn’t another well-studied sport that is very similar to climbing. Many theories are taken from powerlifting, and some from middle-distance running. It’s not that these sports are the most closely related to climbing in terms of physical demands on the body, but rather, they are considered the most similar among sports that have been thoroughly studied. Researchers are starting to direct more effort towards climbing specific studies, and therefore, we can look forward to learning more about how to train in the future.
To you and me, that means my training regimen is always in flux. I started by adopting the theories of pioneers like Goddard, Neumann, and Yaniro, but since then, I have been constantly tweaking my program, using myself as the “guinea pig” to test out new ideas, and refine my program. Being only one person, it takes a long time to test out different ideas, but hopefully, as more climbers become interested in training, we can all benefit from each other’s experimentation. Furthermore, the human body is a mysterious machine. Every one is different, and everyone will respond to a specific routine differently. Therefore, it is incumbent upon you to be flexible in your program. Start with the basic routine, but be willing to experiment with it. Try different rest periods, or different numbers of reps, sets, etc. That is how this knowledge is discovered.
Why Train?
It seems every time someone asks a question about training, or attempts to have a meaningful discussion, it doesn’t take long for some moron to chime in with “I train my biceps by lifting a beer up to my fat face.” Insecure and below average climbers love to bash those of us with enough self respect to seek improvement. Someone once said: “Anything worth doing is worth doing well.” I believe this applies to climbing as well as it does anything else in life. I cannot understand the attitude of someone who would spend every weekend out on the rock, but not be at least mildly interested in getting better.

The habitat of a “rockprodigy”
Improving is the obvious reason to train, and every climber I have met has always wanted to get better. Granted, some want it more than others, and are willing to make some sacrifices beyond words to actually get better, but nevertheless, most climbers at least say they want to get better. Many lazy climbers will make the argument that they can get better by simply climbing as much as possible. That is true. A certain amount of improvement can be had by just randomly climbing. Physically, there will be improvement so long as the intensity and volume are increased (something that will be hard to tell), and it is likely that technique and other less-tangible factors will improve as well. So why not “just climb?”
To me, the answer has two parts. The first I just hinted at. The only way to ensure steady, continued improvement is with training. Any athlete who has pursued a sport for long, will be familiar with the idea of a “plateau”. The point where some marked improvement over a period of time ceases, and they cannot proceed beyond their current level of performance. With a random “just climb” type of routine, there is no way to force improvement because there is no record of what work was accomplished to get to that point, and therefore, there is no way to incrementally increase the load on the body, which forces adaptation. As monotonous and mundane as training can be, at least I always know that the results will not be monotonous. I know that I will improve, and my training record will reflect that improvement, even if the circumstances of my climbing season don’t allow me to “send”.
The knowledge that you are getting stronger can be very motivating, and can carry you through a number of otherwise disappointing seasons. With the “just climb” approach, the only evidence of improvement is if you “send”. We all know that sometimes, the circumstances of life, be they work, school, a new boyfriend, a new baby, or even just bad weather at your crag of choice can prevent you from sending, whether your body was prepared for better performance or not. With a training record, the simple knowledge that you improved in your training can sustain your motivation through to the next season, where you may have the opportunity to “send” again.
The second, and to me, most compelling reason to train is injury prevention. Stop and catch your breath, that wasn’t a typo. Yes, training prevents injury. Here’s how: Imagine some “guy A” who goes into the weight room (according to no specific schedule whatsoever, just when he has time) and he does one squat rep of a random weight then a couple reps of bicep curls (again at random weight, and so on), then a pullup followed by two more squat reps, then does one max rep on tricep extensions, then does a bicep curl then one max rep on leg extension then does one military press, then maxes out on bench press, then 3 situps, etc….
Now imagine “guy B”. He goes to the weight room according to a schedule he has mapped out that allows for hard days, easy days and rest days. When he’s in the gym he warms up each muscle group before working it, then he lifts a specified weight that is based on what he has lifted during his previous workouts plus an incremental (say 5%) increase. Which guy do you think will get injured?
Most climbers are “guy A”. Their idea of working out is “bouldering”, which is essentially haphazard and random exercises of various muscle groups. There is no way to precisely stress the muscle (and supporting structure) to a specified amount, and there is no way to measure or record how much they have been stressed. There is no way to know if you are increasing the intensity or by how much. These “training” sessions often end in a wild dyno for some two finger pocket which the climber has absolutely no idea if he has any business trying to hold onto, then a loud “pop”!
The problem with this “method” (or lack thereof) is that the way to enlarge muscle tissue is to stress it to near failure. In random bouldering, there is no way to know when that is accomplished, but you definitely know when you’re past that point (pop!) Furthermore, the supporting structure of the fingers (tendons and ligaments) take up to six years (not a typo) to respond to additional stress. That means, that if you have been climbing for six years, your ligaments may now just be starting to get stronger, whereas your forearm muscles respond in about two weeks. Therefore, your random acts of unkindness to your body are priming your forearm muscles to do major damage to the support structure, with no monitoring whatsoever. A structured training regimen allows the climber to carefully and thoughtfully stress the body enough to cause the desired adaptation without stepping over the line into injury. Aside from giving up climbing for golf, training is the best way to avoid injury!
Finally, a third reason to train is that it simply takes less time. Because of the systematic nature of training, it is the most efficient way to completely and thoroughly workout. The “just climb” method may take several hours more to reach total exhaustion because it is so random. If you don’t have 40 hours per week to climb, then training is by far the best way to improve.
So assuming, you are now sold on the idea of training, let’s get into how I do it. Keep in mind, this is my routine. I have no idea if it is best for you…that is for you to decide! I willingly acknowledge that this routine may not be well suited for most people, and I realize that many leading authorities on the subject may completely disagree with me. That is wonderful! Disagreement leads to discussion and further investigation, and hopefully that will make us all stronger!
Before I get into the gory details, realize that my routine is designed specifically to train me for the type of climbing that I prefer. Stop and read that sentence again. I grew up climbing at Smith Rock, then moved to Colorado Springs where I fell in love with Shelf Road and Penitente. Later I moved to Utah and excelled on vertical quartzite, granite and the Virgin River Gorge. What these places all have in common is the climbing style. They feature vertical to barely overhanging rock with technical, powerful moves. On these type of routes, endurance is usually not as important as power. I have found with this style that if you can do all the moves, then you can usually do the route because a good rest is almost always available.
So what? Compare it to the opposite style of climbing, the very steep, “thuggish” routes of Rifle, American Fork, and Maple Canyon. Those routes depend mostly on endurance, and very little on strength and power. Therefore, it makes more sense to emphasize power-endurance training, and learning movement so that you climb very efficiently. For example, a 5.13a route at Rifle may not have a single move harder than V3, but it won’t have any rests either. On the other hand, there are 5.13a’s at Shelf Road that have V7 cruxes with 5.10 climbing in between. If you get pumped, or do some moves inefficiently, there are ample opportunities to recover, so long as you can do the crux moves. Obviously, you would want to train for these styles differently. The approach I present in the following pages is tailored toward the thin, technical climbing style, which I believe is more useful to the average climber who doesn’t have access to a jug-hauling crag like Rifle. Furthermore, if you can do the moves, you can learn to climb more efficiently, and even gain endurance while working the route. Tony Yaniro once said: “If you can’t do the moves, then there is nothing to endure.”
You may find that my ideas contradict many other “experts”. It may be because their goals are different than mine, so make sure you know what your goals are. For now, my goal is to improve my ability to do hard moves. I believe your lifetime power peak happens long before your lifetime endurance peak, so you can train endurance when you’re old! When I get older and my fingers aren’t very strong anymore, then I’ll retire to a crag like Rifle, where there are no hard moves, every hold is a big jug, and I can train endurance all the time and bash people who own hangboards. When that day comes, I’ll modify my program.
Periodization
Periodization is a technique of systematically shifting the emphasis of the exercises throughout a training period. The reason is simple, and it has to do with the whole “plateau” idea. When muscle tissue is exposed to a new type of stress, it will adapt by growing stronger, however there is a limit to this growth. If you continue the exercise long enough, the body will no longer respond. Athletes try to “trick” the body, by changing the exercises, and therefore, the type of stress, with the hope of continuing to force adaptation beyond what would be possible by continuing with the same exercises.
With periodization, the athlete emphasizes a certain type of training for a set period, then, just as the body is no longer responding to that type of training, the athlete shifts to another type for the next period. These periods are often referred to as “phases”. When I first started training, my four-month training cycle looked like this:
Phase 1: Aerobic Restoration and Capillarity (ARC) 6 weeks
Phase 2: Hypertrophy (HYP) 4 weeks
Phase 3: Maximum Recruitment (Max R) 3 weeks
Phase 4: Power Endurance/Peak Phase (PE) 2-4 weeks
Phase 5: Rest/Recovery 2 weeks
The key to building a schedule like this is to take advantage of the properties of each type of work, and there is a reason it is set up as it is. For example, ARC training is somewhat of a life-long pursuit. You will not have massive gains in your ARC performance in a short period of time, but fortunately, you don’t lose those gains quickly either. The strength gains made in the Hypertrophy phase are long in coming, but they hang around for awhile afterwards. By contrast, Power Endurance can be increased very quickly (in a matter of days), but it will be lost just as quickly. Therefore, it is important to place each phase correctly in the cycle. The Power Endurance phase is accomplished last because it can be brought up fairly quickly, and will not last very long. The Hypertrophy which is accomplished early in the cycle, will last the 5-6 weeks until the peak phase occurs. By scheduling each phase correctly, the climber can optimize his or her performance potential by creating a synergistic effect between the various physical aspects of climbing performance. Not every aspect will be at a peak at once, but by bringing them all up to a high level at a certain time, an overall performance peak is created.
This type of scheduling can be very useful if you desire to reach your absolute potential, and are willing to sacrifice climbing at a high level all the time. Periodized training will create a 2-4 week performance peak at the end of your training cycle, but you must realize that it comes with a cost: reduced performance through the remainder of the cycle. This type of training is ideal if you want to prepare for a climbing trip or something like that. I like to use it because it creates “seasons” throughout a year, when I can expect myself to perform. I plan out certain periods where I know I will need to get outside as much as possible to “send”. Then I also know that the rest of the time, I can do “fun” stuff, that doesn’t require me to hang out in some dusty roadside crag every waking minute. I can do that multi-pitch trad route I’ve wanted to do, or go ice climbing, or something else.
So that original schedule that I presented above was what I started out with, but now I do it a little differently based on some of my own experience, and discussions with other climbers. This is what I’m doing now:
Phase 1: Hypertrophy 4-6 weeks
Phase 2: Max Recruitment 2-3 weeks
Phase 3: Power Endurance 2 weeks
Phase 4: Power Endurance/Peak 4 weeks
Phase 5: Rest 2 weeks
The most obvious change is that I have eliminated the ARC phase. I do not recommend this for “beginners”. I still do ARC workouts, but I mix it in with the other phases (more on this later). Furthermore, I still do one cycle per year where I start out with a 4 week ARC phase, but the other three or four cycles through the year, I skip the ARC phase. I decided to do this for a number of reasons. First, I believe my original motivation for including the ARC phase in the first place was because a similar phase is used by distance runners. It is called a “base” phase. I decided that this phase was not as beneficial to my climbing because it does not rely as heavily on aerobic systems. The second reason I eliminated the ARC phase was to reduce the time period between strength (Hypertrophy) building phases. Previously, I might go three months from the end of my Winter HYP phase to the start of my spring HYP phase. I felt that this long of a pause was causing me to start from scratch each time, rather than successively building on each previous cycle.
For people new to “training”, I suggest you include the ARC phase for the first couple years at least, maybe more, depending on the type of climbing you like to do. The ARC phase can be very beneficial to beginners because ARC prepares your delicate connective tissue for the rigors of the upcoming, more intense phases. Furthermore, ARC gives you time to focus on technique which may be just as important as strength training.
The other major change I made was with the Power Endurance phase. When I first started training, I figured that “working my proj” counted as PE training, so why bother with a separate phase? I’ve since refined my thinking and realized that “working the proj” rarely results in effective and thorough training. I now dedicate specific workouts toward PE training, while still working my “proj” on the weekends.
Exercises:
I started with Periodization to explain how I set up an overall training cycle. Now I will get into the specifics of what happens during each phase. At the end of this I will show examples on a calendar of what a full training cycle would look like, workout by workout.
ARC – The purpose of Aerobic Restoration and Capillarity training is to improve your muscles’ ability to produce sustained effort without surpassing the “anaerobic threshold”. There are many books that I’m not going to plagiarize that will give you a more scientific explanation, but basically, ARC increases the level you can climb at without getting hopelessly pumped. For example, if you can execute sustained 5.10 moves for 30 minutes without getting pumped, then you can probably climb most 5.11 routes, which probably consist of “mostly” 5.10 climbing, with a 10+ or 11- crux. So if you could raise that “threshold”, then your climbing ability would improve.
An ARC workout involves sustained climbing, usually in a climbing gym, right below your anaerobic threshold. I typically do this workout by bouldering, without a break, for 30 minutes straight. The trick is to temper the difficulty of moves just right so that you are right below your threshold. Here are some tips: If you get severely pumped, the moves are too difficult. If you are climbing without any feeling of pump, and are not sweating, then they are too easy. A good ARC session should have you breathing heavily, slightly pumped (on the verge of pumping out, but not quite), and lightly sweating after the first 10 minutes or so. It takes practice to figure this out. A typical ARC workout would be two or three 30 minute sets with 10 minutes of rest between each set. Bring your IPOD!
HYP – Hypertrophy means “enlarging the muscle”. The goal, then of the HYP phase is to “get stronger.” Climbers advocate a number of different methods to accomplish this from hangboards, to heavy finger rolls, to systems boards, and HIT strips. I prefer the hangboard. All of these techniques are trade offs between climbing “specificity” (how well they mimic climbing movement) and strength building effectiveness. I readily admit that hangboard-ing does not involve any climbing movement at all. They do mimic climbing holds better than anything else, and are therefore the most effective tool for improving contanct strength – your forearms ability to grab a small hold. The other, fancier variations (HIT strips and Systems walls) attempt to add the element of climbing movement. All this does is water down the workout.
The purpose of the hangboard is to train your forearms, and body builders have long understood that the best way to train a muscle is to isolate it. These other tools do the exact opposite by attempting to train all the various muscle groups involved in climbing movement at once, making it virtually impossible to ensure that any one muscle is stressed until failure. I personally have never failed to redpoint a route because my lats weren’t strong enough to pull me up to the next jug. Unless you’re an elite ice climber, I doubt you have either. For me, I have always thought the most important thing to train was my forearms, so I have always chosen the hangboard as my tool of choice.
Since I’m on the topic of why I don’t like HIT strips and Systems walls, I’ll rant some more. I’m quite skeptical that the exercises that go along with these tools even cause hypertrophy. The number and duration of the repetitions, and the load put on the muscle seem more in line with Power Endurance exercises than hypertrophy. The only way to ensure hypertrophy is to load the muscle until failure quickly (not as a result of a pump). Since these devices usually contain only enormous jugs, and you’re allowed to use your feet, the only way to load your muscles adequately would be to use so much additional weight that it would be impractical and unsafe. These tools might be really useful for PE training, but I recommend you leave them out of your HYP training.
Below, I present two protocols for conducting a hangboard workout. As with all high intensity training, make sure you are fully warmed up before attempting these workouts. I recommend starting with a 20-30 minute ARC session as a warmup, then try some moderate boulder problems, followed by easy hangs on the hangboard on all the grip positions you intend to work.
Beginner Hangboard Workout: The first step in preparing a hangboard workout is to identify which grip positions you would like to work. This depends heavily on what hangboard you have, so get a good one with a lot of variety. I use a Nicros “Nexgen” (if you’re reading this Nicros…I’m available for sponsorship), it is almost perfect (there is no “perfect” hangboard…it’s more of a journey than a destination). For the beginner workout, select 6-10 grips that you will work, for example: half pad crimp, deep (two-knuckle) two-finger pocket w/ index and middle finger, deep two-finger with ring finger and pinkie, shallow (first knuckle) two-finger pocket, sloper, wide pinch, narrow pinch. On my hangboard, I didn’t like the options for the pinch, so I screwed some footholds onto the 2×6 that my board is mounted on to work as pinch grips.
The beginner workout is essentially 6-10 sets, with each set being one of your chosen grip positions. So if you picked 8 grips, you’re going to do 8 sets. Each set consists of five repetitions. Each repetition is a 10 second hang on that grip, no pull-ups or anything fancy, just try to hang on…that should be hard enough. If you have 8 grips, you will do 8 sets, with each set being 5 x 10 second reps. Just as important as the work duration is the rest duration. Rest 5 seconds between each rep in a set, and 2 minutes between each set. The timing is critical. I have a stopwatch that is taped to the wall in front of my face so I can precisely time each rep, each rest period, etc., and consequently, each workout takes almost exactly the same amount of time, every time.
The key to the properly executed hangboard workout, is figuring out how much weight to add (or subtract) for each hang. Keeping a good record is critical. The first time you try it, you will need to experiment quite a bit, and you may blow a whole workout or two dialing in exactly how much weight to use for each grip. Ideally, you should have just the right amount of weight that you barely can’t do the last rep of each set. Record how much weight you use for each set and how that weight felt, then the next time you do a workout, you will have a good idea how much to increase the weight. Remember, that only by increasing the weight each week, can you hope to force your muscles to adapt. See the example Hangboard training log to see how I record this stuff.
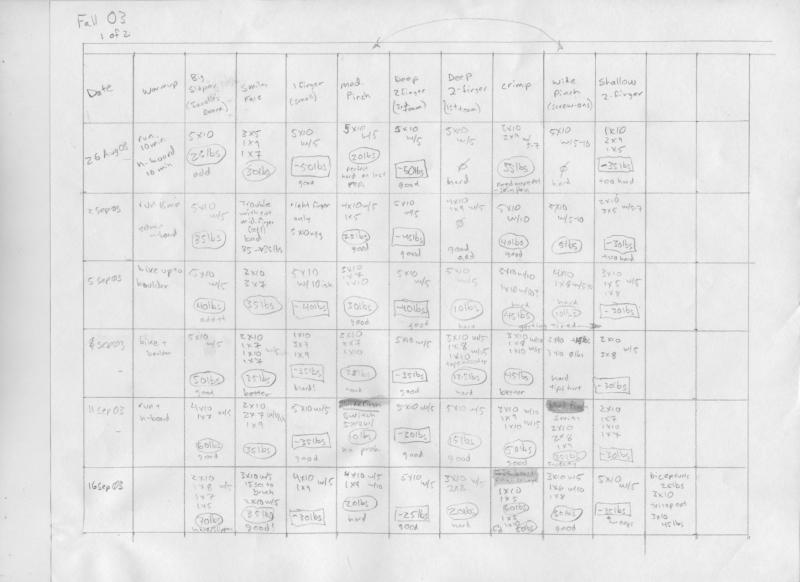
Training Log for the “Beginner Hangboard Workout”
Now I hinted in the preceding paragraph that sometimes you might want to subtract weight. Frankly, if you can hang onto a hold with 60 lbs hanging off your harness, then chances are, you don’t need to work that grip position very much. You get better by improving on your weaknesses, so use the holds that you can’t hold onto, and take weight off your body. You may have seek suggestions to use surgical tubing or put your feet on a chair to take weight off. These ideas are better than nothing, but just barely. Remember my definition of training? It must be systematic. Removing weight with your feet on a chair is not. One of the main benefits of the hangboard is that you can precisely load your fingers, so be precise in how you take weight off. I have done it with a pulley system that connects my harness to weights that are hanging free, so I can precisely remove 35 lbs if I need to. Like a spring, the force applied by a rubber band depends on how much it is stretched, so it’s easy to “cheat” by sagging further down, and therefore taking off more weight. See the figure, for my kick-ass pulley system.

Hangboard setup with weight added.

Hangboard setup with weight removed.
Advanced Hangboard Workout:
If you’ve been training for awhile and you believe your body can take the punishment, then this higher volume workout may be better for you. Choose 6 grip positions, then do 3 sets on each grip. The first set I do seven reps each 7 seconds long, with 3 seconds rest. The second set is six reps of seven seconds with 3 seconds rest. The third set is five reps of seven seconds with 3 seconds rest. I take two minutes rest between each set within the grip position, and three minutes rest between each grip.

Training Log for the “Advanced” Hangboard Workout.
Throughout each grip position I am increasing the weight between each set. For example, on my crimp hold, I might do 7 x 7 sec with 20 lbs added, then rest two minutes, then do 6 x 7 sec with 35 lbs, then 5 x 7 sec with 45 lbs. Then I would rest three minutes and proceed to the next grip position. This is a much longer workout than the beginner workout because you’ll be doing 18 sets, if you have six grips versus the 6-10 sets of the beginner workout.
If you get into hangboarding, you’ll soon learn that conditions are critical. You are trying to work your muscles to failure, so you don’t want skin friction to be a factor, therefore, the colder the better. If it’s summer, I get up two hours earlier and do my workout before going to work, when temps are better…that’s just one of the many sacrifices you’ll have to make. If you have A/C or a swamp cooler in your house, mount your hangboard nearby. Along these lines, forget about trying to use a public hangboard in a climbing gym. These nasty things are usually totally polished and/or gummed up by everyone from the tradie who wears high top climbing shoes with his daisy chain on his harness, to the tanktop and combat boot wearing skinhead gym junkie attempting to crankout tremendous-super-sets of pull-ups at the end of their workout. If you’re in good with the management, you might be able to mount your hangboard somewhere in the gym where other people can’t get to it. Ideally, you would live next door to the gym, and have a key so that you can do your warm up there at 0530 in the summer, or build a gym at home so you have a place to warm up and cool down after the workout. If these aren’t options, it’s quite possible to do your hangboard workout at home, it’s just harder and “boring-er” to warm up.
Max R – The goal of Maximum Recruitment training is to increase the percentage of muscle fibers that are actually contributing during a certain exercise. Believe it or not, you have muscle fibers in your muscles that are just sitting around, doing nothing when you try to grab onto that tiny crimper! The cool thing is that we can make ourselves stronger without gaining unwanted muscle mass, simply by tricking those lazy fibers into helping out. The way to do it is to demand that your muscles produce maximum power. Power is often misunderstood, but in scientific terms, it is force divided by time. That means, the greater force you apply over a shorter period of time, the more power you have produced. In climbing terms, that is most often associated with dynos, which is why the campus board is the favorite tool for this type of training.
The terms “campus board” and “to campus” originate from Germany where the first such board was built in a university campus gymnasium. Climbers use the word “campus” to describe any move made with your feet off the wall, which, unless your Sylvester Stalone, usually involves some dynamic movement. Because of this dynamic nature, the climber has limited time to latch the next hold, and must produce a great force in a short period of time… power!
The campus workout is the most fun part of my training regimen. This is where you really get to cut loose, and just go all out. First, you have to find a good campus board…hopefully your gym has one, if you want to build one, visit the Metolius website for good beta. I prefer the Metolius Campus Rungs as well. If you become a true campus board connoisseur, you’ll soon jump on the Metolius bandwagon. Hopefully your local campus board has a selection of at least three different rung sizes. The board should have identical rungs going up, if they don’t, then whoever built that campus board is clueless. I have visited gyms all around the country, and sadly there are very few that have even adequate campus boards, let alone “good” ones, despite the fact that they claim to have a “knowledgeable personal trainer on staff”. As a matter of fact, last week while visiting my in-laws over Christmas I discovered yet another culprit gym, none other than the famed Boulder Rock Club. It’s campus board was so bad I almost tore a rung completely off the board! If you have a similar problem, I recommend a new gym (move if you have to).

A sweet campus board.
As always, get really warmed up. I always start with a couple easy “ladders”, which just means going up rung by rung, hitting every rung to the top, then dropping to the ground. If this is very difficult for you, then you are not ready to campus. Get better at pull-ups and work the hangboard until you are able to do ladders. Once warmed up, I do anywhere from 6-10 sets, with each set being a trip up (or down) the board. Between sets, you should rest long enough that there is no lingering feeling of fatigue from the previous set. I may rest as long as 5-10 minutes between sets! I like to bring a climbing mag or something to stay psyched, or if you’re at the gym, spot a friend, but don’t climb! You can only train power when your muscles are fresh, so the instant you feel that you are losing the ability to explode off of each rung, you should end the workout. At that point, you will not be accomplishing anything meaningful, and you will only be risking injury. For me, this usually happens around the 8th or 9th set.
There are all kinds of fun things you can do on the campus board…search the web and you’ll come up with all kinds of stuff. For beginners, I recommend going up only, for at least a few YEARS. Do ladders where you reach as high as you can with each move. You can also do double dynos where you move both hands simultaneously (a great way to impress the hottie in the bouldering cave – scream really loud before hand to make sure she’s watching). As always, record your sets so you know where to start from next workout. See my Campus Log for an example.

Campus Board Training Log:
For advanced climbers, you can try “reactive” training. Reactive training involves stressing the muscle while it is extending, which is the opposite of how muscles are typically stressed. This is the most effective way to increase recruitment, but it is also very stressful, and therefore, very injury prone. Make sure you can handle it! The fact is, any campusing involves some reactive training, but you can crank up the intensity by campusing down the board. This is obviously much more difficult, but the gains can be impressive. If you are up to it, this can be a great way to add variety to your sessions by campusing up and down the board. Just the other day, I did a set where I double dyno’d from rung 1 to 5, then down to 3, then up to 7, down to 5, up to 9, etc. Great fun!
A common complaint I hear among campus board aficionados is that their elbows hurt. I don’t have any scientific evidence to back this up, but anecdotally campusing seems to cause medial epicondylitis, or “climber’s elbow”. I’ve found that since my campus phase only lasts a few weeks, consisting of usually six or fewer workouts, I can just train through it, and it will go away when I proceed to the next phase. If you already have climber’s elbow, then you might want to get your Max R training through bouldering instead. If you reject my periodization suggestions and want to campus all the time, then you’re asking for trouble, and I already feel sorry for your elbows.
PE – Like I’ve mentioned before, I used to “train” power endurance by simply working routes, outside or in the gym. I’ve since decided that it can be more effectively trained through other means. There are many ways to train for power endurance, and you may well find a better technique than what I do. This is the area that I’m least knowledgeable of, and least confident of my training techniques. The value of PE training varies greatly, depending on what type of climbing you like to do, so that is something to consider, when figuring out how much emphasis to put on PE training.
Power Endurance training is really a spectrum of endurance training. Yaniro identified three levels that he called “low-end, moderate, and high-end” power endurance, which he defined based on the number of moves of each exercise. Decide what you want to train for, based on what type of climbing you think you will do. If you crag of choice is Rifle, where you may need to do 100 moves or more, with not much rest, you will want to model your training after that. The climbing I prefer, usually involves a distinct crux section with relatively easy climbing for the remainder, so I usually train for 25-35 sustained moves.
I usually accomplish this training through bouldering. Sometimes, I’ll set up a traverse in the gym that is the specified number of moves, and do three burns on the traverse with 5-10 minutes rest between sets. More recently, I’ve been doing 4×4’s, which is similar. For the 4×4, select three to five boulder problems that will add up to the desired number of moves, then do each problem, consecutively, with no rest between each. If possible, down climb to the start of the next problem. You should have a partner time the length of your first set, then rest an equal period of time, usually 2.5-3.5 minutes. Then do another set. I usually do four or five sets, and am pretty trashed afterward. Again, the art comes in picking the right boulder problems so that you just barely can’t finish the workout.
Putting it all Together
All of these individual workouts are nice by themselves, but the real power of a disciplined training program is the synergistic effect to be had from combining these workouts correctly. The original resources that I mentioned at the beginning (PRC and Fingers of Steel) were very helpful in describing what workouts to do, but I found them both lacking in the day-to-day details of how to put together a training cycle. I have developed my workout organization based on my background as a distance runner, and over years of trial and error.
First some rules of thumb. In general, the more intense the workout, the more “fresh” you should be. Here are the workouts described above in order of intensity (highest to least): Max R, HYP, PE, ARC. Therefore, if you are thinking of combining workouts in the same climbing day, or on consecutive days, you should do the most intense thing first. For example, I’m going to Hueco for two days, and I’d like to boulder and climb routes while I’m there. Assuming I don’t have any predetermined priority over what is more important to me, it would make the most sense from a training and performance perspective to boulder (Max R/HYP) the first day and climb routes (PE) the next day. As far as training is concerned, I don’t recommend combining Max R, HYP or PE in any way. I will do it as a matter of necessity when it comes to climbing outside on the weekend, but I never do it intentionally. The only type of training I combine is ARC with anything else.
In addition, if I ever got the urge to do two types of work in the same day, the same rule applies. I often do this with ARC training, for example, I’ll do a hangboard workout, then do a 30 minute set of ARC afterward. I have not tried combining Max R, HYP, and/or PE…if you do, let me know how it goes. Now, to contradict myself, I’ve heard about “Complex Training”, which is essentially a combination of HYP and Max R. I did four complex workouts in my cycle this summer, and I didn’t have conclusive results either way. I certainly didn’t experience any “out-of-this-world” gains, which is what people claim, so as far as I’m concerned, the verdict is still out.
Now I could go through and try to describe how I assemble my training cycle, but instead, I think I’ll just show it to you. A picture is worth a thousand words. Keep in mind, however, the intent here is not to give you a schedule that you copy verbatim. The intent is to provide an example which will hopefully give you some insight into the structure so that you can build a schedule that will work for you. If you are starting out for the first time, and you don’t have a training partner, I highly recommend you sit down and put down on paper a day-to-day schedule like the one shown here before you start training. This schedule will serve as a proxy training partner, it will keep you on track on those low motivation days, when you’d rather “just climb”. As you get more experience, you can create your schedule on the fly, as I do, but for the first few years, I wrote it down in advance. Furthermore, make sure you record your workouts on paper as well. It may seem silly at first, but after a few years, these records will prove invaluable.

The periodized training calendar.
Notes on the training calendar:
1. I have presented a generic calendar, however, I’ve included examples of how I will commonly adjust the schedule to allow for climbing routes on the weekends instead of doing a hangboard workout, or something like that. I will make that tradeoff quite frequently, during a training cycle if the weather is favorable. During my winter cycle, I’m more likely to follow the training program more strictly and train mostly on man-made apparatus, but if it’s good climbing weather, or if I’m training for a trad climbing goal (which I believe is more technique than strength demanding), then I’ll train outdoors on real rock as much as possible.
2. I have not included a dedicated “ARC” phase. I used to do an ARC phase for the first five years or so that I trained, but I’ve since decided not to do it every training cycle. I will do an ARC phase once a year, however. To add an ARC phase, just do 4-6 weeks that are similar to the first week on this schedule. Doing so will turn it into a four month cycle.
3. Where I’ve indicated “routes outside” in place of another workout, try to climb routes that simulate that workout. For example, in place of a hangboarding day, go bouldering, or climb short powerful routes, or “hangdog” to work out the crux moves on your season project. You’ll notice in the “HYP” phase, I’ve alternated between “outdoor weekends” and “indoor weekends” every other week, but that all depends on what I feel like. If it’s an ARC workout you are replacing, think of it as a mileage day, so you shouldn’t be climbing stuff that you fall on, and you shouldn’t get real pumped. However, be sure you take advantage of the great opportunity to work on technique and movement. I love these days for multi pitch trad climbing as well.
4. I generally try to rest 72 hours between hard workouts (either Hangboard, Campus or PE workouts). That means, if I campus on Monday, I try not to campus again until Thursday. The ARC workout the next day is a way to get more ARC work into the program, while it also helps to flush out your muscles by pumping blood through them. It should be low enough intensity that it still counts as a pseudo-rest day, and I find it helps me recover more quickly. Sometimes I will rest as much as 96 hours between workouts…usually I’ll do this to space things out in order to be able to climb outside on a weekend, or if I feel like I haven’t fully recovered yet from the previous workout.
5. The “Aerobic Exercise” days are your climbing rest days. You shouldn’t do anything remotely like climbing. If you are training correctly, then your “hard” days are so intense, that you won’t have anything to gain by climbing on your rest days. It may feel like you’re not climbing enough. If so, good…you shouldn’t get injured. Don’t think that you can only go running on your specified Aerobic days, I will often do an “aerobic exercise” workout in addition to my climbing workout. Some weeks I may do something aerobic every day of the week, regardless of what my climbing workout is. As for the exercises to do, the best thing is probably swimming. However, if you’re a climber, you probably like being outside, and unfortunately swimming is usually indoors, and therefore very boring. If you can do it, great. Running is a great workout, and you can get worked pretty fast. However, rumor has it, running contributes to what climbers call “sewing machine leg” or “Elvis leg” by increasing muscle tension, so keep that in mind, if it’s a problem for you. Just do something you like. I enjoy this as a day to get away from the often stressful monotony of training. I’ll sometimes play ultimate Frisbee, soccer, football, or basketball (I have a wicked 2” vert)…just make sure you don’t get hurt!
6. Transitions: Notice the transition between phases. I’ll usually overlap some workouts, i.e., do my first campus workout before my last hangboard workout. I got this from my days as a distance runner, when we would always do this. The theory is, it gives your body a “warning” workout before jumping into that phase, full bore. My brother thinks this is a waste of time, and avoids it completely. I’ve tried avoiding it, and as far as I can tell, there is no big difference, but it certainly seems to help psychologically to prepare your mind for the change.
7. Phase length: Don’t treat the phase lengths described here as cast in stone. In my training, the length of each phase changes from season to season…my hangboard phase is never the same length! Remember that the reason we do periodized training is to benefit from our body’s ability to adapt. If you did nothing but hangboard all the time, your body would adapt for awhile, maybe six weeks or so, then it will hit a plateau because the stimulation is no longer new. The trick is to switch exercises at the right time to optimize your overall performance level. Therefore, you need to closely monitor your progress to switch between phases at the right time. For example, if you’ve been hangboarding for four weeks, and you have two “flat” workouts in a row, it’s time to move on to the next phase. Of course, this will take some experience and trial and error to figure out.
8. The “Power-Endurance” (PE) phase is somewhat intertwined with the peak phase. That is because the process of “sending” routes, which your peak phase should consist of, is similar to the PE workouts you should do during your PE phase. Therefore, I sort of think of them as the same thing. Notice, however, that I put more emphasis on indoor workouts (4 x 4’s) earlier in that phase, and more outdoor climbing later in the phase. The workouts where it suggests routes outside is when I am trying to “send”. Either I’m trying hard onsights, or working redpoint projects on these days. The length of this phase always depends. I’ve found I can usually get four weeks of “peak” performance, but it’s really tempting to try to stretch it out, especially if you didn’t send your project. If you do this, beware that you are risking injury. I also believe that your body will go through different types of peaks, so if you’re smart you can take advantage of this. For example, early in your peak phase you should have a lot of power, but not much endurance. Therefore, if you have a boulder problem goal, or a short bouldery route as a goal, that is the time to try it. Later in your peak phase, your power will taper off, while your endurance is increasing, so shift to longer, more endurance dependent routes. This will also reduce the chance of injury. You definitely don’t want to try tweaky routes four weeks into your PE phase.
9. You’ll notice that near the end of the peak phase, I suggest climbing outside all the time. This is what you’ve been working for the whole cycle, so get outside as much as possible to take advantage of your new found strength. If you can, go on a trip, or take days off from work so that you don’t squander any “peak” days.
RCTM.com Articles related to The Making of a ‘Rockprodigy’:
(Coming soon!)
If you have questions or comments about The Making of a ‘Rockprodigy’, please post them on the RCTM Forum. We will try to respond as soon as possible.

This was my first taste of the Rock Prodigy method! I’ve incorporated these concepts for a few years now in some variation or another, with great results. I specifically recall the winter training season of 2010. Previously, my hardest onsight had been 5.10b/c and hardest redpoints were 5.11b. After using the information in this article all winter, the following season I jumped my routes to a 5.11c onsight and several 5.12a redpoints. I am using these principles again, slightly modified (very periodized in winter, more general/gradual during the few warmer months in MN). I look forward to the release of your book.
LikeLike
Pingback: Still here (in socal), still warm | Joshua Tree bouldering
Pingback: GRIMPEUR.org | Planification de l'entrainement en escalade
Pingback: GRIMPEUR.org | Planification de l'entrainement en escalade
Pingback: GRIMPEUR.org | Planification de l'entrainement en escalade
Thanks for the excellent site and research! I see a typo? on #4 about 3/4 way down the page. you describe resting 72 hours between workouts–campus monday, then wednesday, but I think you meant to write “Thursday?” Great work and happy climbing.
LikeLike
Fixed it–Thanks Andrew!
LikeLike
This site is amazing! I am new to climbing and absolutely hooked (hugged) to the rock, really riding on that excitement of discovery. But this figure that up to six years years are needed for the hands to adapt got me worried. Do I need to slow down in order not to experience my first finger injury too soon? Where can I find more information on this issue? Thanks and keep up the great work, the next generations just coming 🙂
LikeLike
Merle,
Glad you are so stoked on climbing! Whether or not you need to slow down really depends on the type of climbing you are doing. It seems that most finger injuries occur in eager beginners who do a lot of intense indoor bouldering. If you are mostly trad climbing, or climbing moderate sport routes outsides, I would think the risks would be quite a bit lower. I would recommend that you spend at least your first year focusing on your technique on climbs that are not at the limit of your finger strength. You can begin systematic training immediately, as long as you take it slow, listen to your body, and back off when things don’t feel right. In my experience, systematic training is the best way for climbers to reduce the risk of finger injuries.
Good luck,
Mark
LikeLike
Hi, amazing article man!
I started training this year using much information found on this article and have been noticing some good improvement. I was wondering if you could describe an at-home warm-up adequate before hangboarding without having a climbing wall
LikeLike
Pato,
There are some good ideas in this thread on our forum: http://rockprodigytraining.proboards.com/thread/275/
NB: the answers to most training questions can be found on the Rock Prodigy Forum!
Mark
LikeLike
Pingback: Forget Climbing Goals. Focus on Progress. – Hangdawg Climbing
Hey guys didn’t know where else to turn.
My gym is fortunate to have a motorized treadwall “the rock”
I know you have one as well. One of the bolts is stripped and a hold is stuck on the wall… anyone know how to get it off and repair the bolt?
LikeLike
Use Vice Grips on the nut on the back side of the wall. Hopefully you can reach it.
LikeLike