The advent of inexpensive, compact digital imaging technology has been a boon to outdoor sports. Now, nearly everyone can get Galen Rowell-worthy images of their adventures in the wildest of places; and products like the Go Pro allow for first-person videos that required a professional camera crew in the past.
I’m surprised and a little confused that more sport climbers don’t take advantage of this technology to boost their climbing performance. Modern digital point and shoot cameras can easily record high definition video that can help you remember those complex sequences. Though I’ve climbed all over the country, I’ve only ever seen Mark and I recording our attempts at the crag in this way. I suppose the reason is that I’m so awful at remembering beta that I need all the help I can get 🙂
One of my most-important pieces of climbing equipment – My Canon S100 digital point and shoot. It has a relatively wide-angle lens with a 5x optical zoom which is great for climbing photography because you’re often taking closeup shots near the belay, or zooming out for far away shots. For sport climbing, the wide angle lets you get the whole route in view, even if you can’t get far back from the cliff.
Video is a great tool for remembering beta, but it can also be extremely useful for refining your beta. A recent project of mine hammered home this point to me, and it reminded me of a blog post I’ve been meaning to write….
The route is Primeval (5.14a) in Clear Creek Canyon, CO. It climbs an overhanging blunt arête on a flawless shield of stone, known as the “Primo Wall”. The route is both powerful and technical, requiring you to pull on tiny sharp crimps, while executing precise footwork to control your body positions. The holds are never “good”, or facing in the right directions, so clinging to the rock requires you to use hold combinations in opposition along with correct body tension to maintain those connections. It can be tricky to figure out the right combinations of hand and foot placements, and perhaps, more importantly, where to hold your hips and center of gravity to optimize your balance.
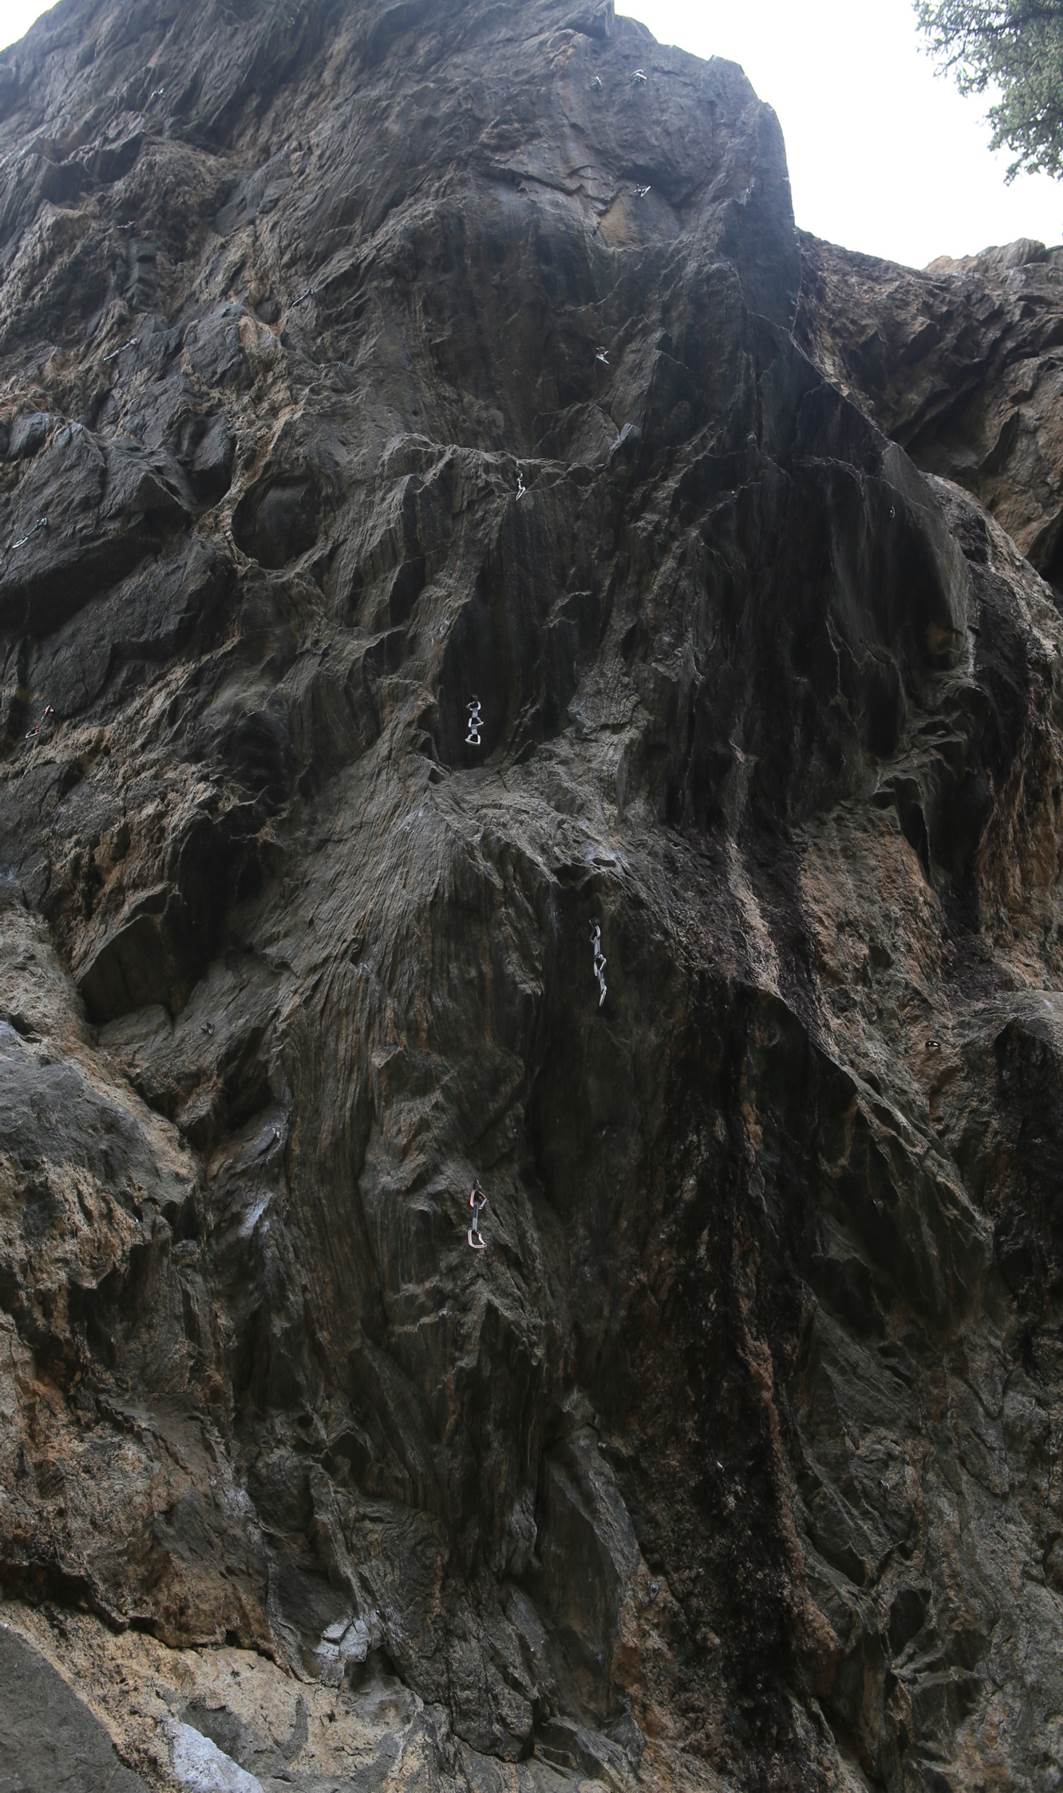
Primeval, 5.14a, Clear Creek Canyon, CO.
One day last spring, Mark recommended the route to me, and gave me a rundown on the general beta. I was psyched on the route, and vowed to return in the fall for a redpoint campaign when the weather was more “crisp”. I knew the general flow of the route, but I still needed to work out the finer points of the beta, such as which particular foot chips to use, and where those subtle hip shifts lie.
This process of refining beta involves trying the hardest moves while varying little details, like slight adjustments in foot positions, hip positions, and/or how fingers are placed on the holds. Video is very helpful in this phase because you are making many attempts that are very similar, and it can be hard to keep track of all the minor variations you employed. Also, these are typically the hardest moves on the route, so they can be very energy-sapping and skin-intensive, so you’re limited in how many attempts you can make. Video allows you to get the most bang for your buck because you can analyze the body positions and movements between attempts, and select the most promising sequences based on indications you might not notice while you’re climbing at 100%.
To get the best video for movement analysis, it is helpful to use a tripod to hold the camera still, and to ensure you are shooting from a fixed vantage point. It is easier to compare beta sequences with each other if the images are shot from the same vantage point and zoom level because the rock will not be moving in the frame, only the climber.
I use a lightweight Manfrotto Tripod that I found at Best Buy a few years ago. It is designed for both photo and video, which means it has a nice head that allows for horizontal or vertical shooting, and is easy to pan and tilt — more so than a tripod designed just for photography would be. It also has an easy and quick release mechanism for the head so that it can be quickly repositioned.

I use this light-weight photo/video tripod from Manfrotto for recording my climbing.
To record a burn, you can just have your belayer press record before you start, and let the camera run. You can always edit out the boring bits later. Check the specs on your digital camera; most will record a single clip for 20 minutes, maybe longer, depending on the resolution you have it set to. Battery life can be an issue to, so always charge up your battery before each climbing day, and it helps to have a spare. If you’re climbing in a larger group, you can have a third person operate the camera, which will save some editing time later. I have my son, Lucas, do it for me and I pay him in ice cream, “(smart) phone time”, or cold hard cash.
So, back to Primeval. I worked the route over a couple burns two weeks ago, and by my second day, I felt I was ready to redpoint. On my second burn of that second day, I made it through the crux dyno move to a heinous sloper, I shook out, clipped, and continued up towards a final redpoint crux that guarded the easier moves to the chains. I had done this move several times while working the route, and knew it was hard, but not terribly hard. This time, however, I was pumped. I setup my hands and feet for a long right hand dyno to a pinch hold on the upper arête. I made the lunge, but I was a little short reaching the hold, and couldn’t control the resulting swing…I fell.
The following two images are screen captures from my video that show this sequence of setting up for the dyno, and at the apex.
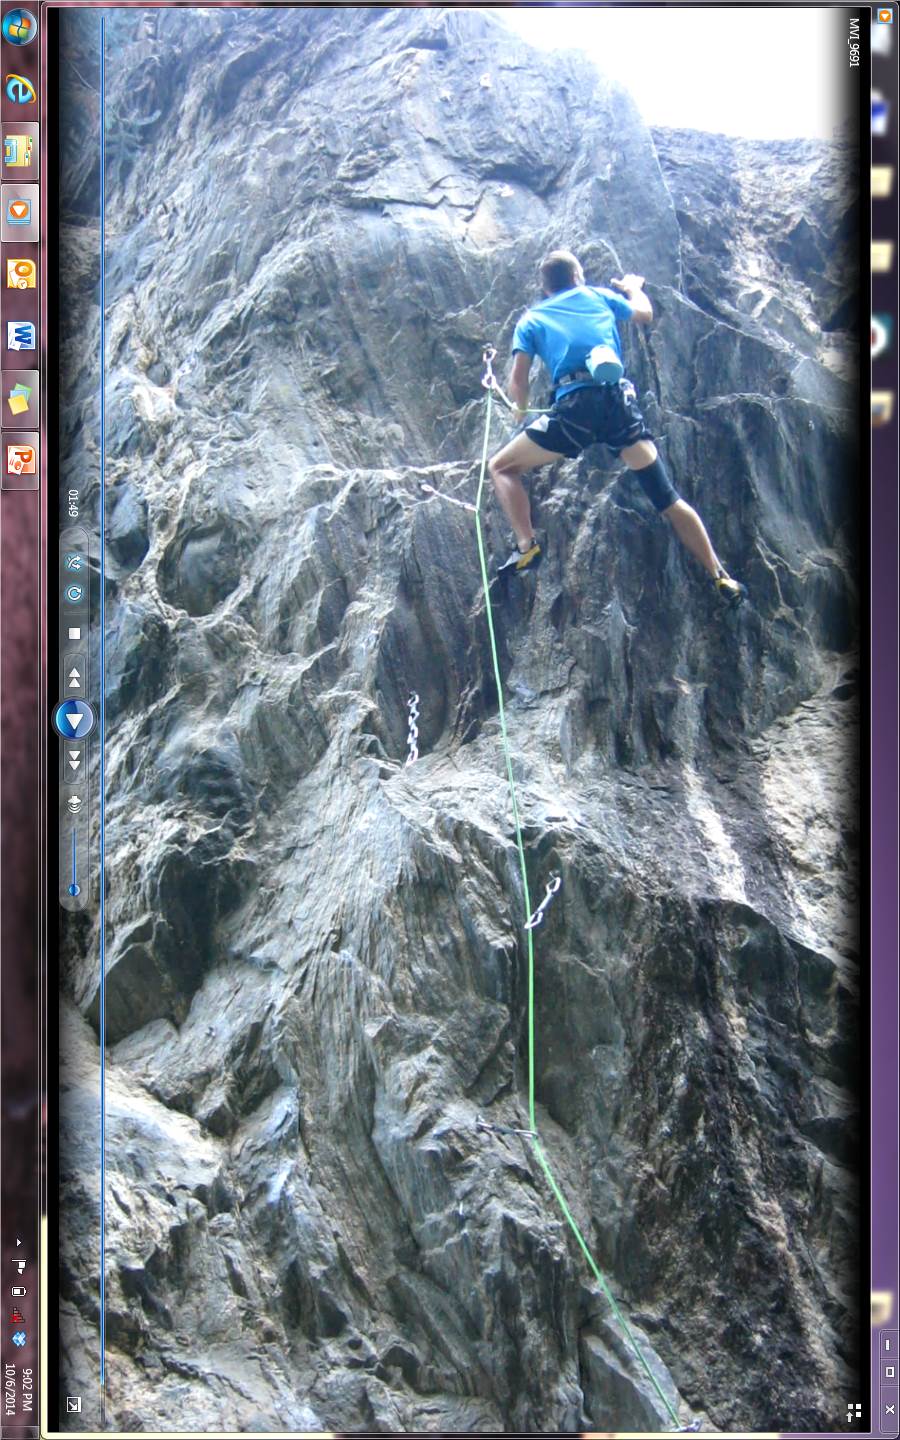
Video capture from a redpoint attempt. Here I’m setting up for a dyno that is a redpoint crux of the route.
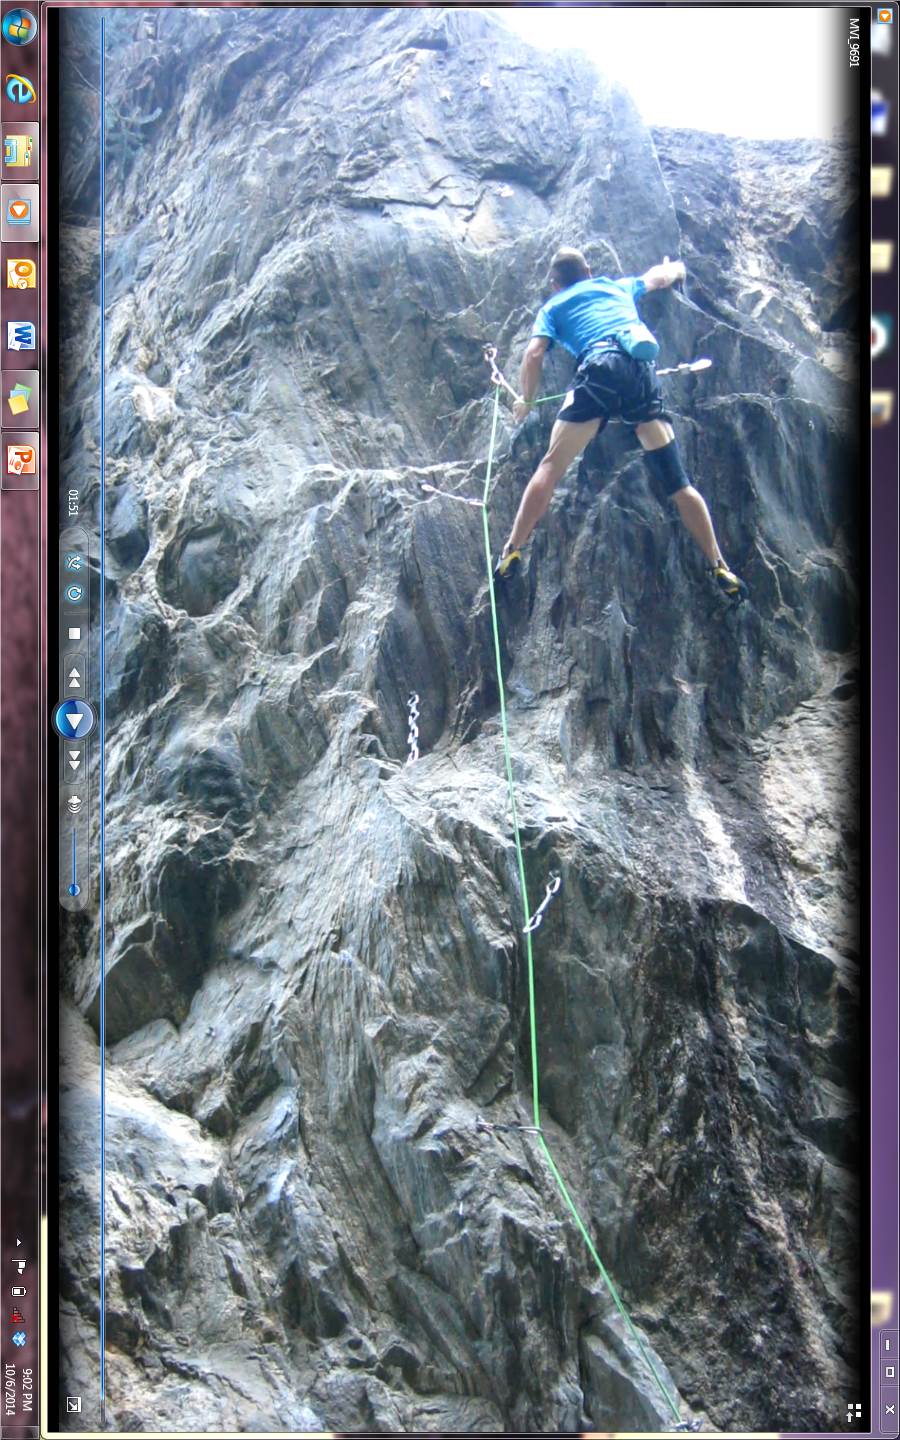
Moments later, going for the dyno, I came up a little short, and couldn’t control the swing.
After I fell, I tried that move again, and along with analyzing my previous video, I determined that I may have had my left foot too high when attempting that move. In fact, you may have experienced situations where you are unknowingly doing moves differently “on redpoint” than you do when you are trying the move “off the hang”. This is a common error that climbers (including me) often make. There are several reasons this might happen:
– We don’t realize that a certain detail is important, so we don’t focus on executing it correctly.
– A move “feels” differently when we are on redpoint (probably because we are more fatigued, have less power, etc), so we discard beta which we decide in the moment is unlikely to succeed.
– We forget the sequence.
Regardless of the reason, video can be very helpful in preventing this “off-the hang vs redpoint” error. Video captures the details of the proper movement (whether we notice those details or not) so that, even if you don’t recognize it while working the moves, you still have the opportunity to discover a subtle movement key later.
In the case of Primeval, I had a hypothesis that my foot was in the wrong position, and after reviewing video of my earlier working burns, I verified that I should have been using a lower foothold.
The next images show a side-by-side sequence of attempts on this move. The images on the left are from my failed redpoint burn, and the right shows the move executed correctly:
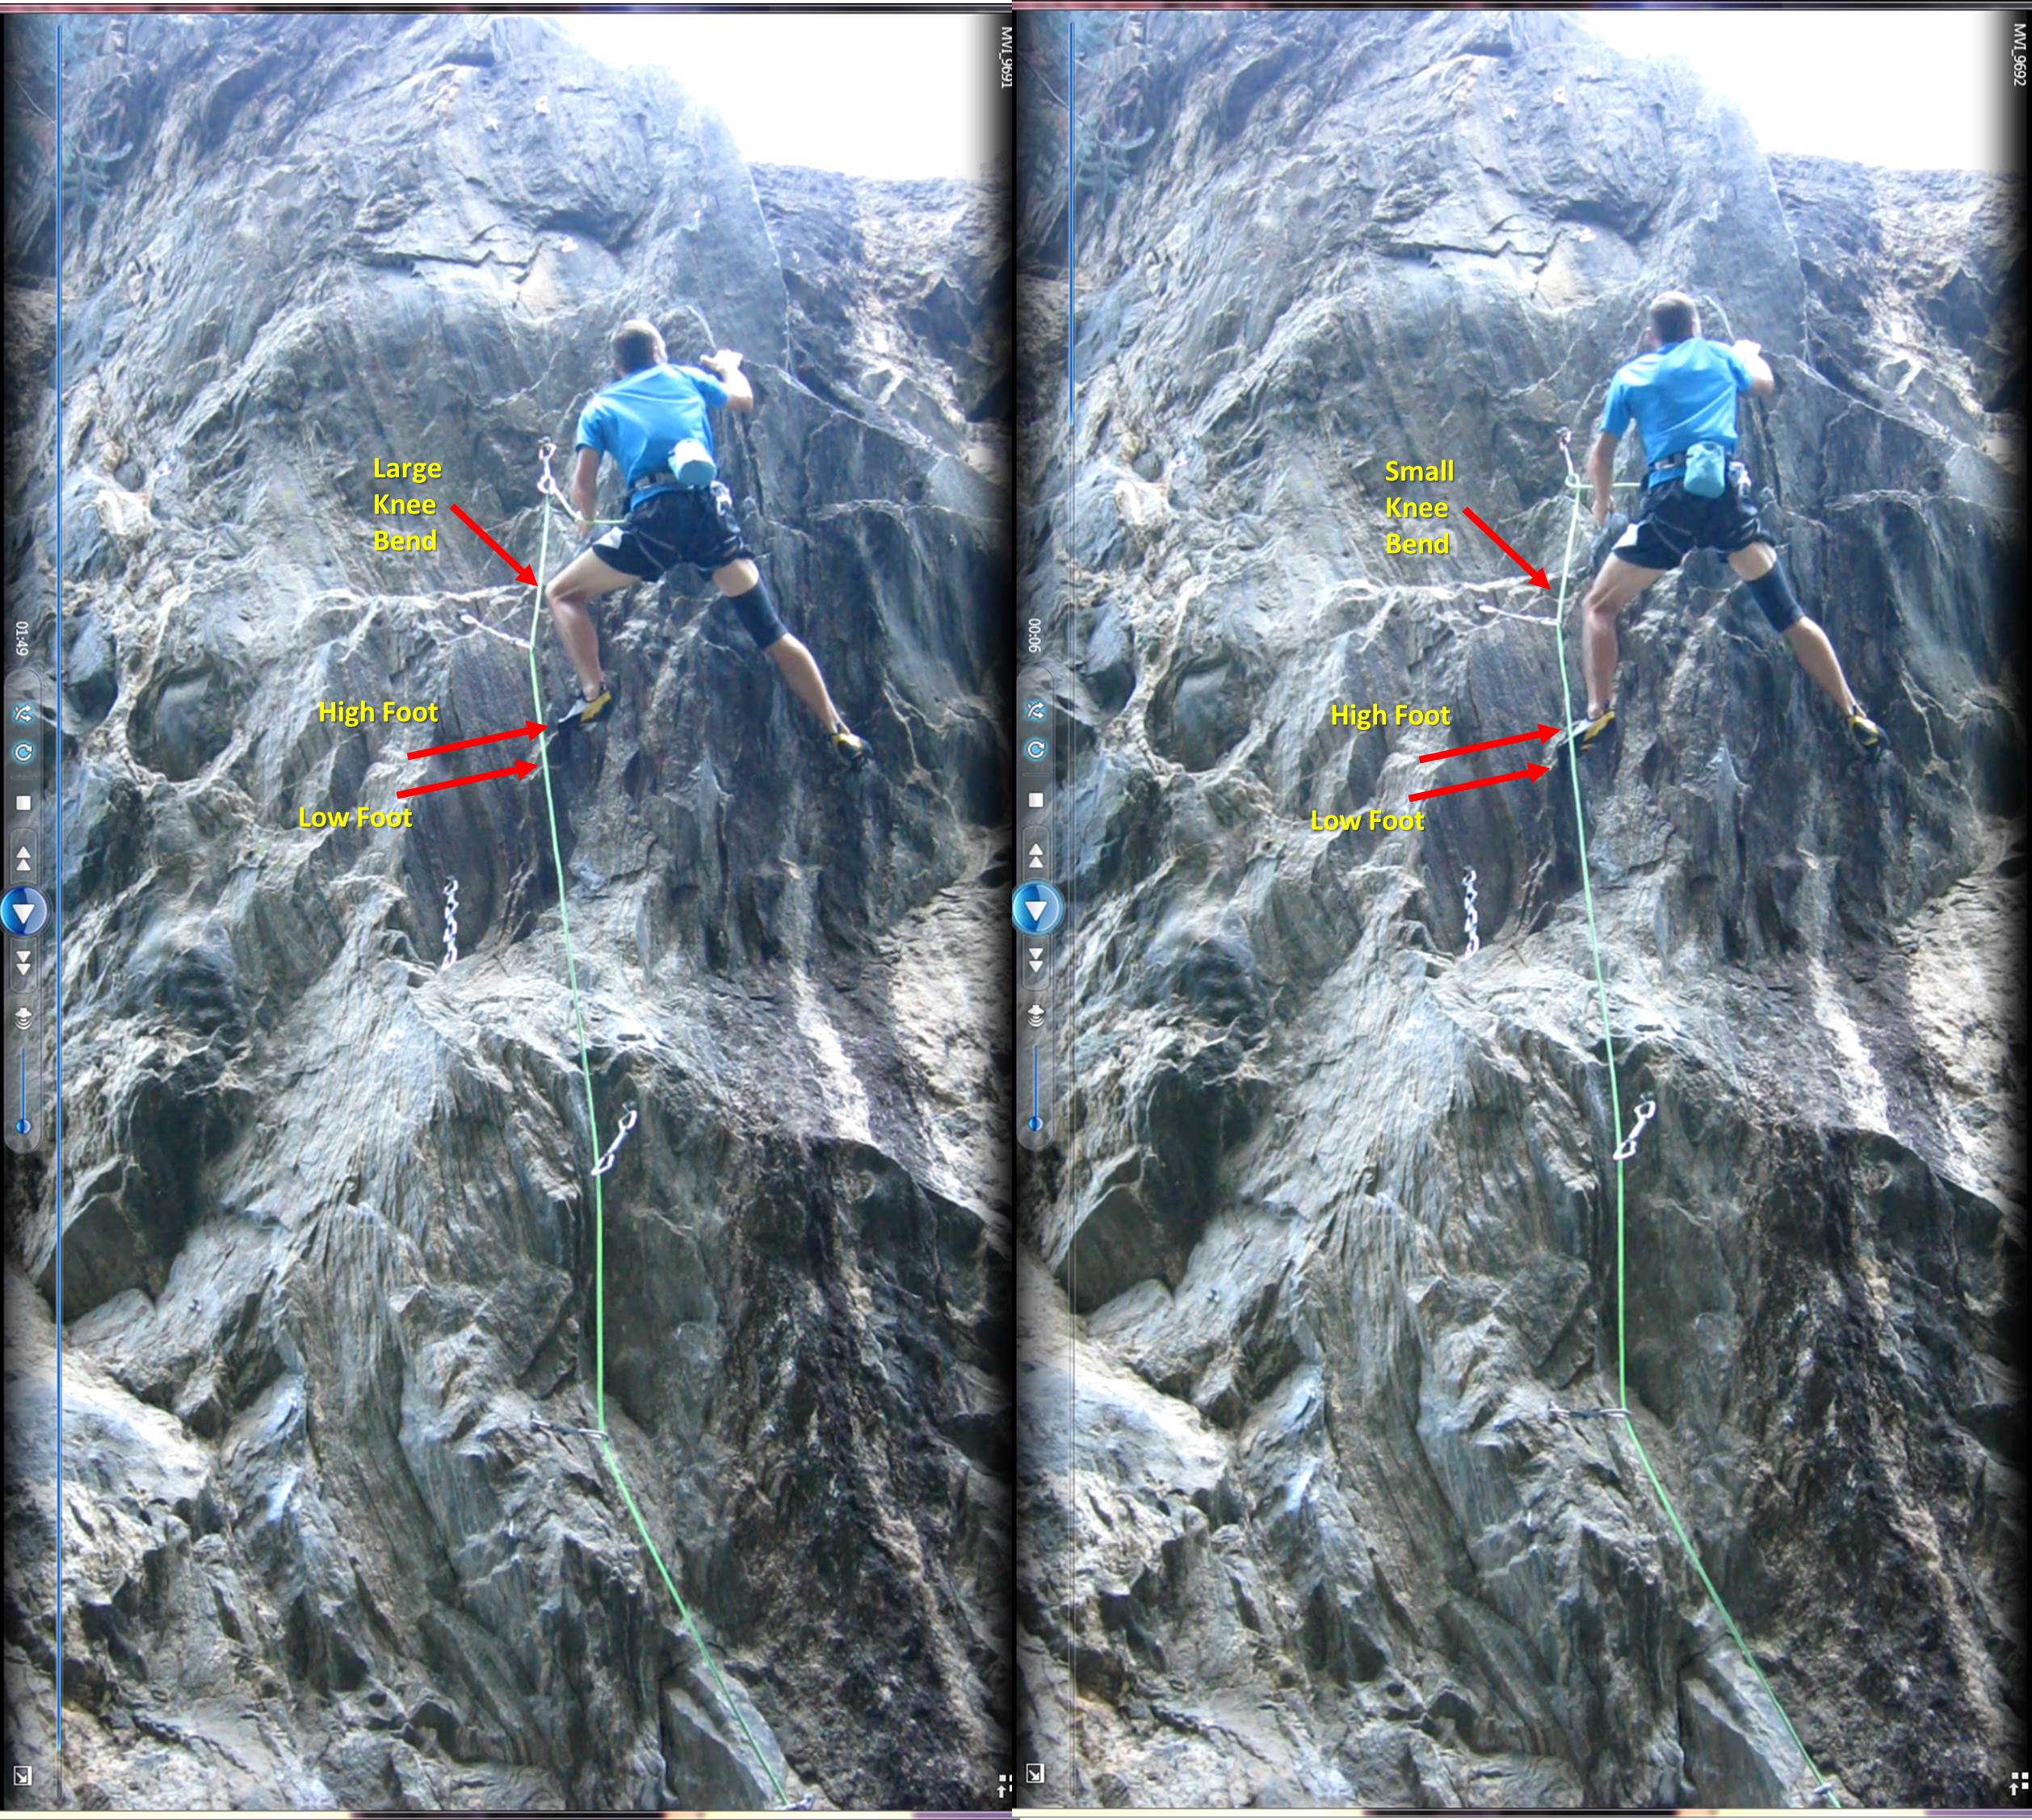
Setting up for the dyno. The left is from my failed redpoint attempt, the right image shows the the move correctly executed. Notice the different foot position, and how it affects the rest of my body.
In the right image, I’m using a slightly lower foothold. It’s only a few inches lower, and it’s a smaller “worse” hold, but the body position is much more important than the size of the hold (especially when wearing these sweet new Tenaya Tarifas). As a result of the lower foothold, I’m less scrunched up as I set up for the dyno, and my hips are much closer to the wall. It’s counter-intuitive, but this lower foothold actually gives me a longer reach because it keeps my hips closer to the wall, and makes the dyno more likely. This is clear in the video, but really hard to figure out by just trying on the rope.
The next images show how the setup positions for the dyno affect the outcome:
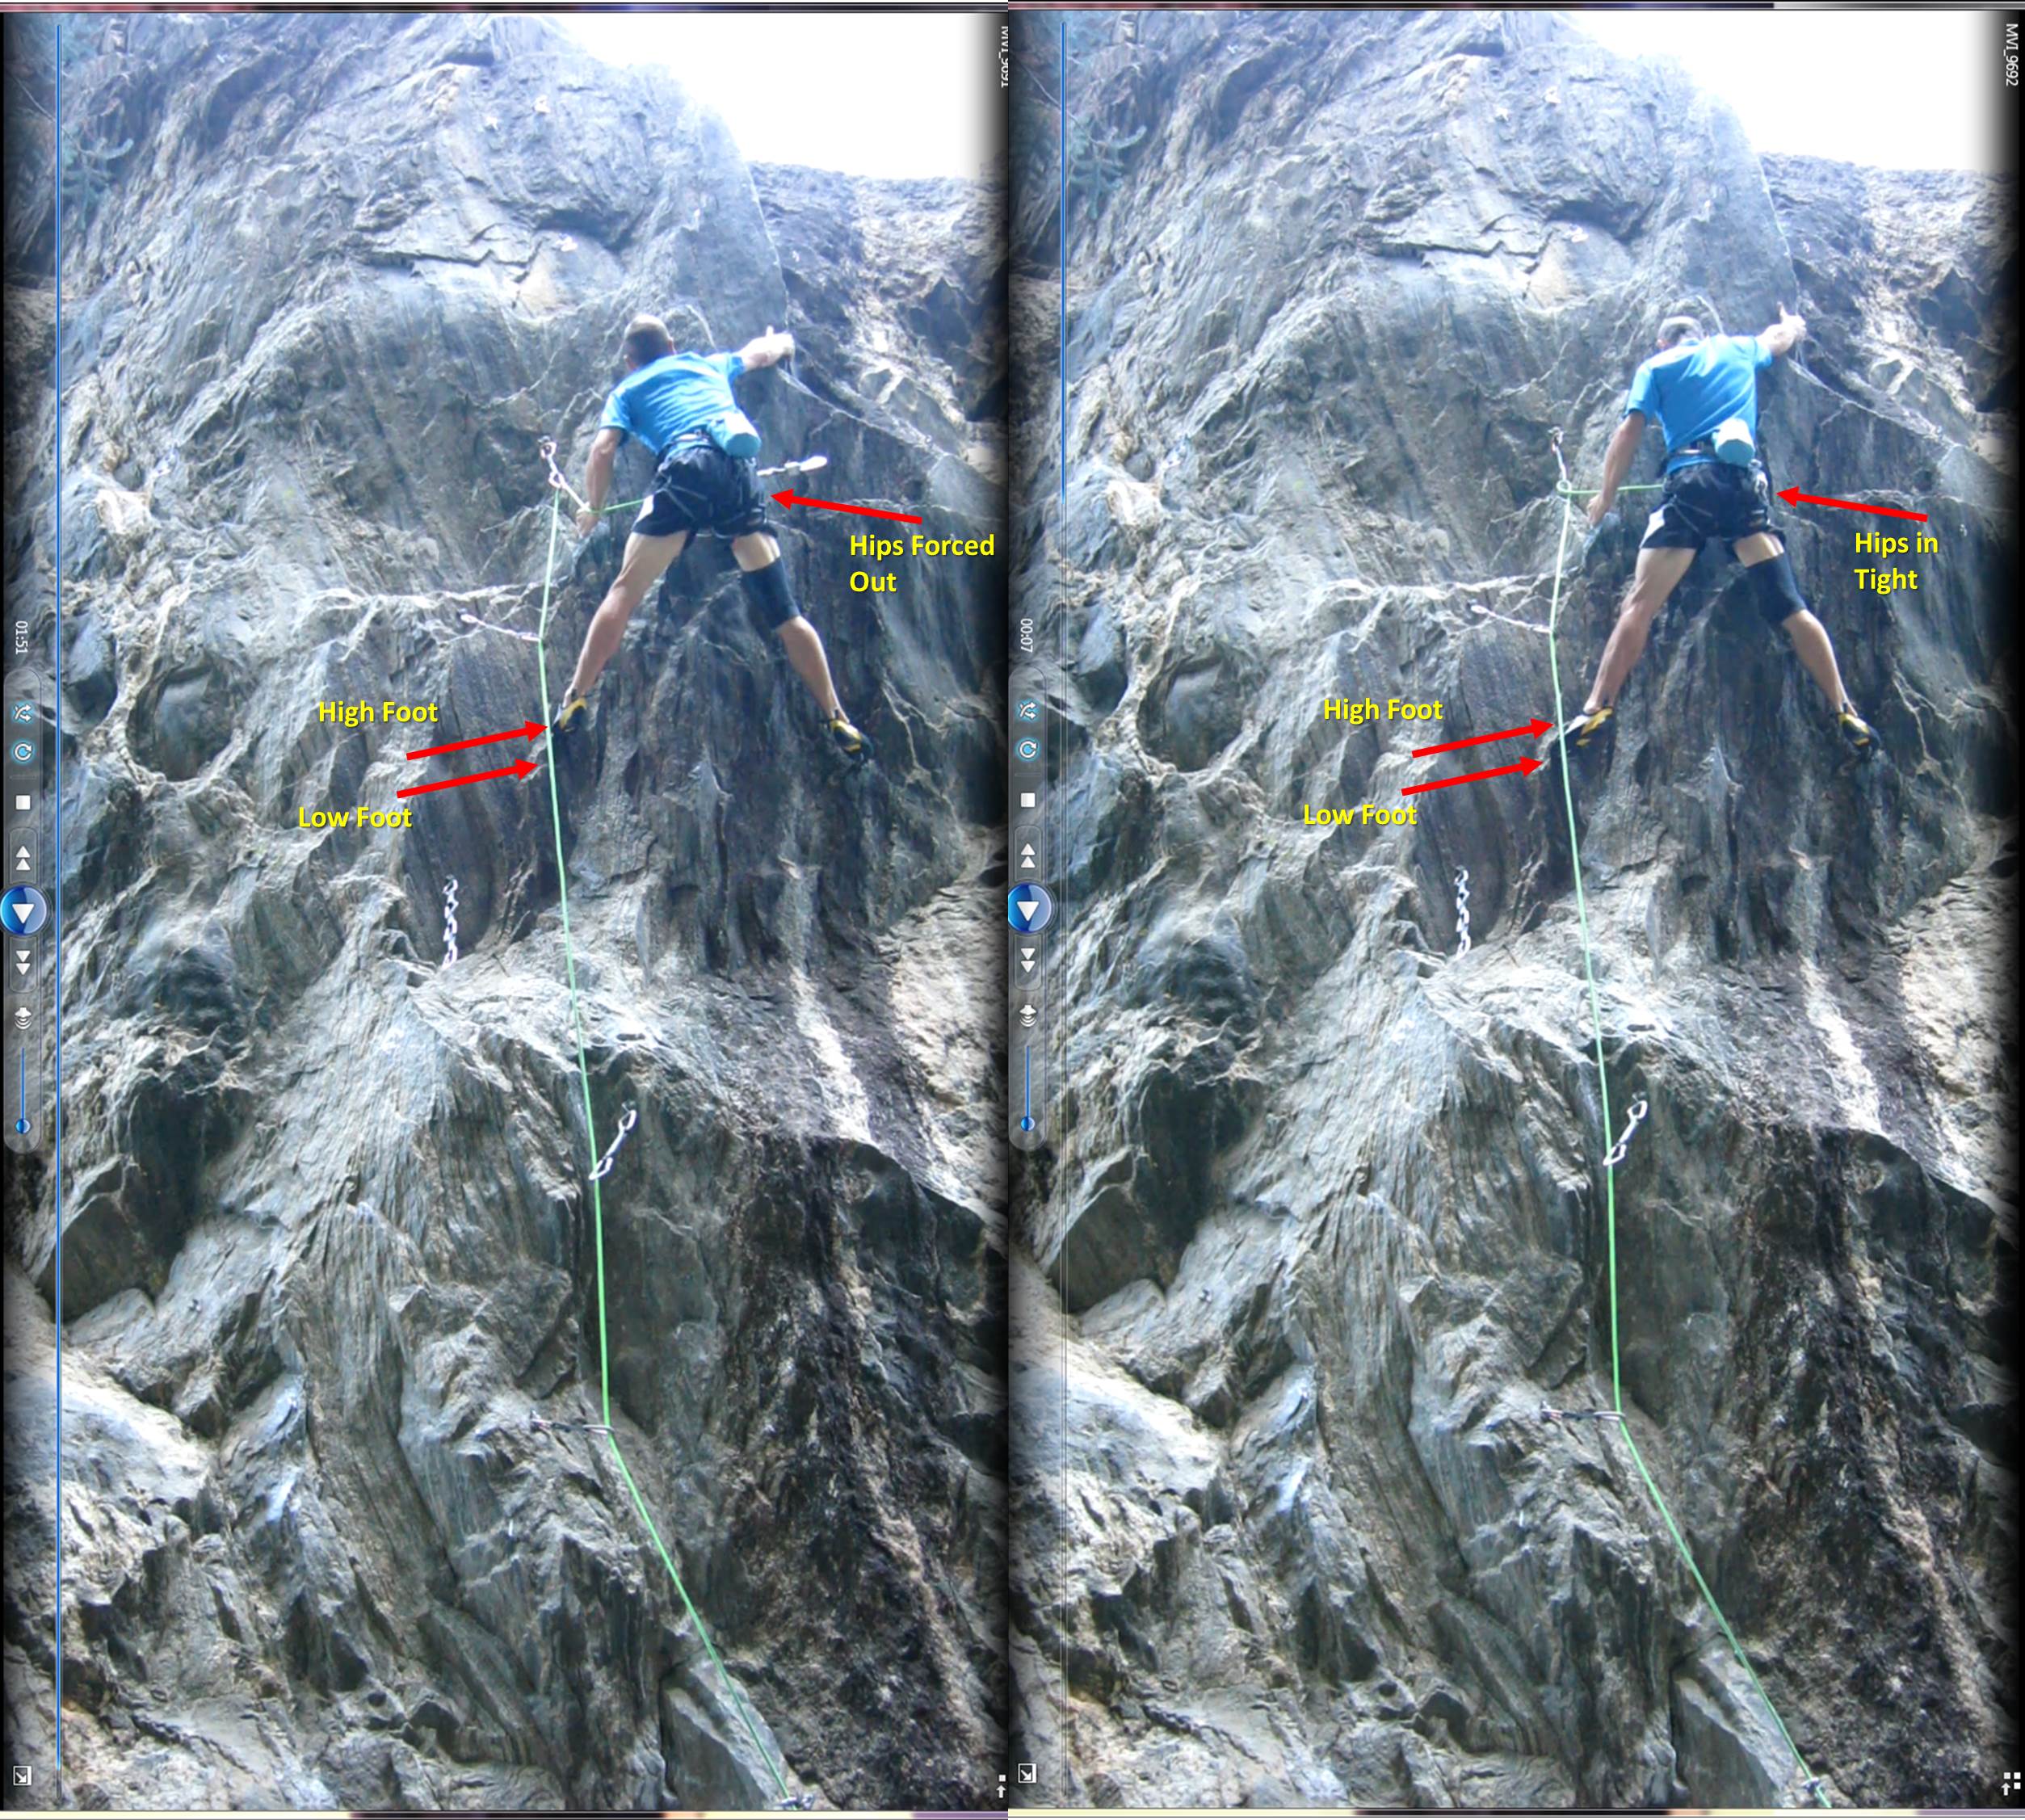
Side-by-side video screen captures of the apex of the dyno. The left image is from my failed redpoint attempt with the incorrect (higher) foothold. On the right, the lower foothold is used, and I have a longer reach because my hips are able to be closer to the wall.
By using the lower foothold, it is clear that I’m able to keep my hips closer to the wall, and thus extend my reach and better control the subsequent swing. Once I recognized this error and rehearsed it a couple times, I sent the route on my next go.
This is a clear example of the value of video analysis, but more generally, I’ve found it to be tremendously helpful in my climbing. When it comes down to it, video saves me time. It enables me to learn beta more quickly during a redpoint campaign so that I can make the most of my limited burns in a season. At my age, and with all the demands on my time, I only have so many good burns in a season when I’m fit, the weather is good, I have free time, and a belayer, so I want every burn to count. I don’t want to spend any of them taking “mental reps” that I could accomplish by viewing video. So hit the “film room” and save your body for game day.

I’ve been using video lately in this same way and it is extremely helpful!
LikeLike
That is a truly beautiful looking line, despite the weird beta you mention.
LikeLike
If you want to bring your video analysis game to the next level check out – http://www.ubersense.com/. It allows for side-by-side and overlaid analysis of different tries. Works best on a tablet.
LikeLike
Pingback: Don’t Call it a Comeback! | The Rock Climber's Training Manual