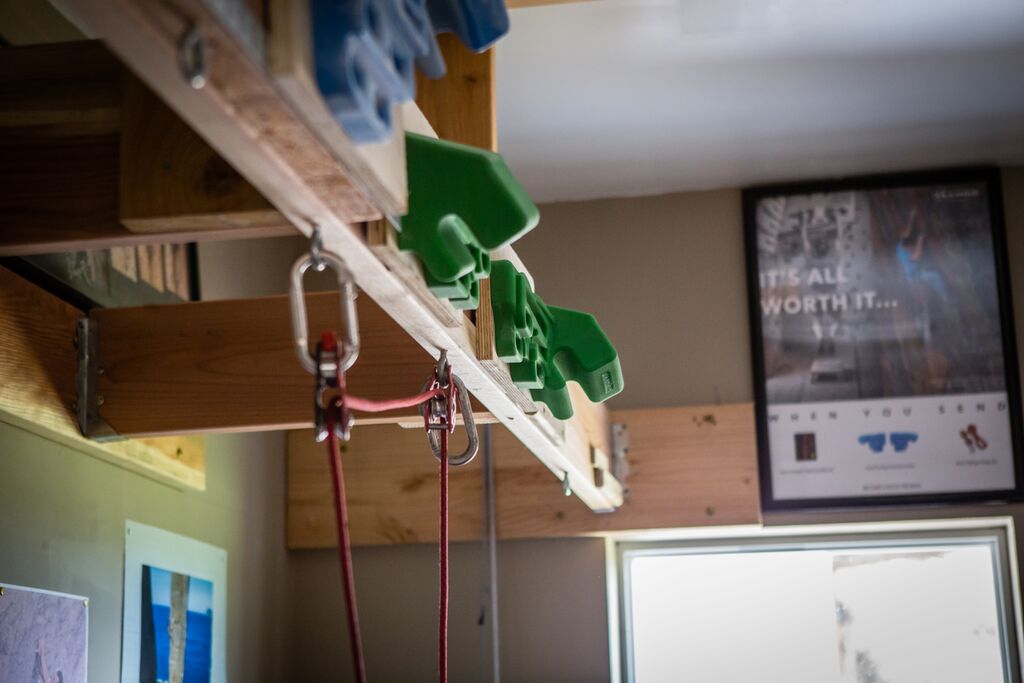
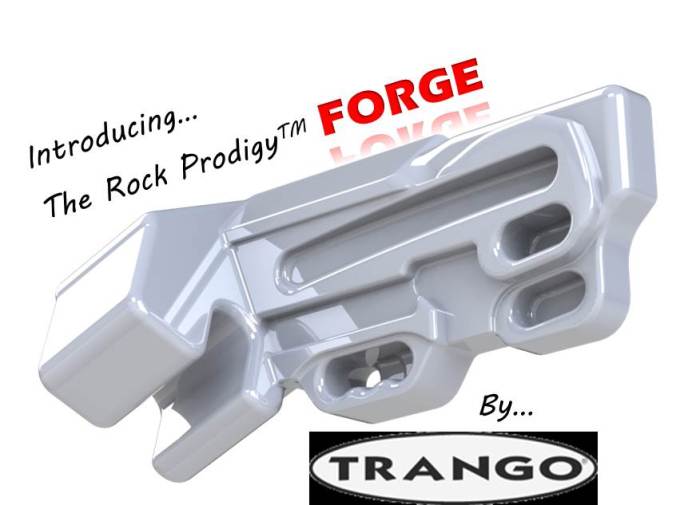
The all-new Rock Prodigy FORGE, by Trango. The world’s most advanced finger strength training device.
The new Rock Prodigy Forge hangboard will be available from Trango beginning this week, and I’d like to share with our loyal readers just how it came to be. I’m confident The Forge is the most technologically advanced finger strength training device ever created. While it may not appear to be a complex product, it was developed iteratively using the latest engineering technology, and based on the latest finger strength training research.
Solid model rendering of the Forge.
In 2013, we launched the Rock Prodigy Training Center, and we’ve collected user data on its effectiveness, and compiled customer suggestions for improvement. The Forge is the result of all of that experience and a published, peer reviewed research paper on the Rock Prodigy Training Method and Training Center, and what we have developed is incredible. Of those who have had a chance to product test it…four-out-of-four psycho-hangboard-fiends love it!
Perhaps the biggest innovation is in how the Forge was designed. Like with the RPTC, we wanted to apply the latest Computer Aided Design (CAD) and Computer Aided Manufacturing (CAM) tools and techniques to what has traditionally been considered the “art” of hold-shaping, and the Forge is the result of that which yields perfect symmetry in the design and some pretty cool other features. With this computer-aided process, we would only need to design one half of the board, then the other half would be replicated automatically. Besides the obvious manufacturing advantages, the computer-aided processes would allow us to quickly create prototypes to test different grip shapes so that we could iterate on the shape of each grip individually. This iterative process was an enormous improvement, and enabled us to really perfect each grip. For example, we created over 8 different designs and prototypes for the Closed Crimp grip alone!
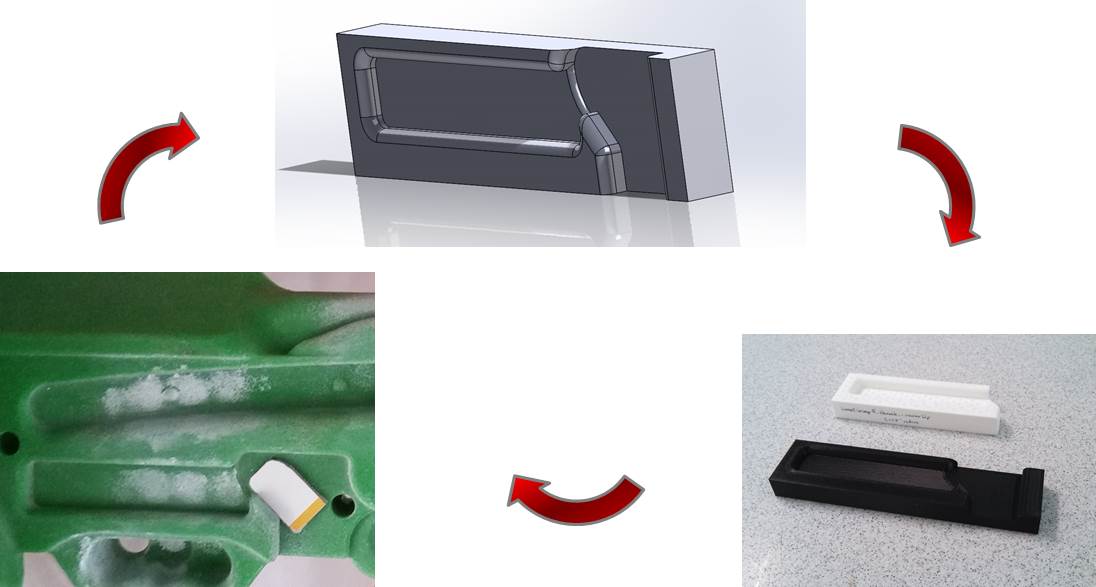
Our computer-aided iterative design process that allowed for rapid design evolution to make sure we got it right!
The Forge is intended to be a compliment to the Rock Prodigy Training Center, not a replacement. It is more compact and in most cases it offers more advanced (i.e. “difficult”) grips for those climbers who have experience with hangboard training and would like to progress to more difficult holds, while other holds are simply improved to benefit climbers of all abilities. Many of the holds are replicated from the RPTC, but have less depth in their geometry, making them more difficult. There are also some new holds, and other features to increase the training intensity. These are all described below in more detail.
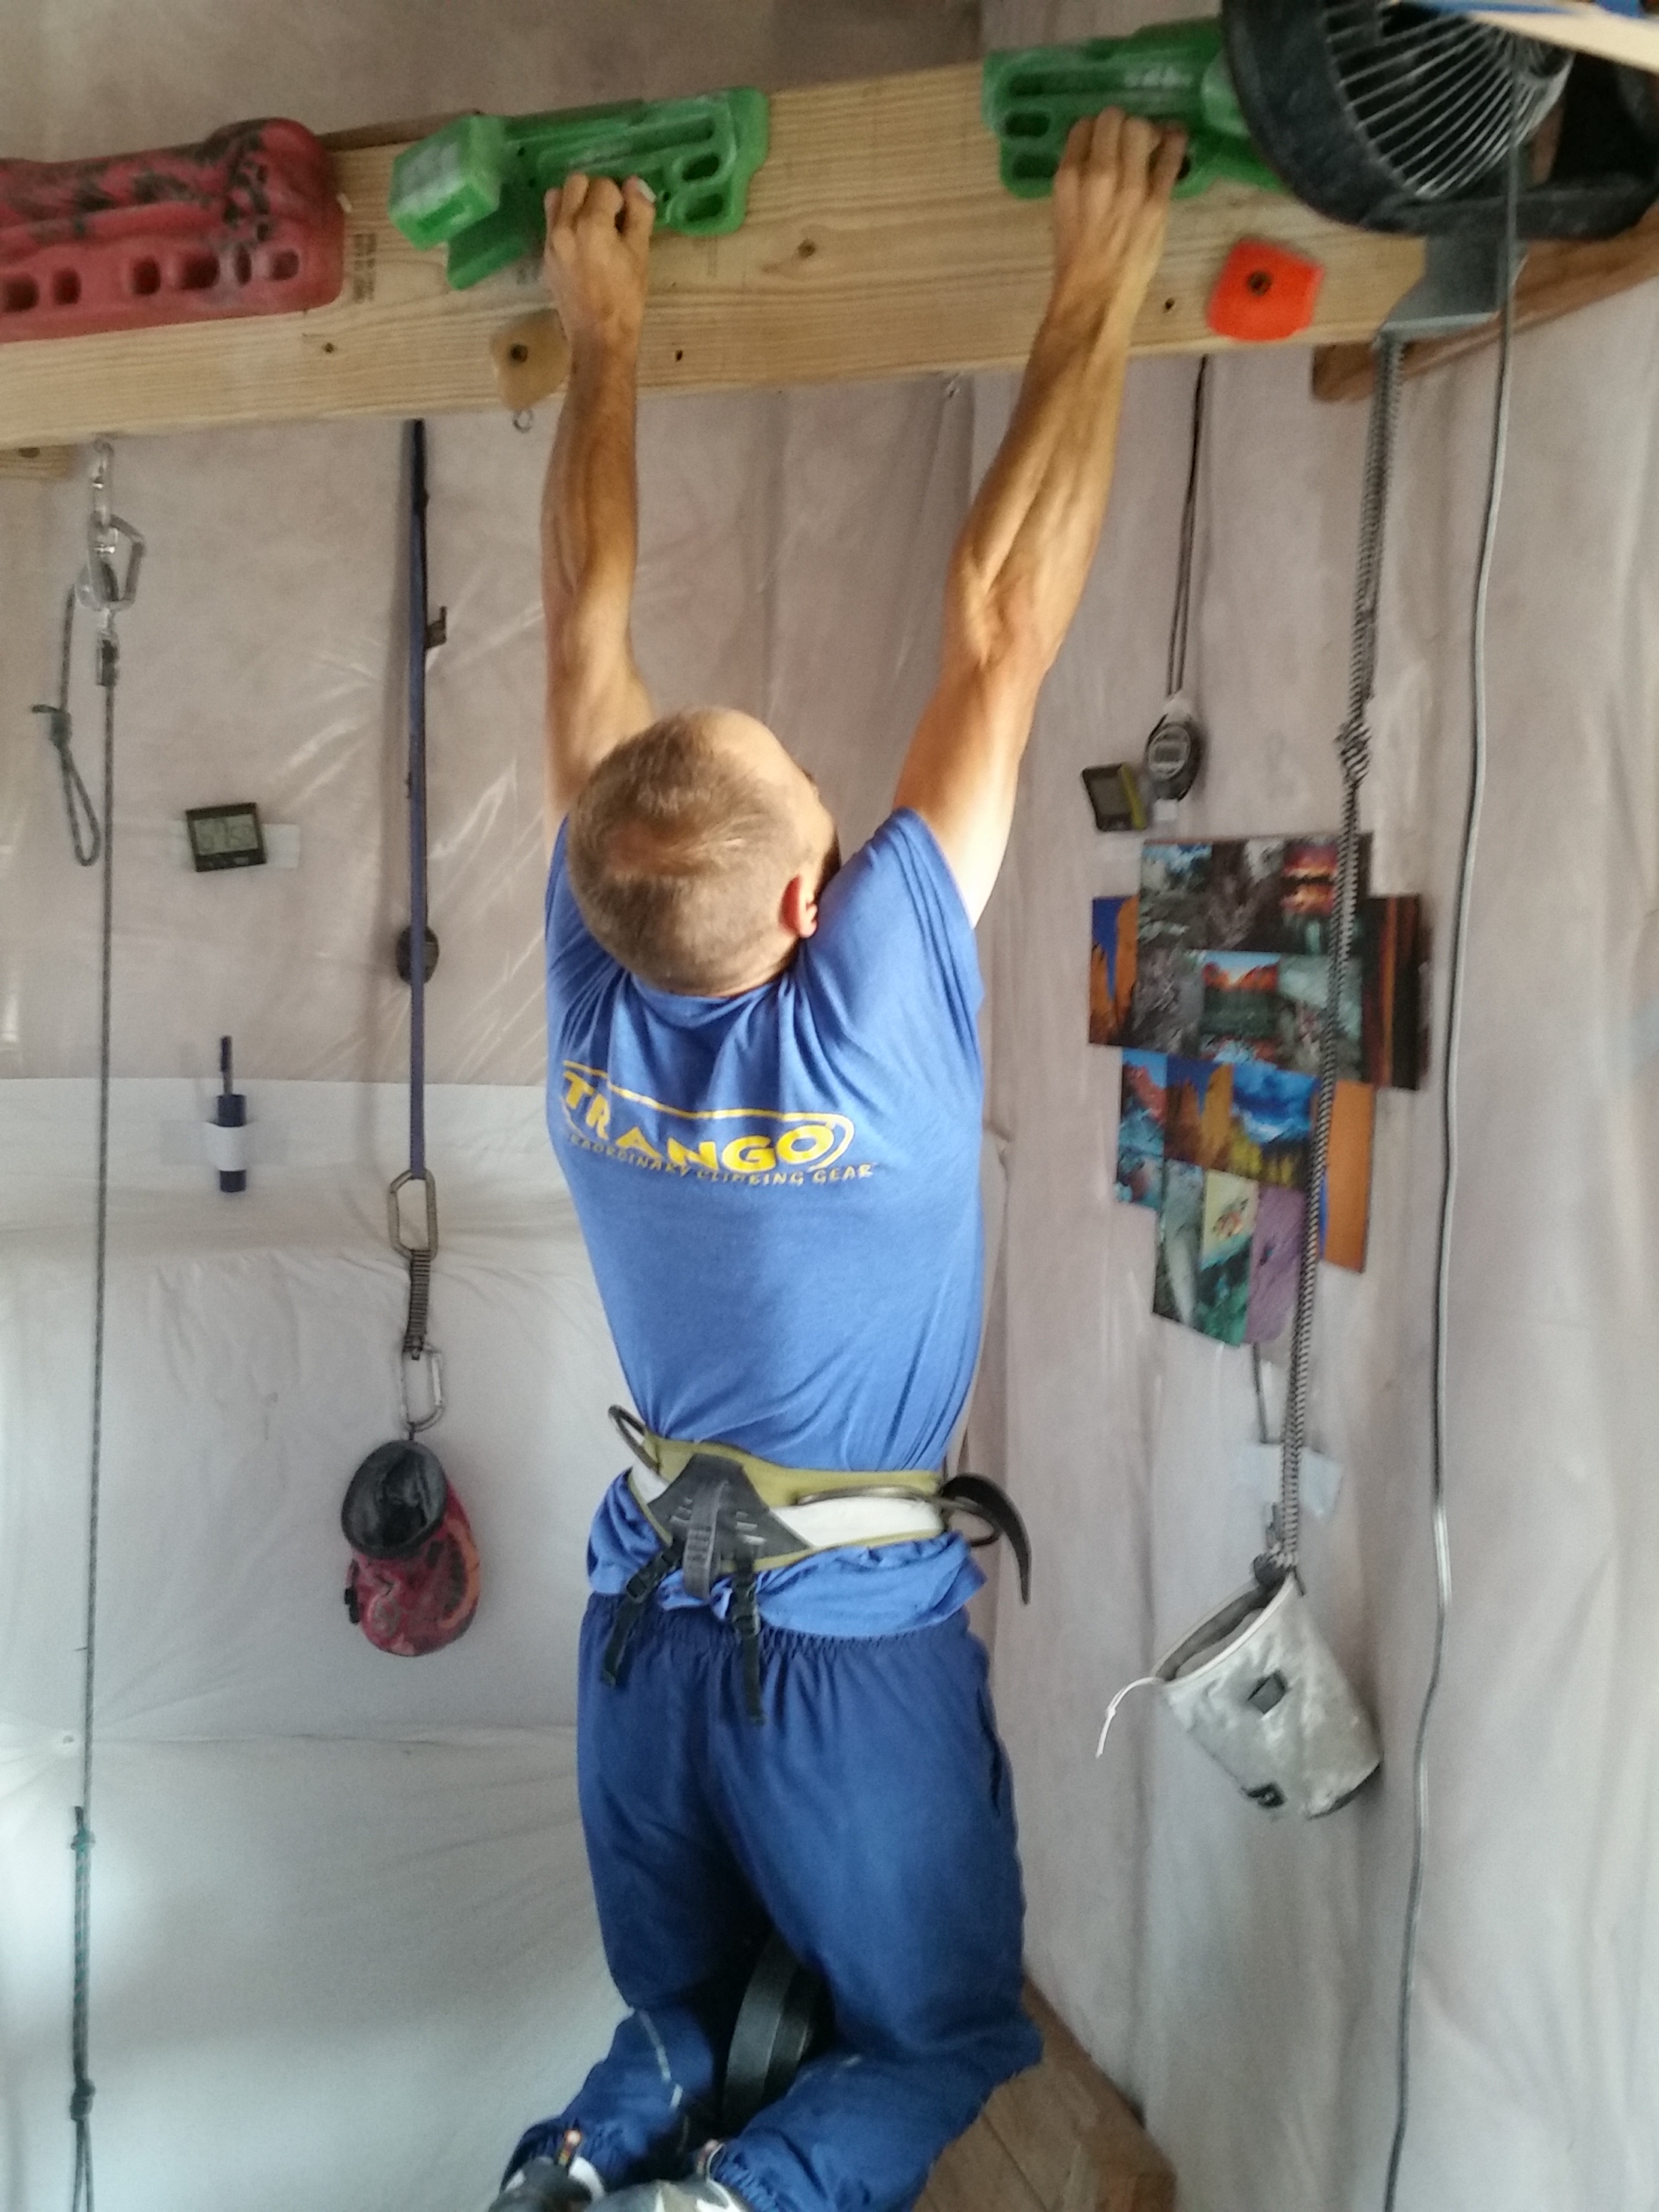
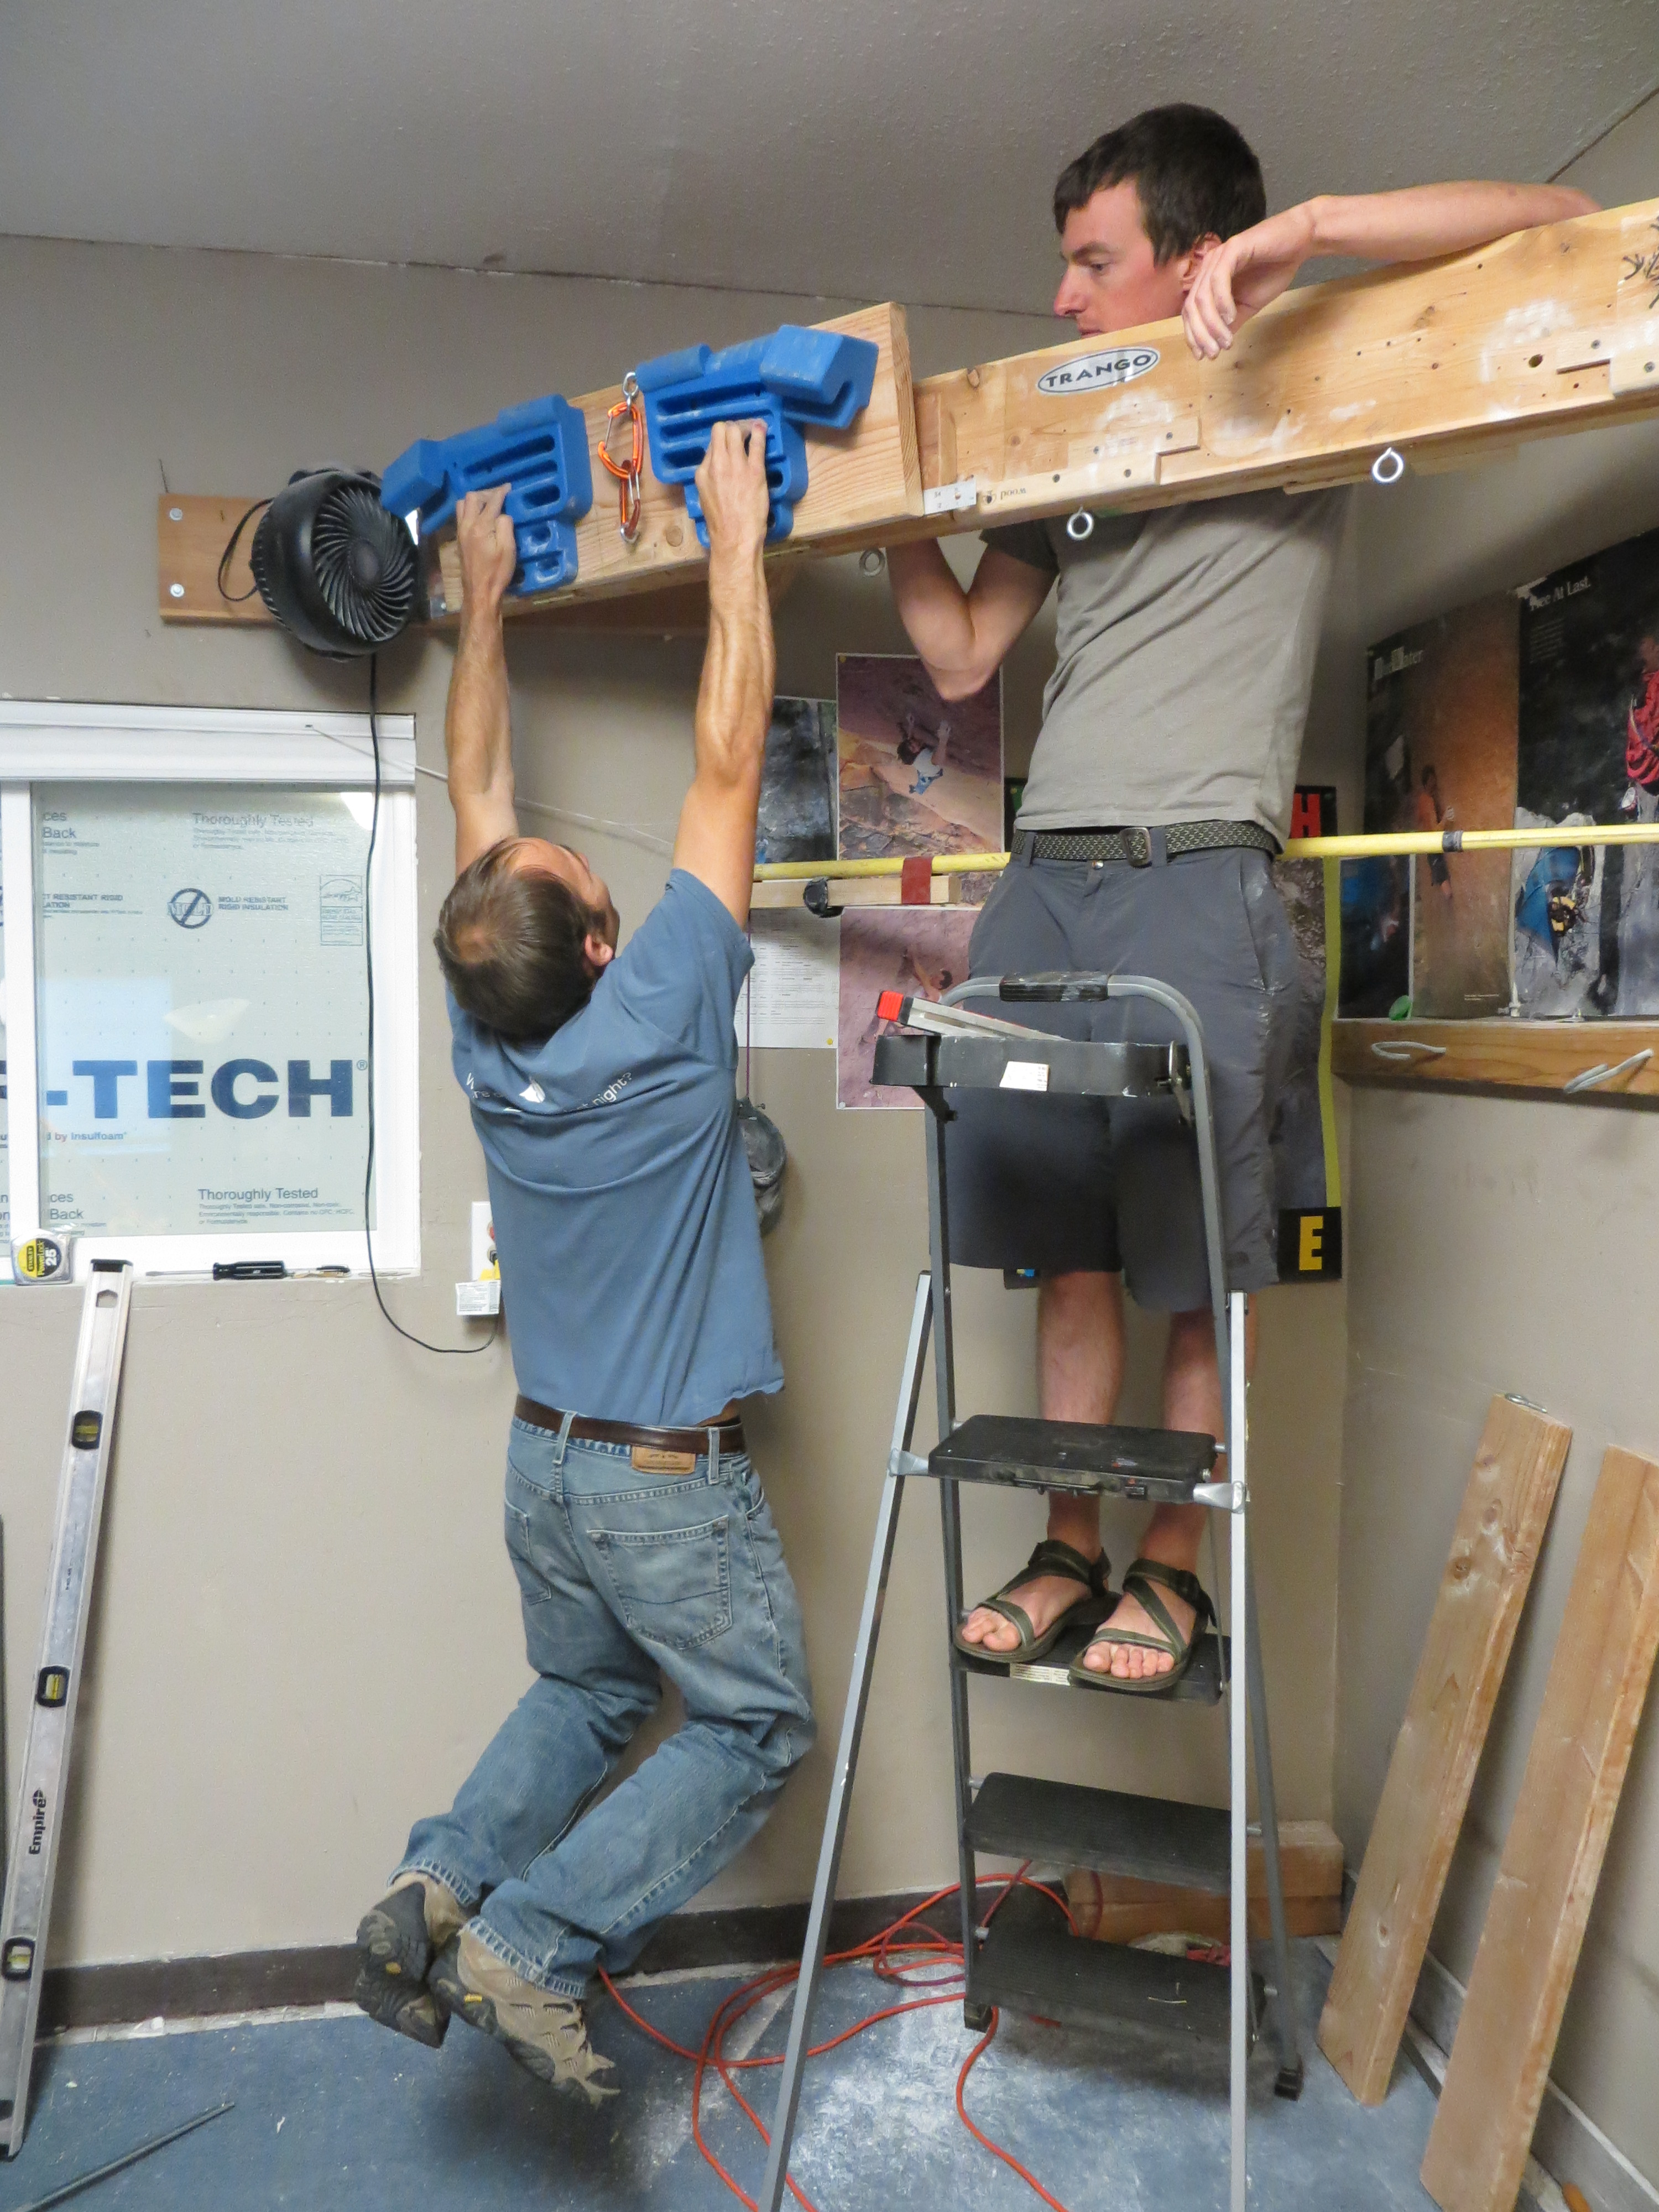
Psycho-Hangboard-Tester, Mike Anderson taking the new Trango Forge through its paces.
First, let me introduce some of the key new features of the Forge:
1. New Holds:
The Forge incorporates several new holds, which I’ll detail here.
The re-deigned Micro Crimp, with a thumb support to prevent DIP joint injury.
– Advanced Micro Crimp with DIP guard technology:
This is similar to the Micro Crimp on the RPTC, but Mark ingeniously came up with a “thumb support” to prevent climbers from wrapping their thumb over their index finger during training. This practice is perfectly acceptable on hard moves, and makes a stronger grip, but doing so repeatedly in training is risky because it places a lot of stress on the Distal Interphalangeal (DIP) joint of the index finger. It also can create skin problems in the cuticle of the index finger. This guard allows you to train the grip in the proper position, without excessively loading up your DIP joint.
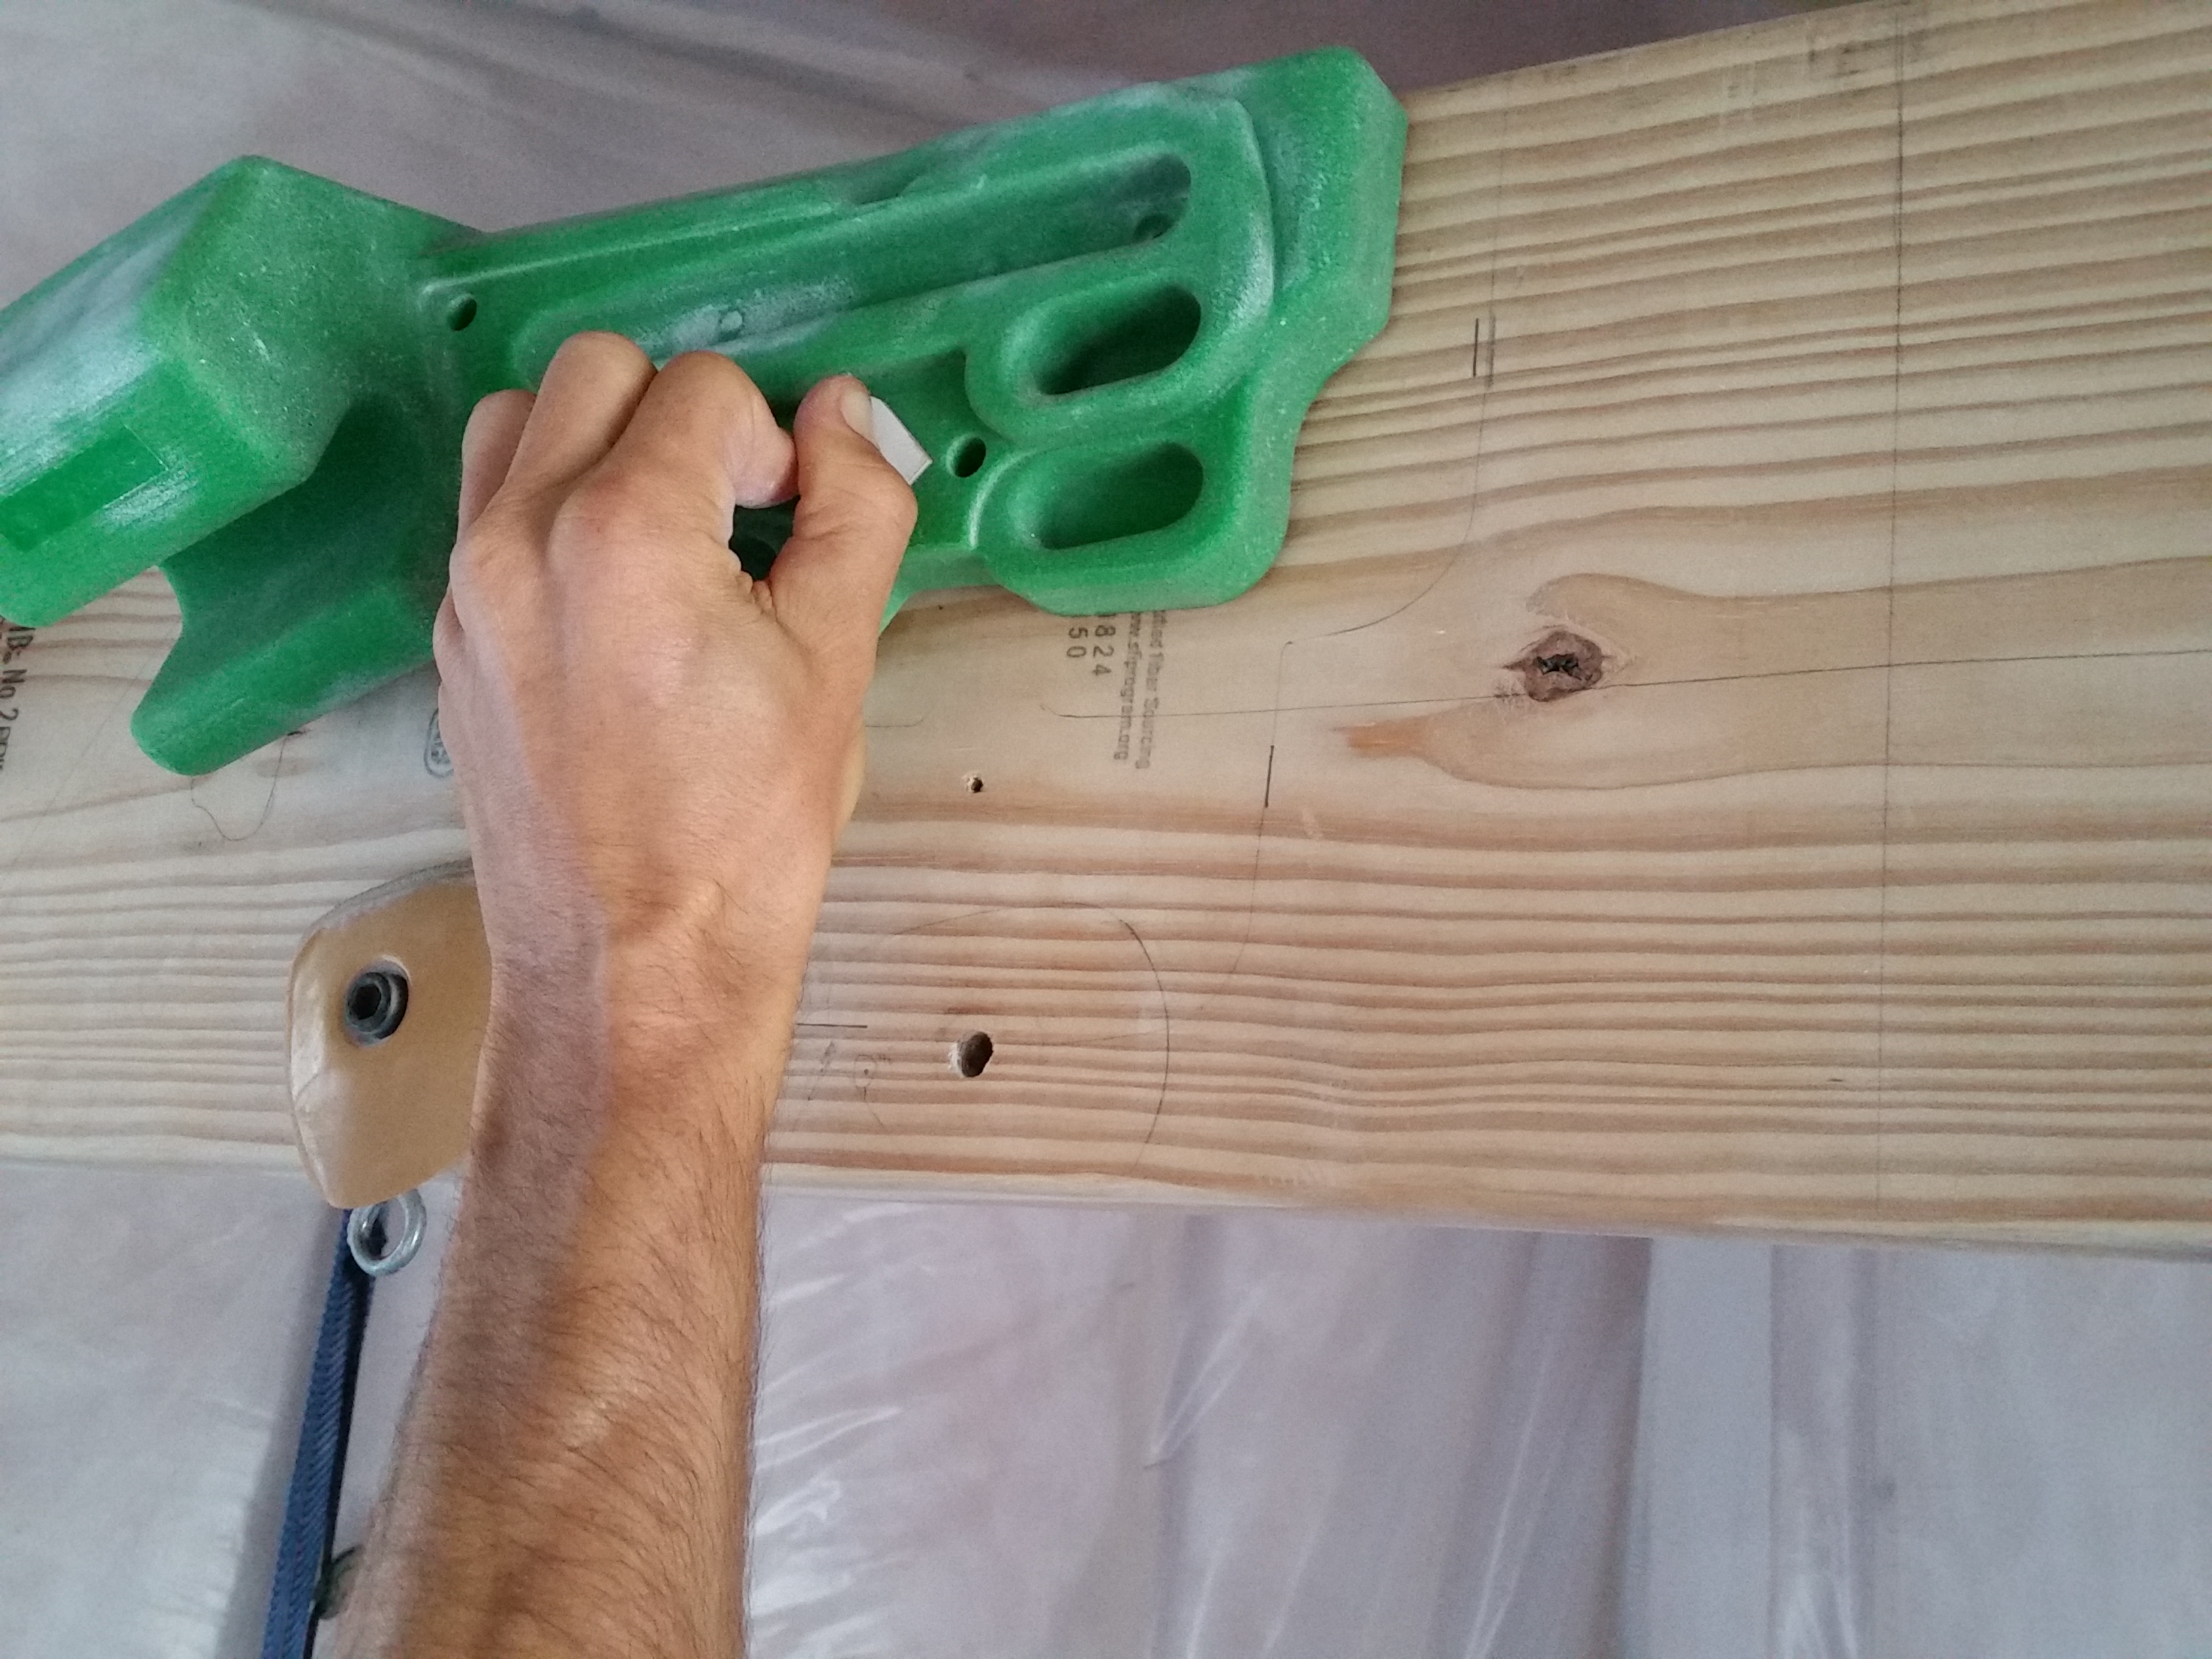
The Micro Crimp with DIP guard in action. It appears that my thumb is wrapping over my index finger (which would put it under a lot of stress), but in fact, my thumb is resting safely on the thumb support.
The re-designed Micro Crimp with Thumb Support.
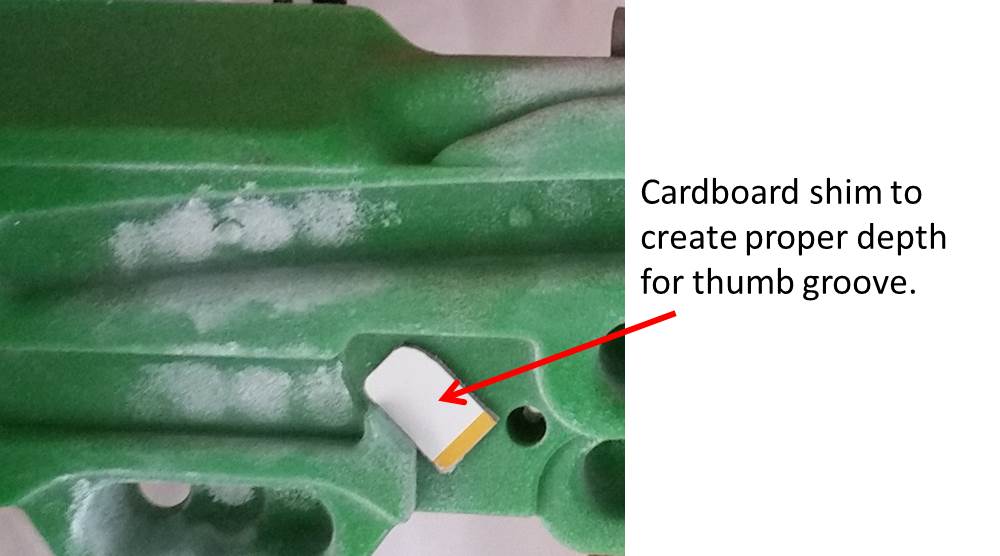
The “support” was designed with a lot of depth to accommodate climbers of all sizes, but I added some shims to mine to make the grip extra difficult to hang onto. Only super-psycho crimping fiends would want to do this 🙂 Most thumbs will fit perfectly. I also sanded a little bit of the texture off the thumb support to prevent myself from “milking it” too much. That’s one great thing about this board…it can easily be customized. Early testers love this re-designed crimp!
The Forge’s new Slopey Crimp grip.
– Slopey Crimper:
This is something our customers have been clamoring for, and I was happy to be able to incorporate it into the Forge. The new Slopey Crimp was modeled after an eGgrips hold I’ve been training on for years. It uses a slightly open-hand crimp grip with a thumb catch, and is complimentary to the closed crimp grip. This is a grip I find on routes all over the place, so it’s useful to train. This grip took some work to perfect, but you can see in the photos below that, in the end, the new slopey crimp creates the finger joint positions we were designing for:
– I: bent at the DIP
– M: bent at the PIP
– R: bent at the PIP
– P: bent at the DIP
The new Slopey Crimp was modeled after an eGrips hold I’ve been training on for years (the orange hold in the photo). It uses a slightly open-hand crimp grip with a thumb catch. The center photo is the Forge, the right photo is the eGrips hold.
New 30 degree and 40 degree slopers.
– Slopers
You asked for steeper slopers, so here they are! The Forge incorporates two slopers; a totally heinous 40 degree sloper on the top-center of the board, and a more reasonable 30 degree sloper above each pinch. Note that the 30 degree sloper is an add-on caused by the pinch, and the palm will sit on the pinch when training this hold. Boulderers may find some application for this in training for slopey, groveling topouts, but most sloper lovers will stick to the 40 degree sloper.
Re-designed Pinch grip with “honesty bumper”.
– Re-designed Pinch with Honesty Technology
The pinch grip has all-new geometry (detailed next), but we also added a little bump to keep us all “honest” while we train 🙂 This will make it harder to migrate higher on the pinch, or reach the sloper with our fingertips. This was another feature that YOU, the customer asked for, so thanks for the great suggestions!
Large, Flat Edge for pullups, etc.
– Large Flat Edge
This was added in place of the large jugs on the RPTC. It can be used for standard grip training, warming up, or just as a convenient surface to do pullups, etc. The geometry was designed to allow it to be used without interfering with the Slopey Crimp just below it.
2. All-New Hold Geometry
As I said, we intended the Forge to be complimentary to the RPTC, not a replacement. Therefore, every grip on the Forge is distinct from the RPTC. There may be similar grips (i.e., 2-Finger pockets), but the depth is different, generally creating a more difficult grip for more intense training. The changes are summarized in this table:
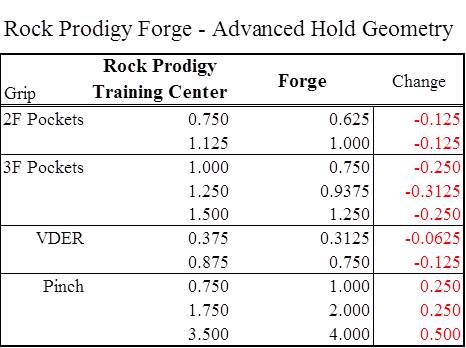
Summary of the Forge’s advanced grip geometry. These are the depths of each pocket in inches (why didn’t we use metric?).
For the Variable Depth Edge Rail (VDER), we also reduced the range, or rate of change of depth, which is another suggestion we received from multiple users. Doing so makes the VDER more consistent for each finger because the depth change is less noticeable. But wait, there’s more! We changed the basic sizes of all of the grips, but we also made other modifications to improve ergonomics and/or increase training intensity, which I’ll detail below.
3. Equation-Driven Hold Lip Radius
Typically, climbing holds and many hangboards are shaped by hand, and it’s up to the shaper’s artistry. For hangboard training, little details like the shape of a hold’s lip are absolutely critical because a bad shape can cause major skin irritation, and flappers. Our computer-aided design and manufacturing process gave us more control over the lip designs, and we wanted to take advantage of that. This would allow us to ensure consistent shapes across several different hold types (e.g., the VDER (Variable Depth Edge Rail) and two-finger pockets have the same lip profile). The RPTC features circular lip radii, which were very comfortable, but on smaller holds you have to make those radii pretty small to be functional, and we wanted to push the envelope of comfort and training specificity on the Forge. We knew that a logarithmic shape would be a better lip profile for most grips, so we west to work. The design software I used enabled us to specify the shape of a curve, and apply it anywhere on the design. We developed several different profiles, created prototypes of each, and tested them until we settled on the perfect shape. Our automated process allowed us to apply that shape to all of the pockets, and the VDER. Who knew math was so cool? 🙂
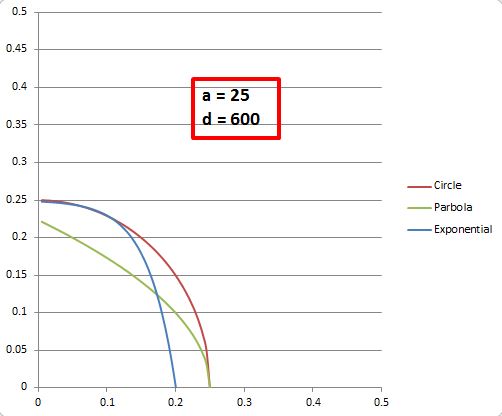
Different hold lip profiles. Note the difference between a simple circular radius and the logarithmic (exponential) shape.
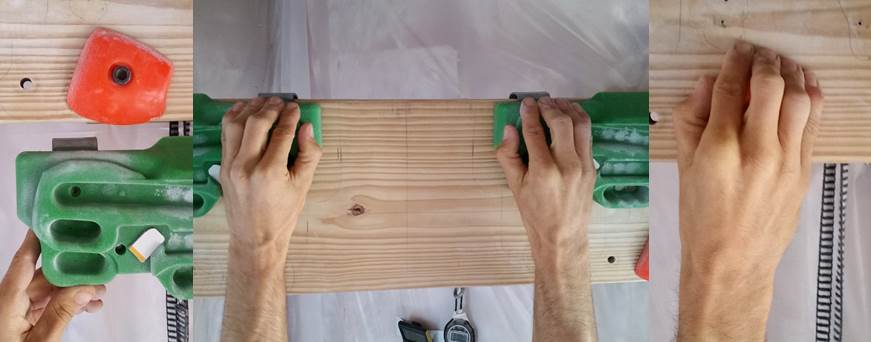
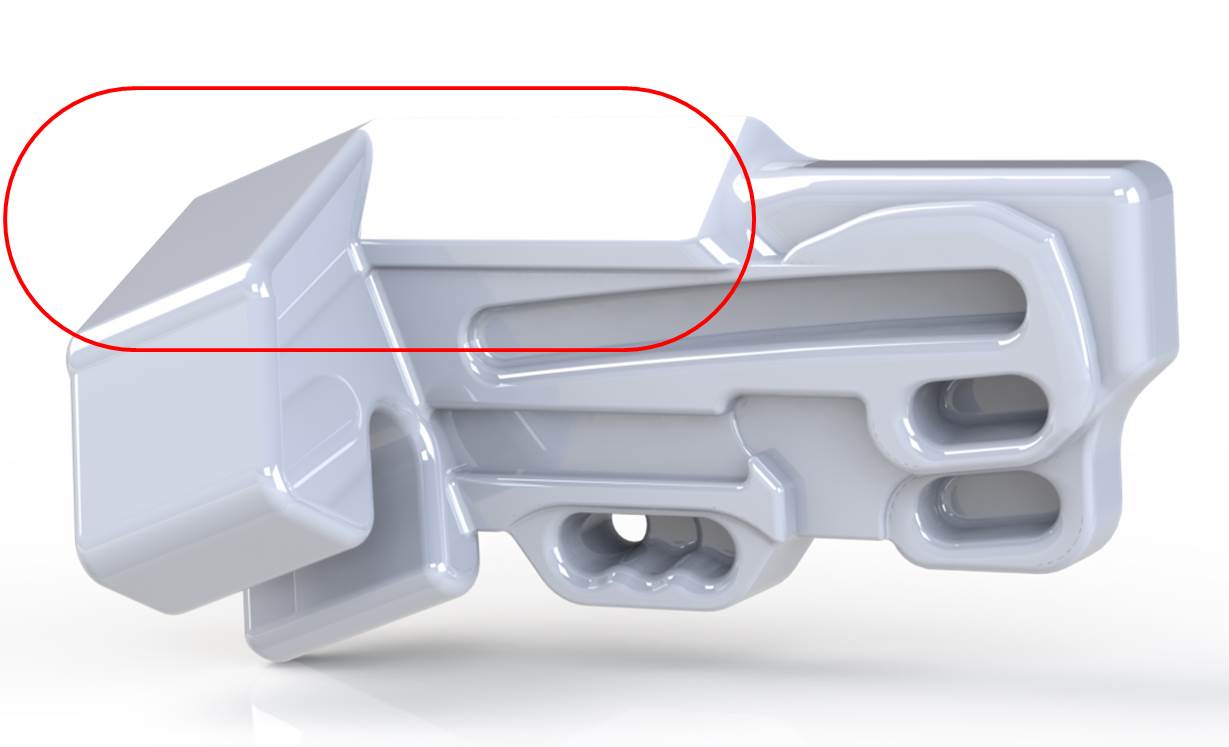
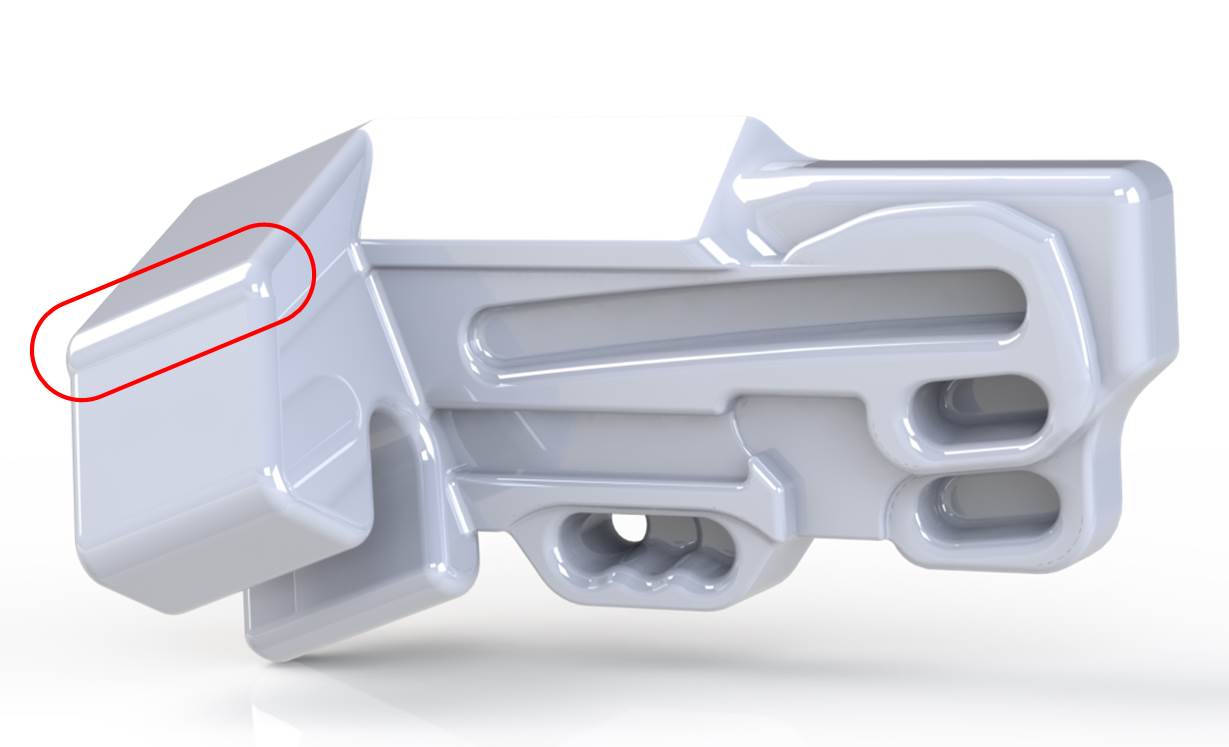
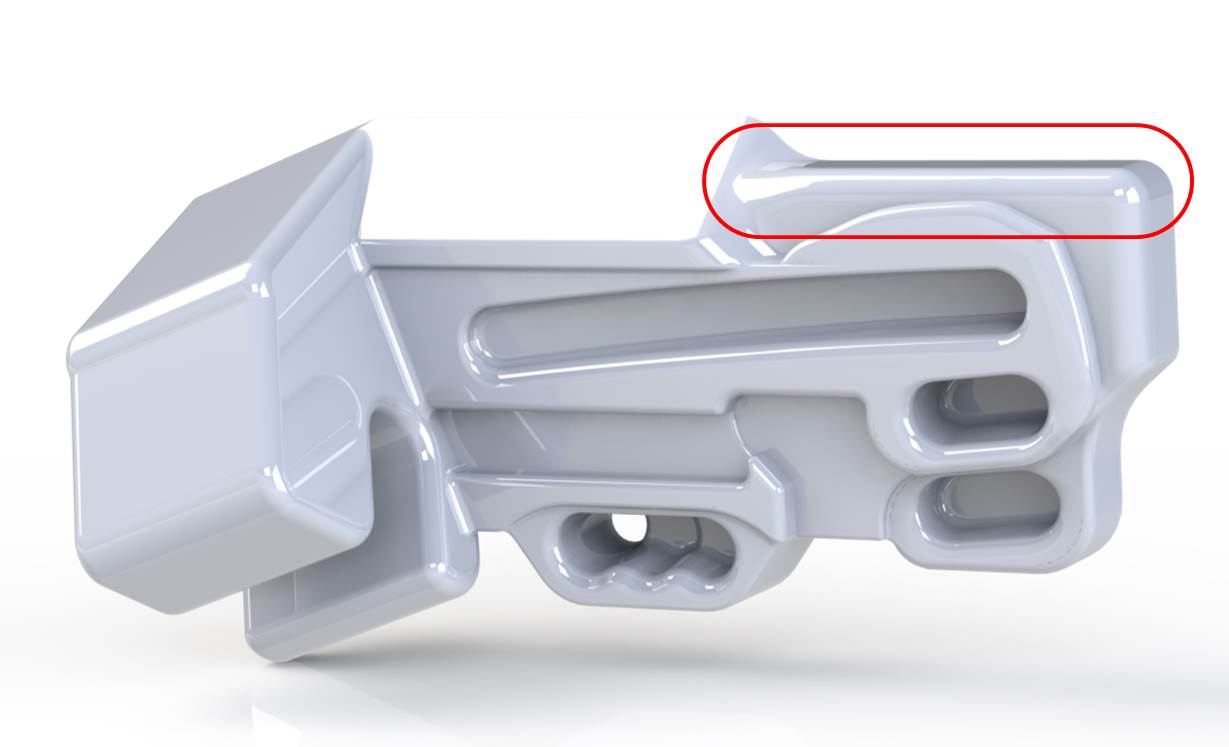
4. Drafted Pockets
“Draft” is a slightly increased slope on the interior of a concave surface. All of the pockets, including the VDER are drafted at a slight angle, which essentially turns them all into slight slopers. It may seem like this would make the grips harder to hold onto (and it would, if taken to an extreme). However, if the optimal slope is added, it reduces the resulting angle of DIP joint flexion without noticeably increasing the difficulty of the grip. This allows for greater skin contact in the back of the hold (where a flat surface would leave dead space), thus increasing skin comfort and DIP joint safety.
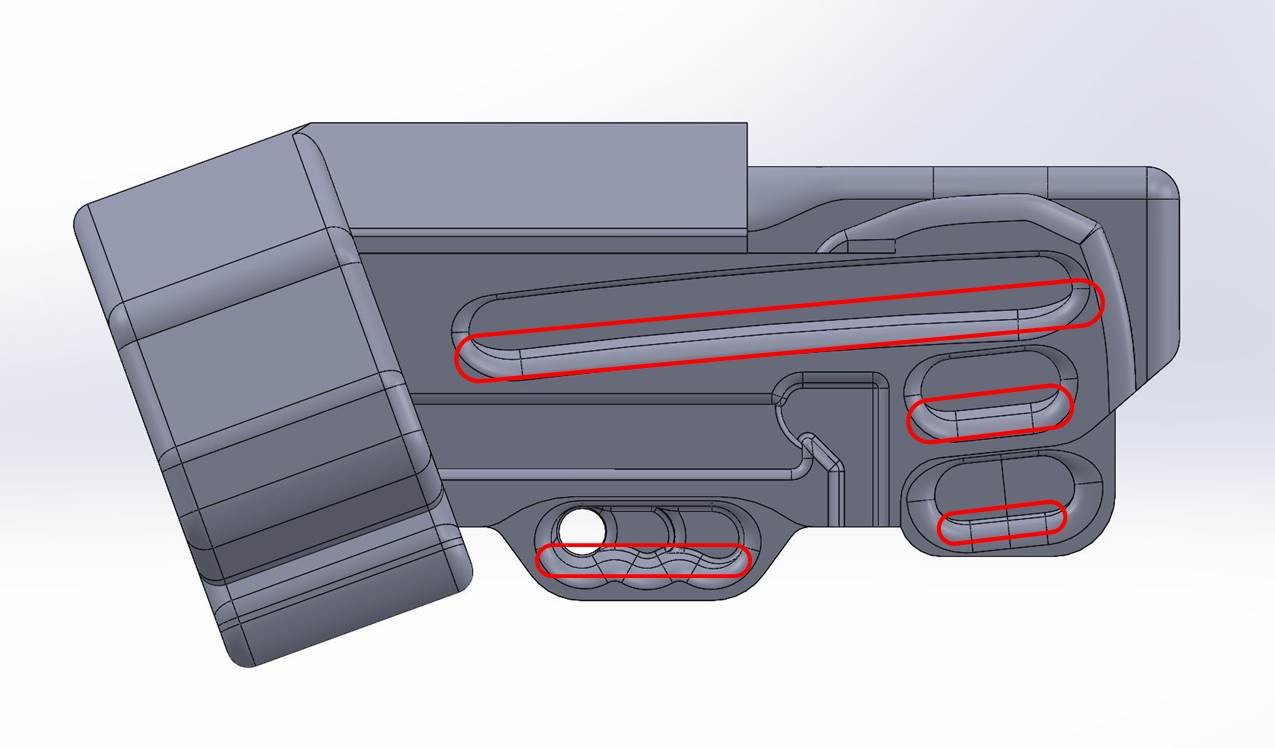
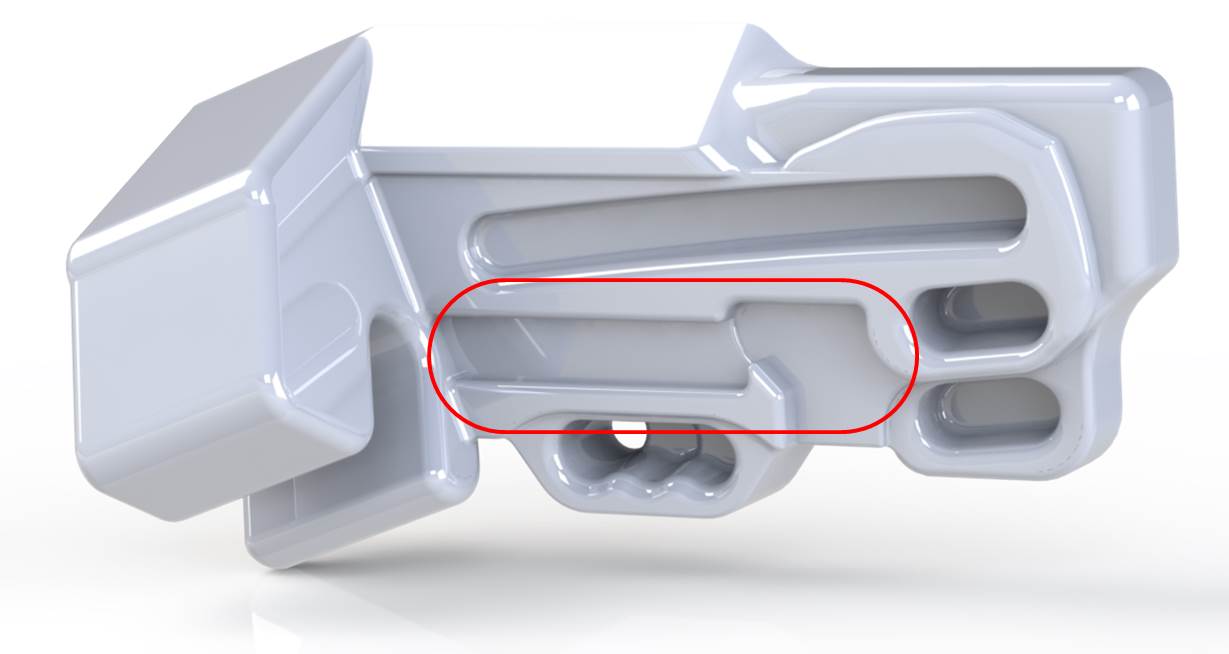
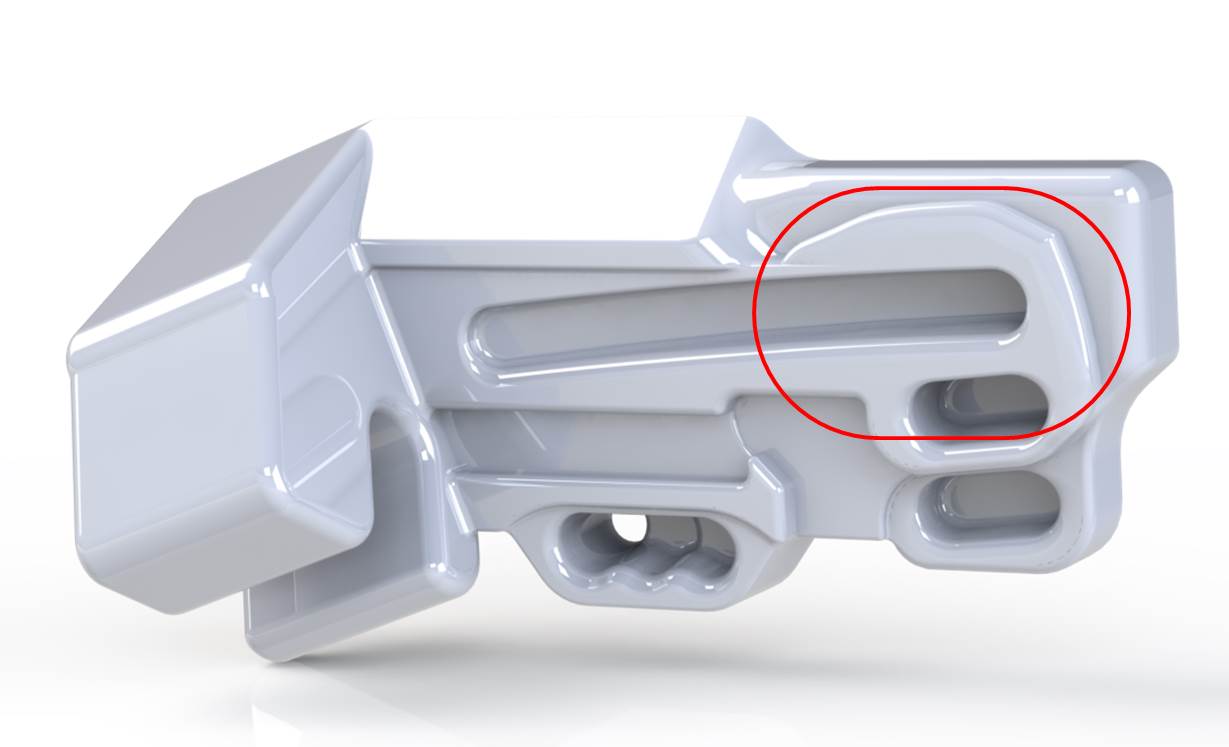
CAD model of the Forge. The draft that was added
to all of the pockets is apparent in this screen
capture, indicated by the extra line at the bottom of
each pocket (and circled in red).
To experiment with the draft, Mark modified his RPTC hangboard setup to allow it to rotate about the base, as shown in this photo (note the hinges at the bottom):
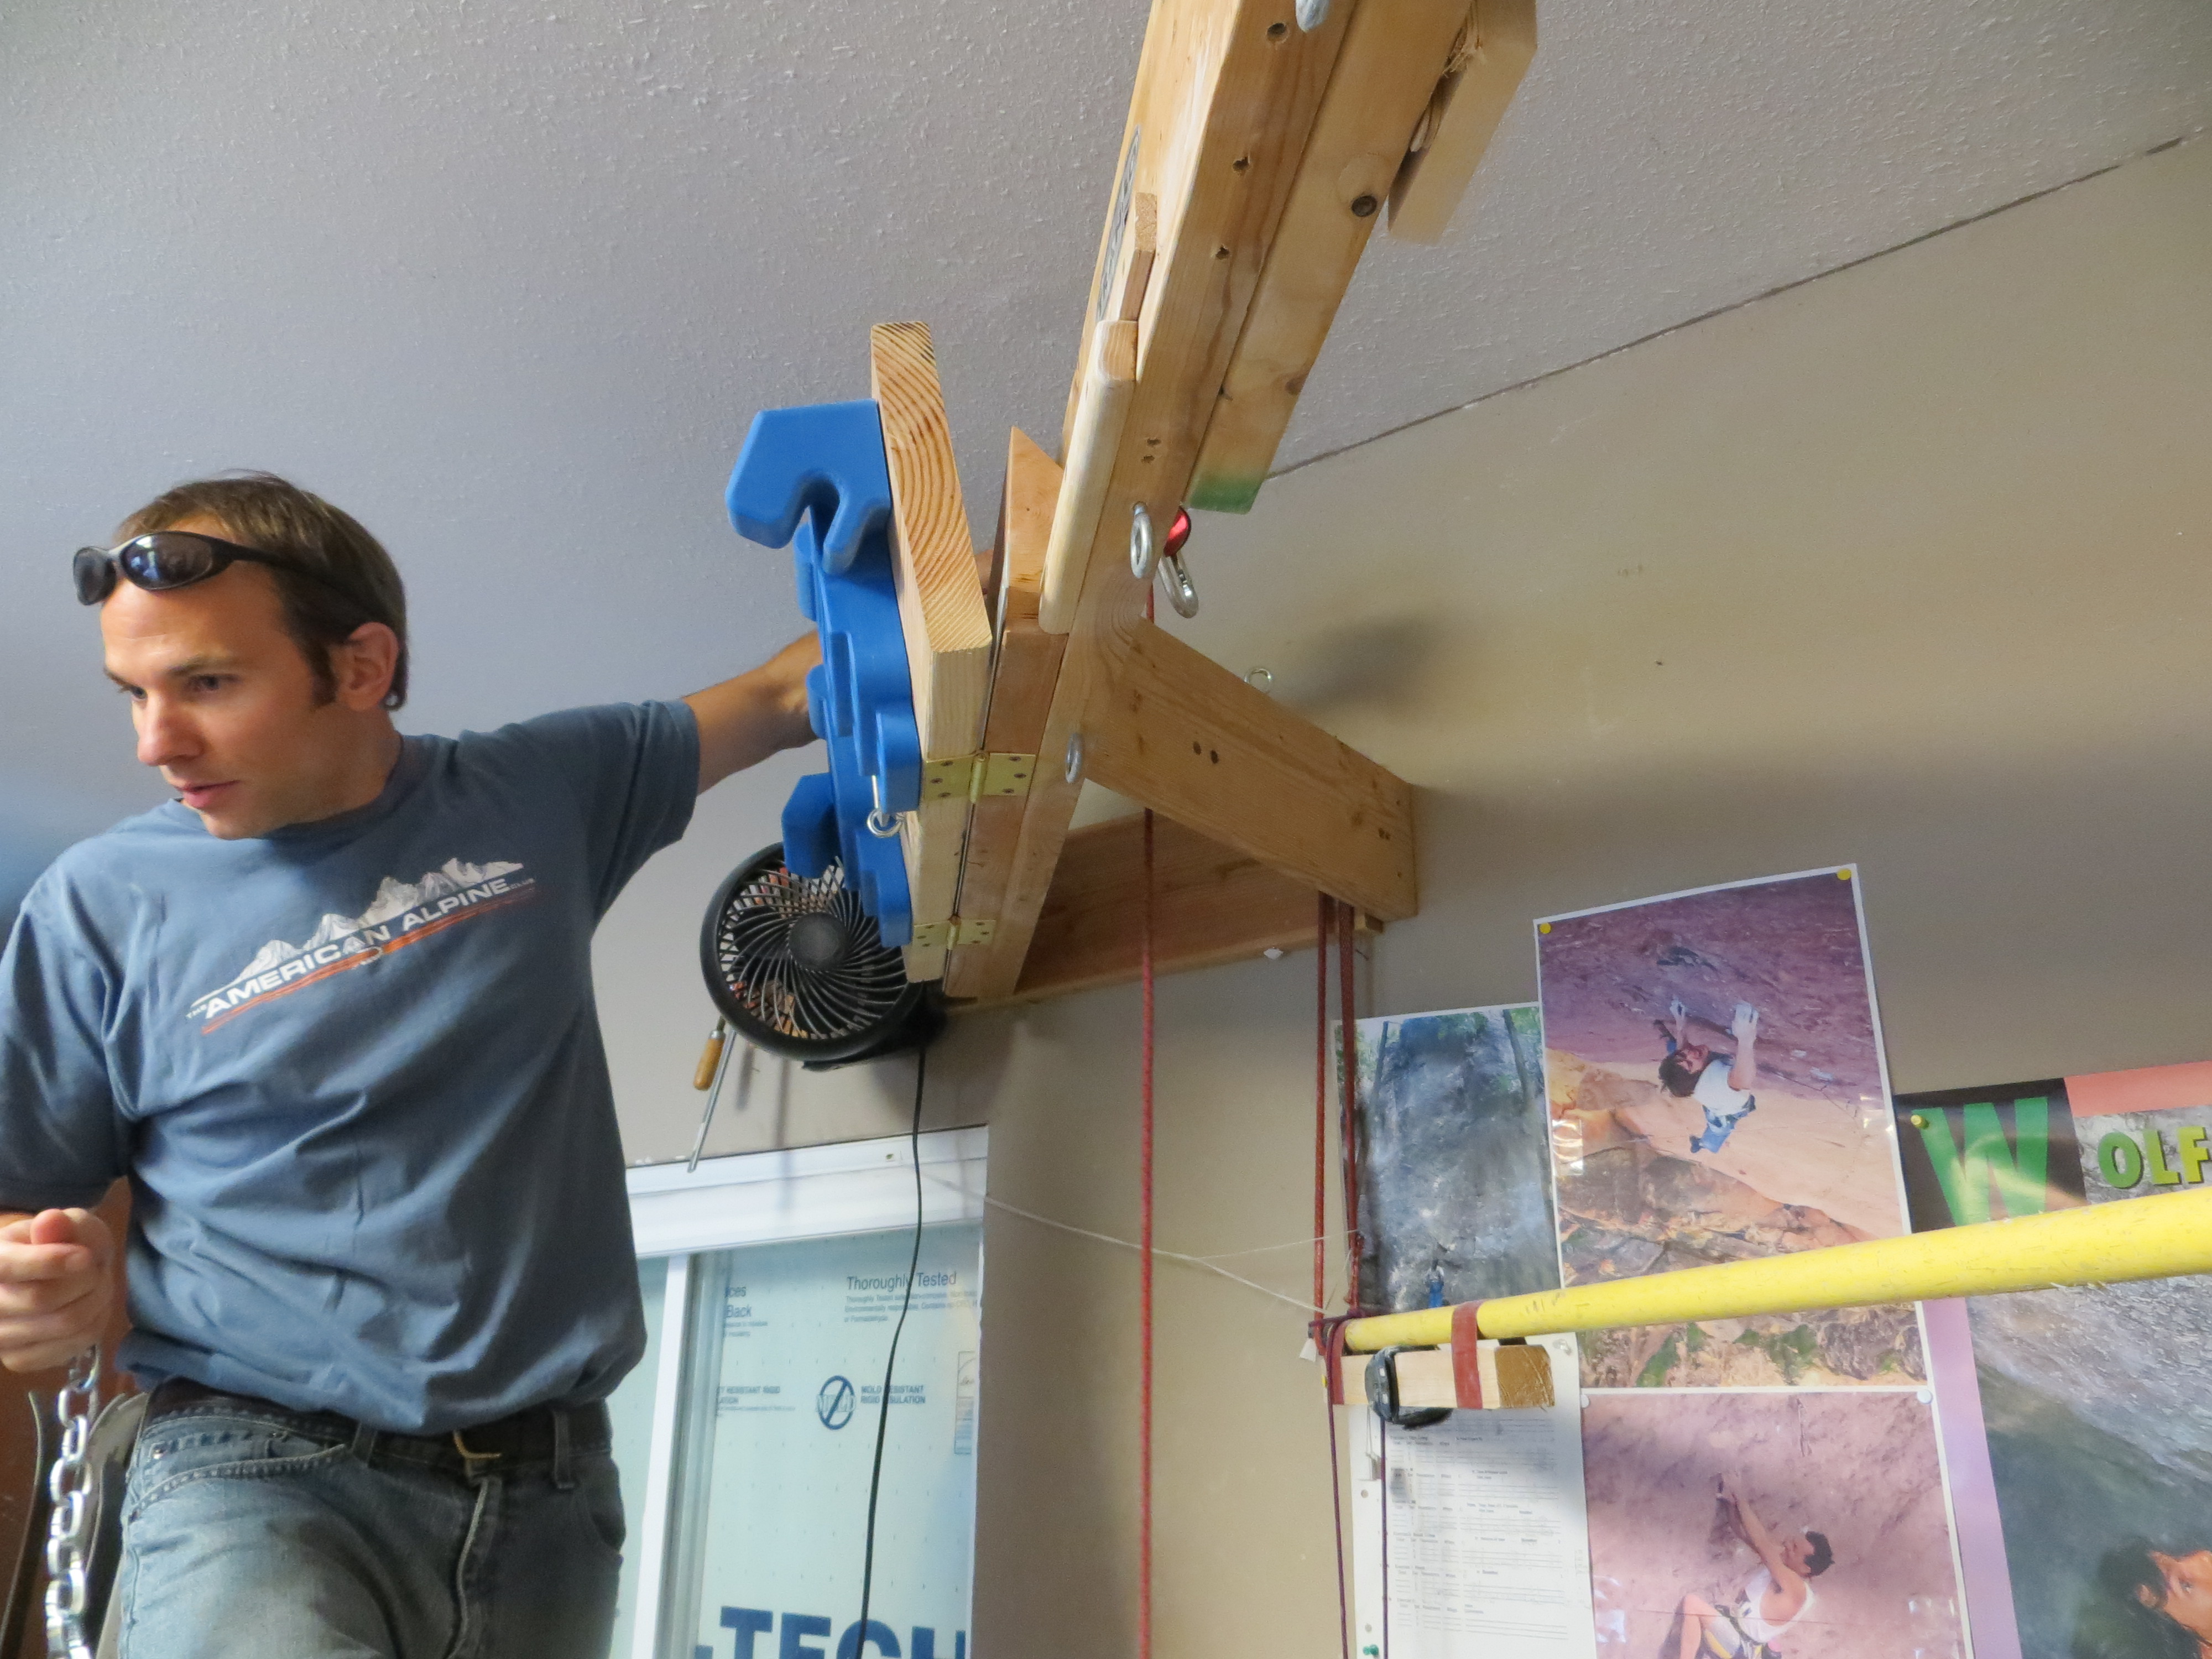
Rotating hangboard fixture to allow us to test Draft. Note the hinges at the bottom.
We experimented by setting different angles, then hanging from edges and pockets on the board to find the perfect draft angles:
Mark testing out a potential draft angle as Adam Sanders of Trango supervises the operation and records the angle.
Those of us who have tested it absolutely love the draft! In some cases we find it makes the holds easier to use, and in all cases they are much more comfortable on the skin.
5. Improved Texture
Sorry, no pictures for this one, but trust me…when you get your hands on the Forge, you’ll love the texture. It’s not as rough as the RPTC, so grips may feel a little more slippery at first. However, this should produce a more consistent training surface across the life of the board, and it absolutely creates a more comfortable grip when using high levels of resistance. It’s also a safer option for preventing skin injuries on the smaller holds of the Forge. And Highly Obsessed Hangboard Fiends (HOHFs) should note that a very rough texture will wear more over time, making it difficult to compare results. Additionally, users have the option to make adjustments to the texture to meet their preferences. Just a little sandpaper can remove or add texture (finer grit to remove, coarser to add). You may want to practice first on an unused surface!
6. Rotatable Board
Ok, so this isn’t really new or unique to the Forge…the RPTC had this capability too, but I think it bears repeating while I’m on a roll here. The great thing about the split hangboard design is that the spacing can be adjusted, but the angle of rotation can be adjusted as well! This should be done to improve ergonomics for certain grip types. For example, I find this particularly helpful on my “Index-Middle” finger, two-finger pocket grip. When you hang from a two-finger pocket with your index and middle finger, your middle finger is longer, and the load on each finger is unbalanced, and often uncomfortable. (The opposite is true for MR grips, which is why the MR two-finger pockets on all Rock Prodigy devices are slightly angled.) By rotating the pockets (rotate the right pocket counter-clockwise, and the left clockwise), the holding surface for the middle finger moves farther from your wrist, and it is possible to create a really comfortable grip. Take a look at the photos:
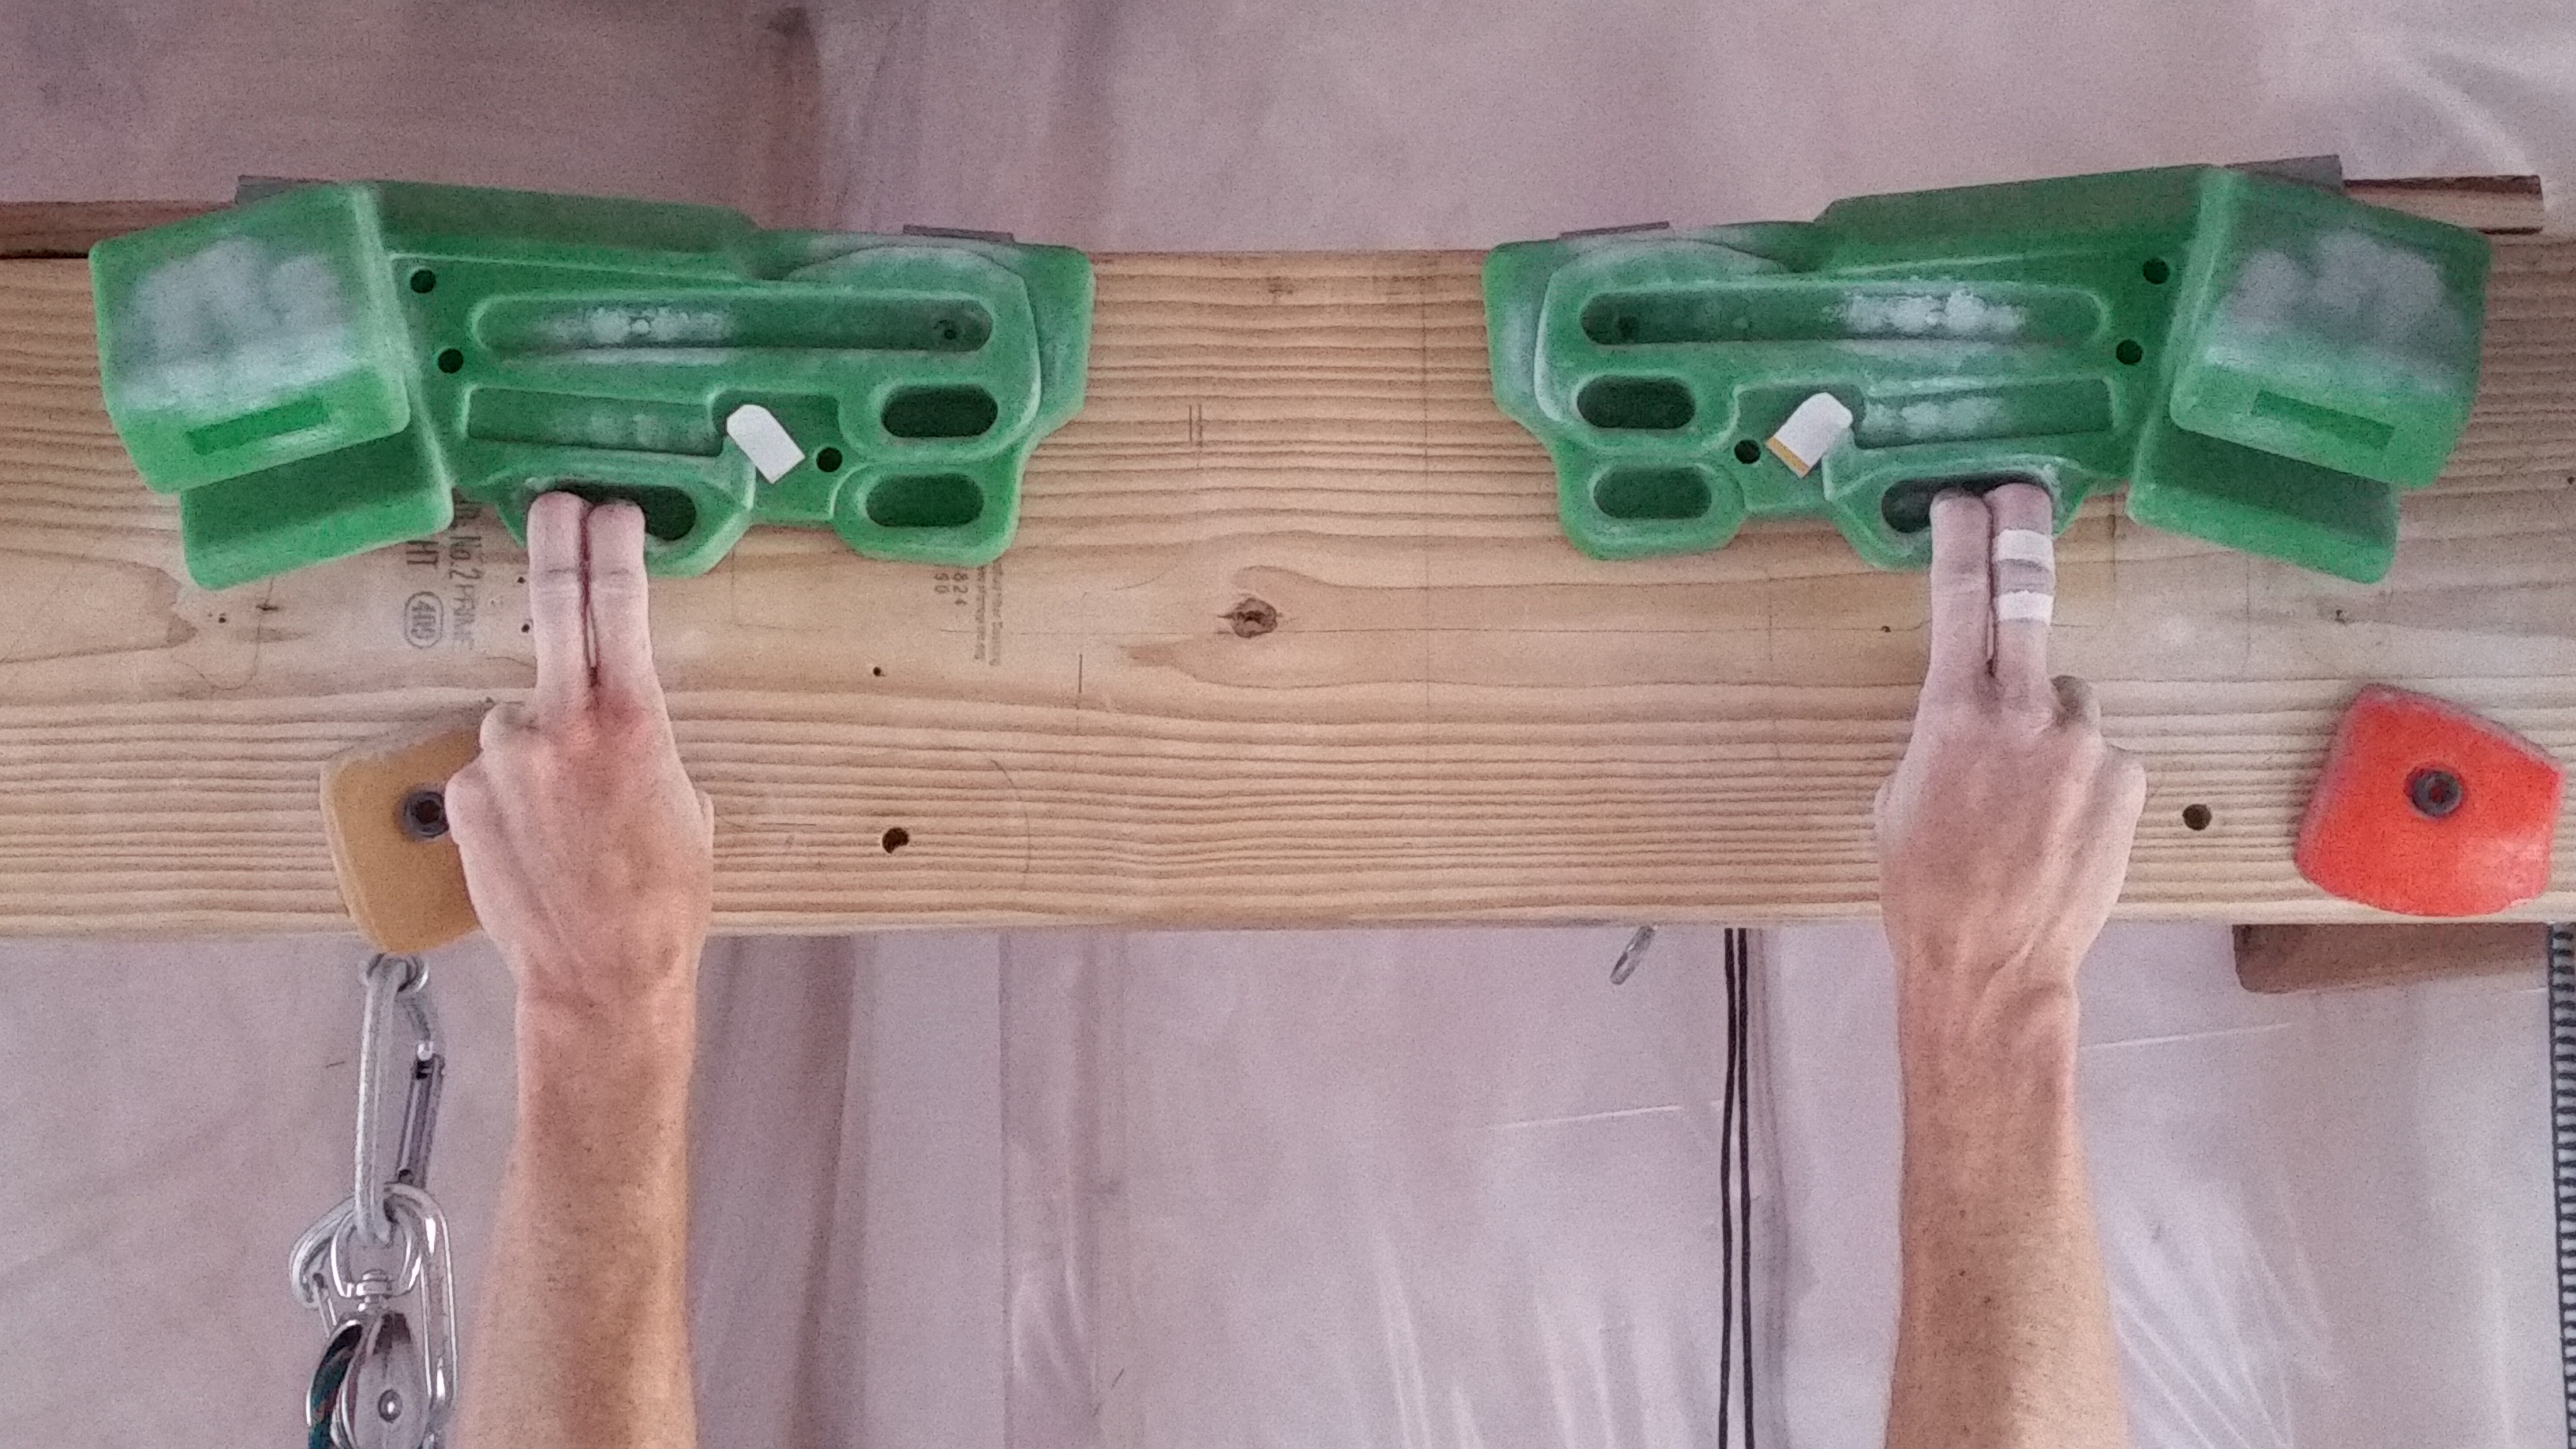
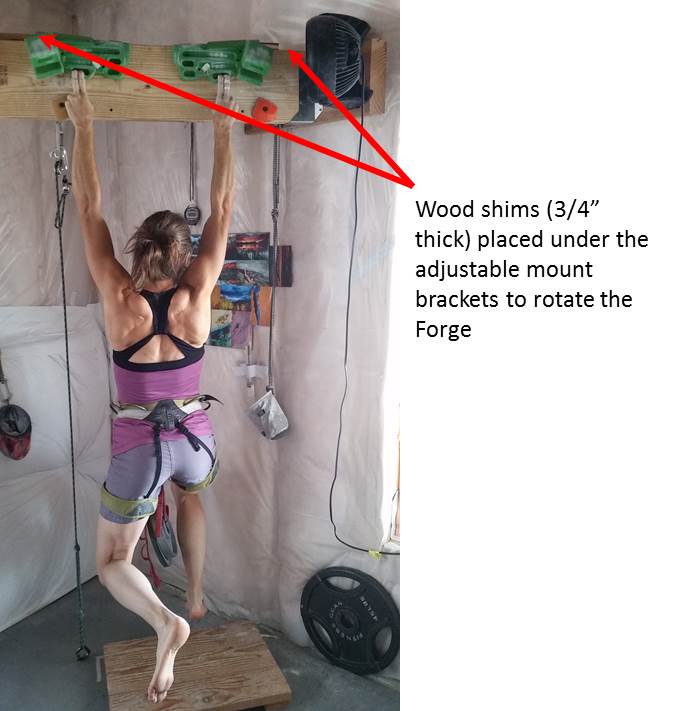
By rotating the Forge slightly (canted inward), Janelle’s fingers line up with the pocket surface perfectly.
To create this rotation, I simply place a 3/4″ shim material (wood block) under the outer bracket that holds the Forge (see this post on how to create an adjustable mount, with more adjustable mount designs on their way). The angle of rotation can be adjusted by changing the thickness of the wood shim, or placed under the inner bracket to rotate in the opposite direction (which you might want to do for your “Middle-Ring” two finger pocket).
By rotating the Forge slightly (canted inward), Janelle’s fingers line up better with the pocket surface
Finally, please remember, the Forge is a more advanced hangboard than the RPTC! If you’re transitioning your training over to it, you need to adjust your expectations in terms of what weight you expect to be able to hang on these new grips. The new features of the Forge such as reduced geometry, draft, new texture are all conspiring to increase your training intensity, so expect to need to ratchet back the externally applied intensity (the weight you hang) on each grip.
Now go out there, get a Forge, and hammer your fingers into the best shape of your life!

instead of canting inwards the two individual parts of the hangboard, did you consider re-designing the three finger pocket at off-set heights,such as having the middle position 4 to 6mm higher than the adjacent positions on either side? The higher position would correspond to an more ergonomic position for the typically longer middle finger (the distal joint in middle finger is not aligned with the other distal joints), which appears to be what you are trying to achieve in rotating the board.
LikeLike
Rui,
We have considered using an angled pocket for the IM and/or IMR pockets. The reason we haven’t pursued that design is that we find the disparity in I and M finger lengths varies drastically among climbers, so it would be very difficult to pin down an angle that would suit everyone. For now we think it’s better to leave it “neutral” (horizontal) rather than inadvertently pick an arbitrary angle that doesn’t work for many climbers.
Mark
LikeLike
I just received my Forge and I measured the slopers out to about 34 degrees and 16 degrees for the ones above the pinch. I measured the distance from the top of the flat edge to the highest point of the steeper sloper to 10mm, which appears less than the distance in the rendering. Having just completed a session with it last night, I noted the steep sloper felt a bit easier than the 35 degree Beastmaker.
Aside from that, I have to commend you on the pinches. The 4″ wide grip is brutal and is exactly what I was looking for. The Honesty bump was a really nice touch as well. I also really like what you’ve done with the micro edge, after experimenting a bit with it last night I know I’m going to be in for some good ‘try hard’ in the future.
Haven’t played around too much with the sloping crimp just yet, but it seems the lack of distance between the top of the edge and the bottom of the flat edge might make it a bit difficult to get a consistent grip on the hold, especially when quickly trying to position your fingers during a repeater set. I measured this distance at 5mm and it seems like bumping this to 10mm might make the hold a bit easier to quickly grab.
Great job overall, looking forward to training on it for years to come.
LikeLike
Pingback: Introducing the “Rock Prodigy Forge User Experience” Survey – Win some shwag! | The Rock Climber's Training Manual
Pingback: Adjustable Hangboard Mount (3.0) – Easiest yet! | The Rock Climber's Training Manual
I’ve been on the fence for a while, debating whether to switch to the Forge from my Metolious hangboard. How often should a hangboard last? One of my main concerns is the VDER, variable depth edge. How can I be certain from that I’m not slightly changing my hand position between workouts? I don’t want to get a different edge depth each set.
LikeLike
Steve,
Both the RPTC and the Forge come with “Position Index Bumps” that are designed to help you locate the same position on the VDER each set. I think if you ask around you will hear that these are quite effective at limiting “cheating”. For more information, check out the RPTC page under the “Tools” menu.
Mark
LikeLike