[*Editor’s Note: This blog post was updated on October 22, 2018 to correct the proper polarity for the “1-Tin Method”]
by Mark Anderson
This is Part II in a two-part series. Check out Part I, especially the many warnings and disclaimers, here.
While the “standard method” of Iontophoresis was working well for me, I found it annoying to submerge both hands simultaneously, when only one hand was getting treated. Furthermore, it seems unnecessarily risky to run current across both arms and shoulders, potentially through several vital organs, if it can be avoided. So, always looking to optimize things, I’ve been experimenting with what I call the “1-tin method”. This involves using a dampened wristband, placed somewhere along the forearm of the submerged hand, to close the circuit (instead of a second tin-full of water). With this setup, the current only runs through one hand and forearm (at a time), and the other hand is free to do…whatever it is you do with a free hand when nobody is watching**.
[**I’m assuming you will do this when no one is watching. Seriously, you’d have to be nuts to do this in front of other people. They’ll have you hauled off to the loony bin right quick.]
The following hardware is needed for the 1-Tin Method:
-1 metal tin
-2-4 Electrical wires with “alligator clips” on each end
-2-3 6v lantern batteries
-A pinch or two of salt
-Tap water
-1 Wrist sweatband
-(Optional) Non-conductive spacer, such as a plastic tupperware lid
-(OptionalP) Piece of aluminum foil, approximately 12” x 18”
Wire everything up as shown in the photo. If using multiple batteries in series, wire them together as for the Standard Method (with the negative terminal of the 1st battery connected to the positive terminal of the 2nd, the negative terminal of the 2nd battery connected to the positive terminal of the 3rd, and so on). [Updated October 22, 2018] Clip the positive terminal of the last battery to the metal tin, and the negative terminal of the first battery to the dampened wrist-band (more on this below). I like to clip the wire to the outside of the wrist-band to ensure the metal clip doesn’t directly contact my skin. Use the same timing and frequency as for the Standard Method, but without reversing the polarity half-way through (so each hand gets submerged one time).
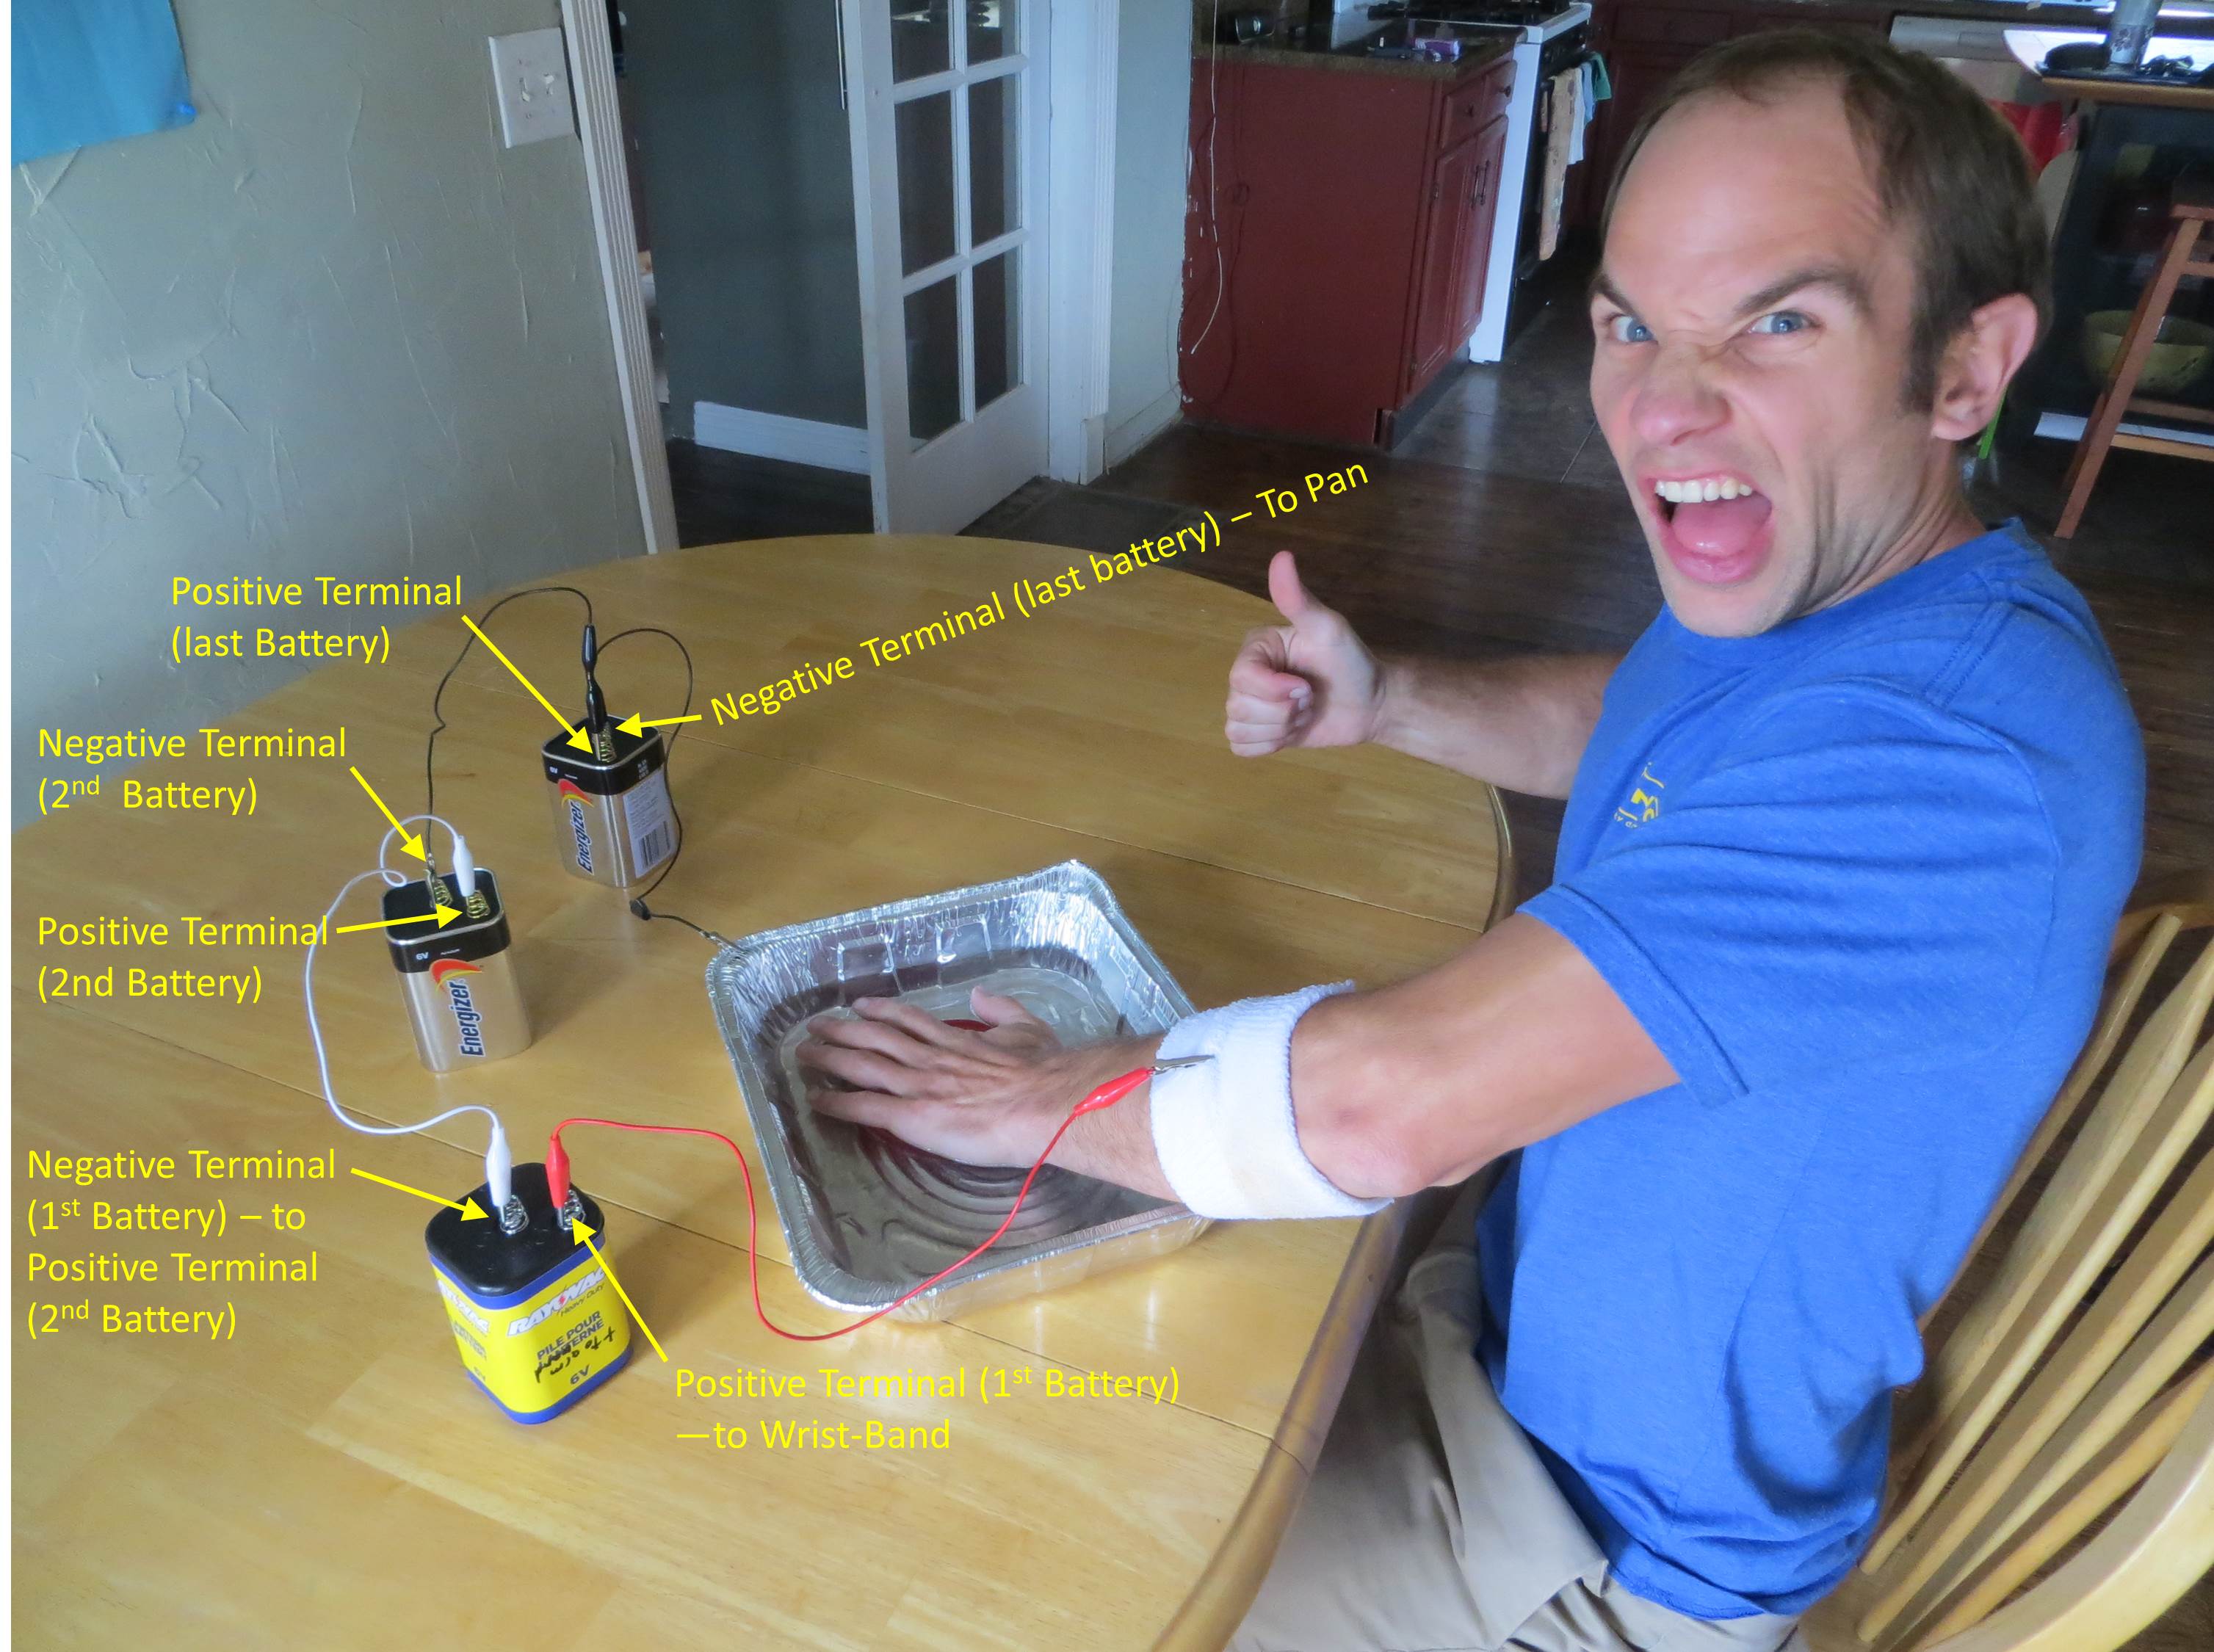
This shows the 1-Tin setup. [Update October 22, 2018:] Note the polarity shown here is backwards. The red wire (from the positive battery terminal) should be clipped to the pan, and the black wire (from the negative terminal) should be clipped to the wristband. Do not start with 18v!
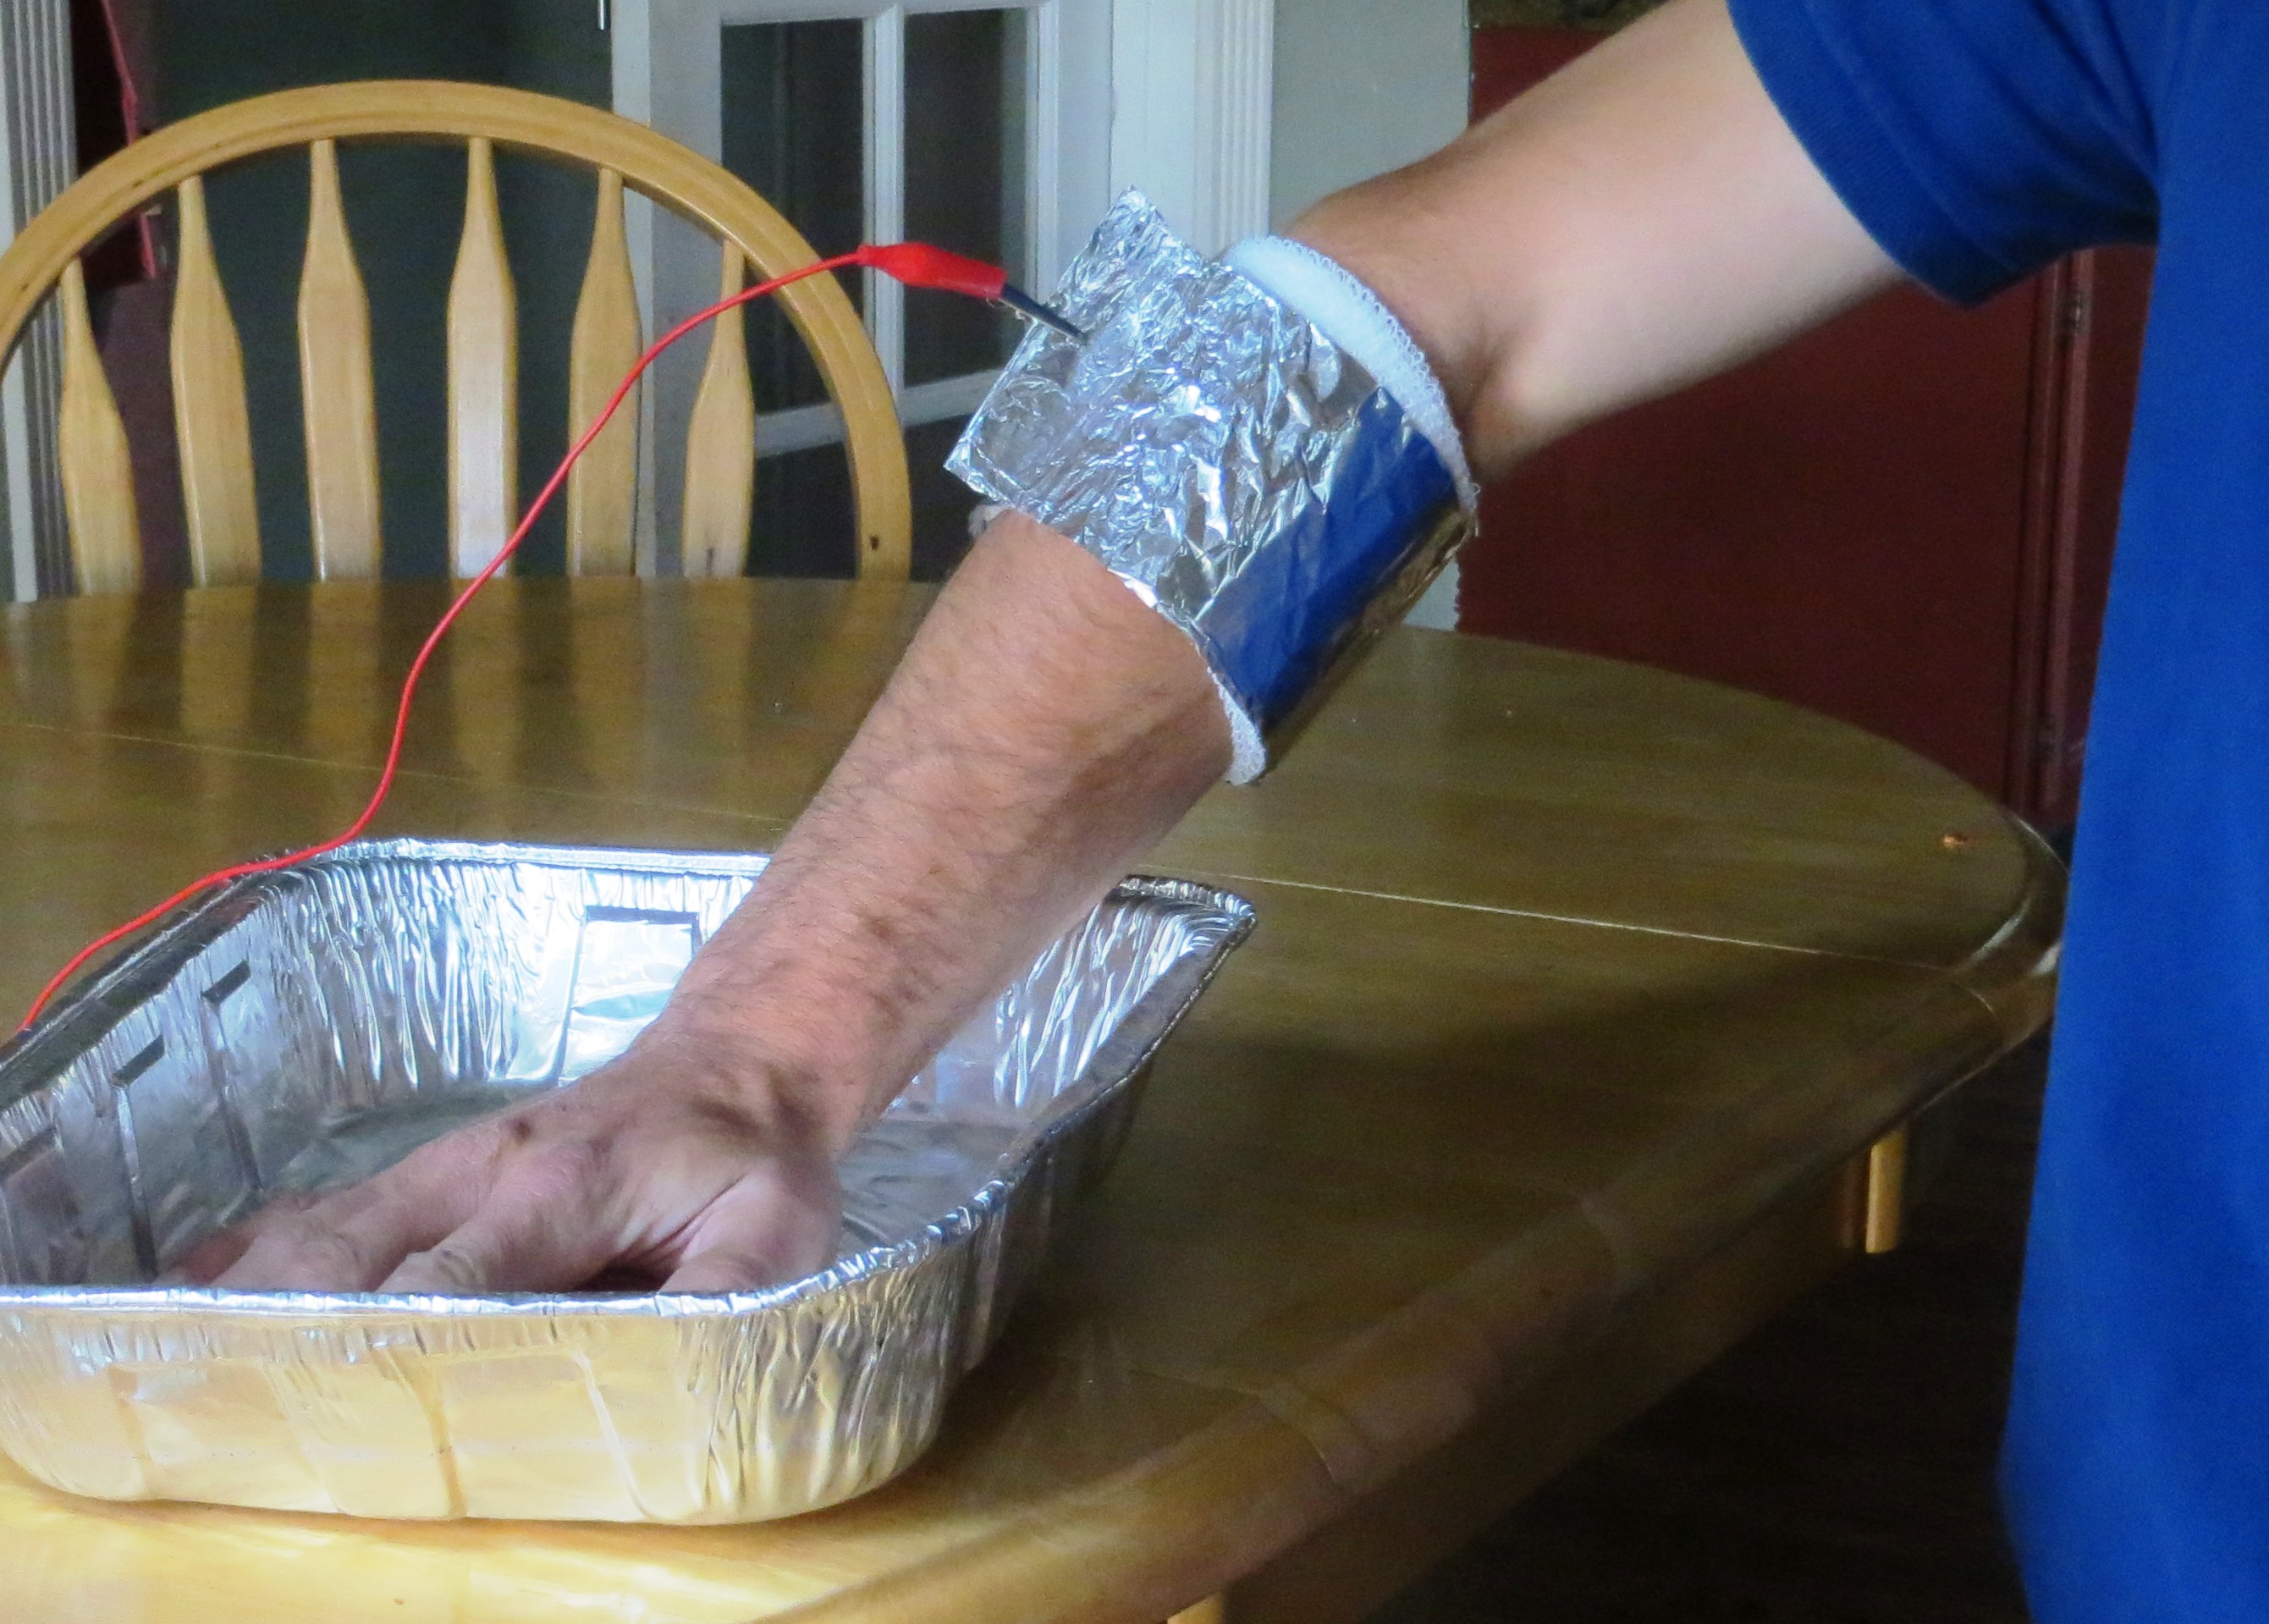
Wrapping foil around the wristband will greatly increase conductivity, reducing the amount of current required and decreasing current density where the wire is attached. This piece of foil is approximately 12″ x 18″. Fold it twice length-wise to create a strip 3″x18″, and wrap that around the dampened wristband. Roll the two ends together and clip the wire to the roll.
The other complication of the 1-Tin Method is that polarity of the circuit (probably) becomes much more important. With two tins, the polarity is reversed half-way through, so both hands will be subjected to current flowing in both directions. That is not the case with one tin. While the mechanism of iontophoresis is unknown, it is likely that current polarity is important, because it determines the direction of flow of positively and negatively charged ions (positively charged ions, such as sodium ions, move away from the positively charged battery pole; negatively charged ions, such as chlorine ions, move toward the positively charged pole—both of these ions are produced when salt is dissolved in water, and sodium ions are a primary component of sweat).
The importance of ion flow is well-understood for the delivery of medications via iontophoresis, and each medicine’s ionic polarity (when dissolved in water) is clearly identified***. For hand drying applications, determining which is “right” through logic is difficult, since nobody seems to know what exactly causes the drying effect. Do we want to push positive ions into the hand? Do we want to pull negative ions out? Does it matter which ions are at play? I don’t know.
[Updated October 22, 2018:] Fortunately my friend Boer took the time to experiment and came up with I believe is the definitive answer: if using salt in the water, the batteries should be wired such that the positive pole of the last battery attaches to the metal tin, and the negative pole of the first battery attaches to the dampened wrist band. You can see the details of Boer’s experiments here.
[***Here’s a good source that describes the science behind iontophoresis for medicine delivery. Incidentally, it states “Positive ions accumulating at the negative pole…produce hardening of the tissues by increasing protein density,” which led me to believe for a while that the negative battery pole should be wired to the pan. This is incorrect.]
Tips on the 1-Tin Method:
- Do this at your own risk
- Talk to your doctor before electrocuting yourself
- Please don’t do this if you are pregnant, have a pacemaker, or any other metal implants in the path of the current flow.
- Definitely don’t do this if you have a heart condition, epilepsy, or other medical condition that responds poorly to electricity.
- Probably, just don’t do this.
- I find that I need less voltage for the 1-Tin Method than I do for the Standard Method to get the same effect (for example 18v vs. 24v). Start with low voltage and ramp up if necessary. Adding foil further reduces the required voltage.
- The wrist band will dry out during the session, thus reducing conductivity, so it helps to have a sponge handy that you can use to re-moisten the wrist-band every few minutes. Note, this doesn’t seem to be a problem if you use foil around the wristband.
- Water may trickle down your arm, from the wrist-band, toward the pan. It helps to have a small towel handy to dry the trickle of water (in order to avoid shorting the circuit).
- You may notice skin redness in the vicinity of the water line of the metal tin(s) and/or where the wristband was located. This is “normal” (within the context of submerging your body in electrically charged buckets of water), and seems to fade within a couple hours.
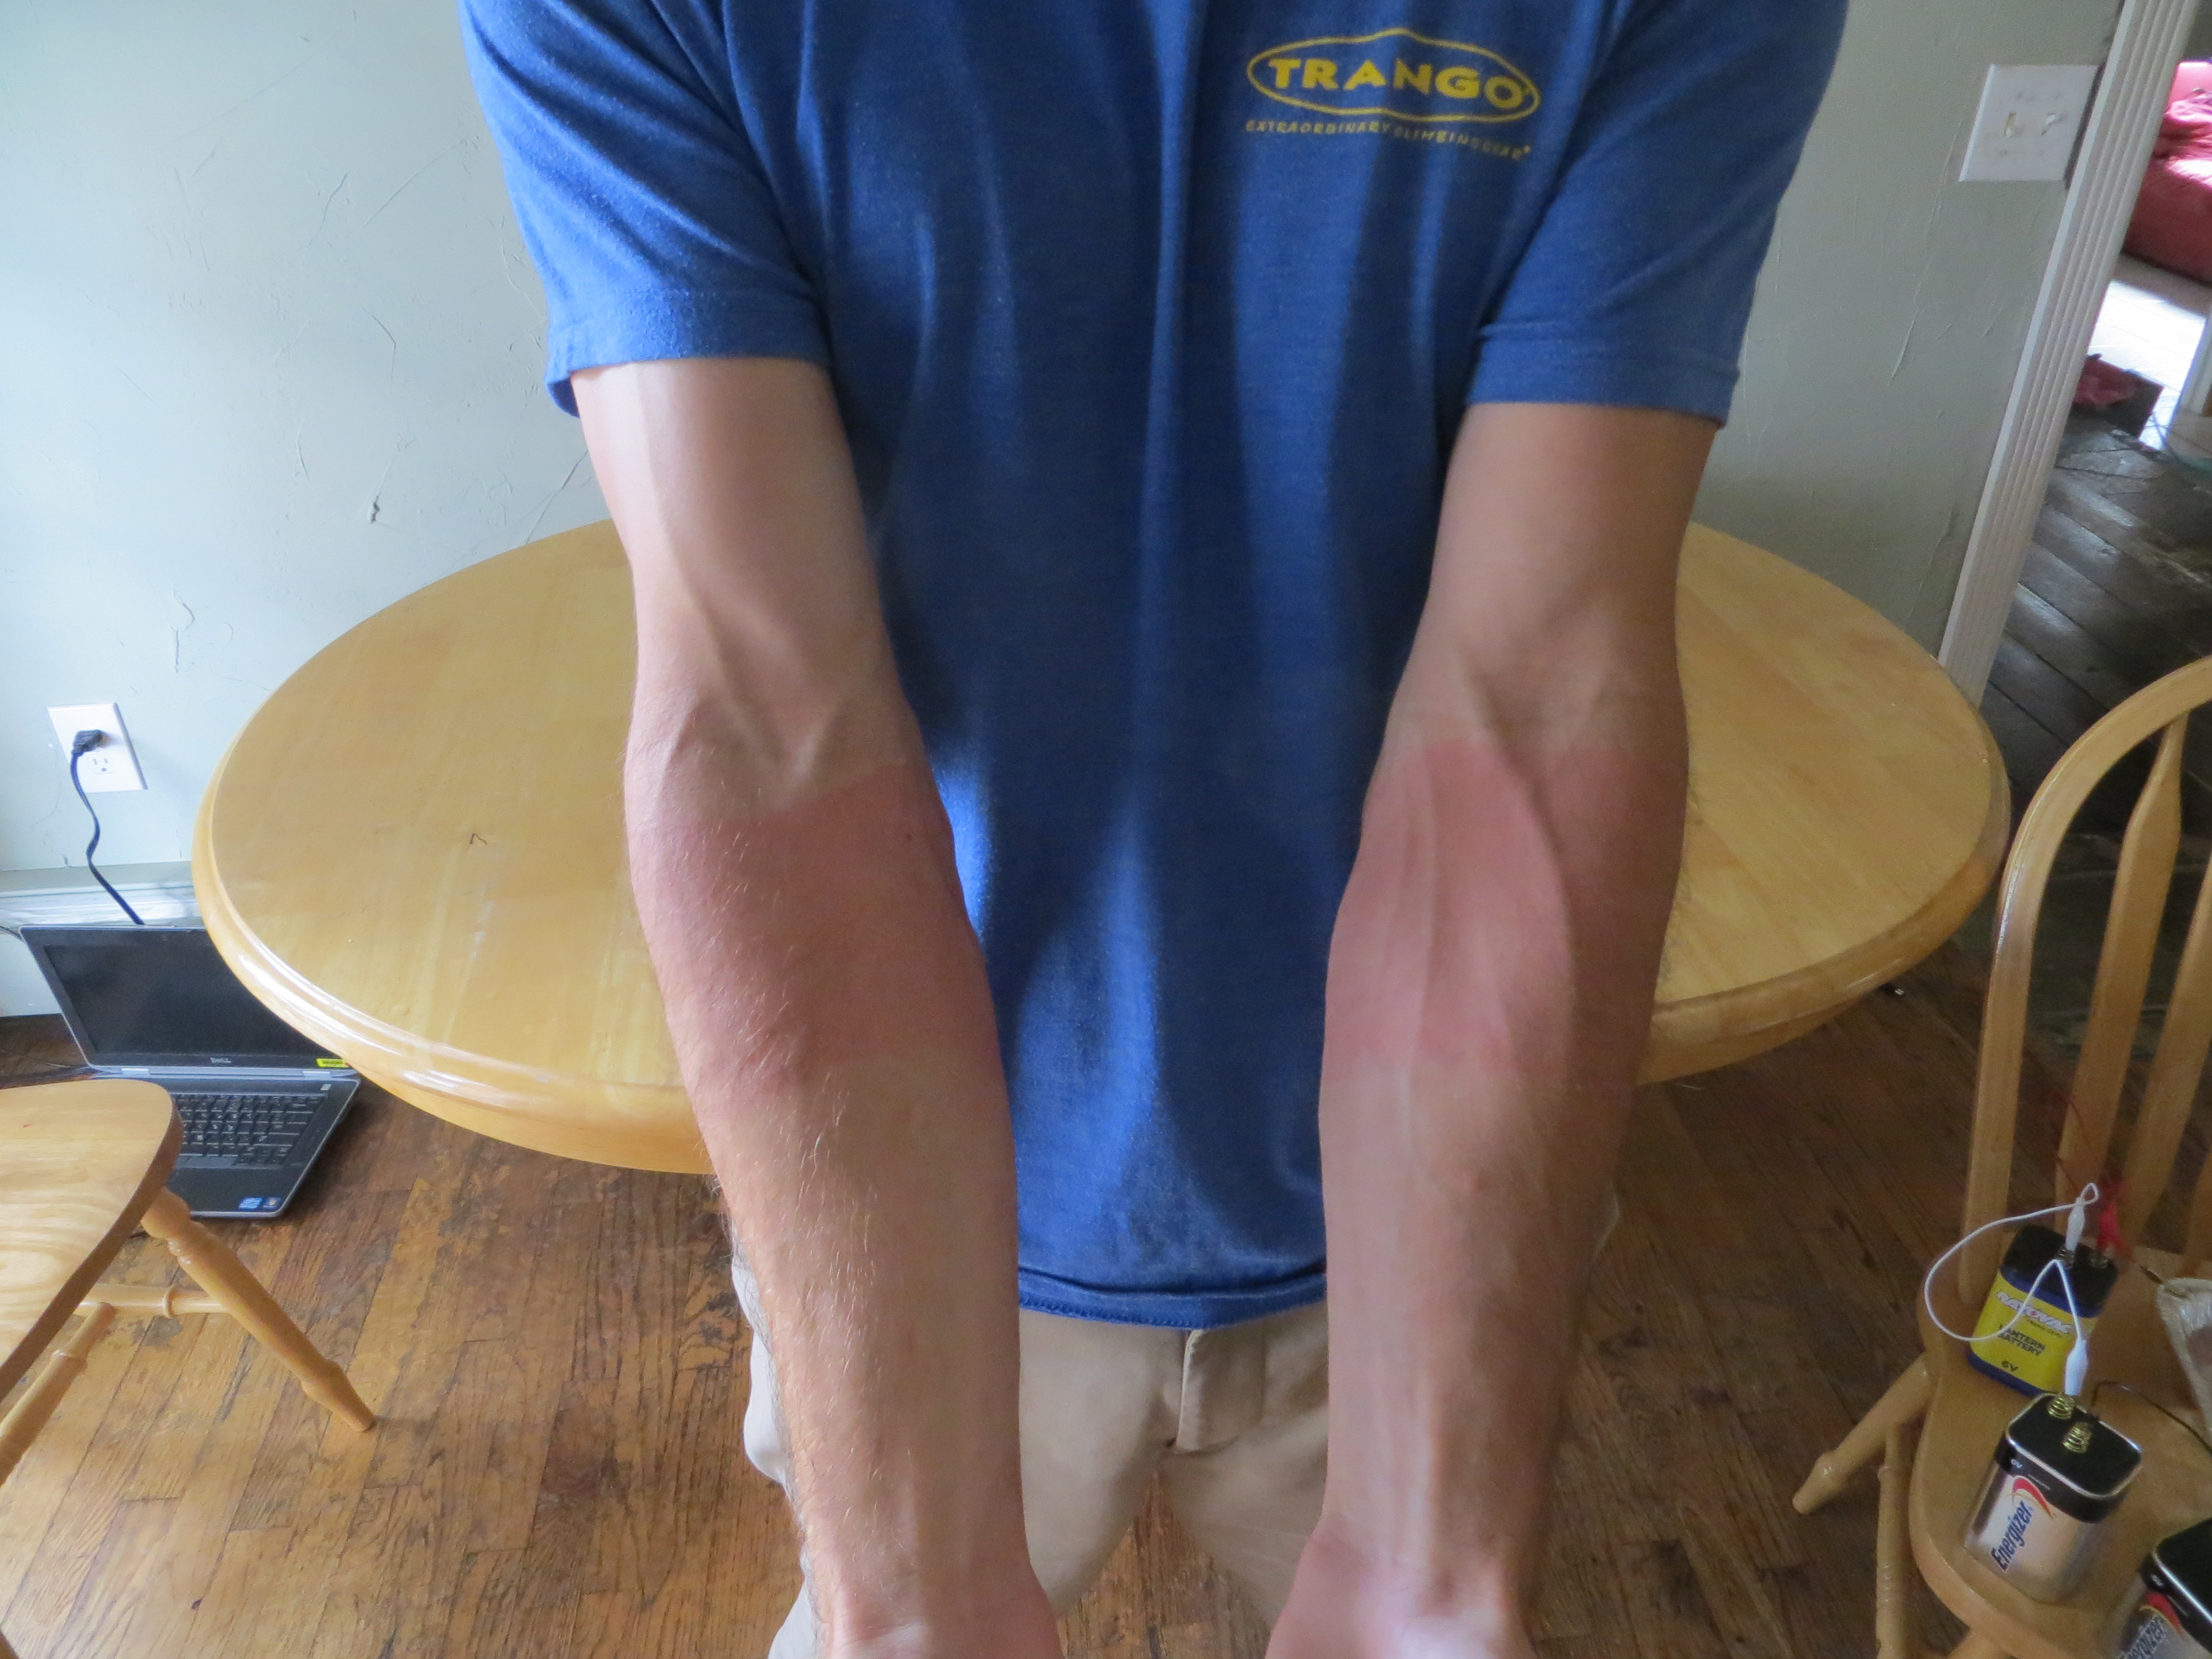
Note the skin redness on my forearms where the wristband was located. This fades within two hours or so.
Final Thoughts
[Updated October 22, 2018] I’ve been using the 1-tin, positive-to-pan method as needed for a couple years now. It definitely works, and I prefer it greatly to the 2-pan method. It’s really nice to have a free hand, and I’d like to think I’m reducing some health risk by limiting the current flow to my forearm.
For more information on iontophoresis for climbers, and to ask questions from experienced climber-iontophoresis-users, check out this thread on our forum.

Did you ever learn which hand (or which polarity direction) is causing the improvement in sweating?
LikeLike
Pingback: Sweaty to dry fingers for climbing: iontophoresis and antihydral experiments – Steven Low