by Mark Anderson
For many performance-oriented climbers, finger skin durability is a limiting factor. Repeatedly reefing on small, sharp holds can do significant damage, resulting in debilitating skin injuries like bloody flappers, splits, blisters, or simply thin skin that oozes sweat. Through trial and error, climbers have devised various methods to maximize skin toughness and longevity. These include regular sanding (to remove dead skin cells, promote regeneration of new cells, and minimize sharp edges that might catch on the rock), avoiding contact with water (especially warm or hot water), and topical application of various balms and creams (including some, like the infamous Antihydral, that contain known carcinogens*).
[*Formaldehyde]

At crags like Smith Rock, where sharp holds abound, skin toughness can make the difference between success and failure.
All of these methods have their downsides and limitations. Personally I’ve had the best luck with sanding, but it’s tedious, requires monk-like devotion and offers limited results. I’ve experimented extensively with Antihydral—much to my wife’s dismay—but more often than not wound up with devastating skin injuries (including splits and blood blisters). Even when Antihydral “works” for me, it results in slick, “glassy” skin that often slips off smoother holds (especially on wood or plastic holds). And that’s to say nothing of the potential long-term health effects.
Now there is a new contender: Iontophoresis. In a nutshell—I’m not making this up—you immerse your hands in two metal tins filled with water, and run an electric current from one tin, through one arm and out the other. Seriously. I first heard about this sorcery from my buddies Lamont Smith and Jon Moen. This mad-science was originally developed (probably) in the 18th century as a method of delivering medication to patients, but is now most-often used to help those suffering from “hyperhidrosis”, or excessive sweating. Researchers are unclear of the mechanism, but a large body of research supports its efficacy among hyperhidrosis sufferers as well as “normal” patients. (for example). [One theory on why it works is that it temporarily plugs sub-dermal sweat glands, while another is that it impairs sodium ions in the sweat glands.]
With respect to the effectiveness of iontophoresis versus Antihydral and sanding, climbers have only anecdotal evidence to consider. The few folks I know who have used it agree that the results are superior, creating thick, tough skin that is still supple, not glassy, and uniformly tough**.
“I tried Antihydral, but disliked it for several reasons. It makes your skin dry and hard, but in kind of an unnatural feeling and dead sort of way. It tended to make my skin overthickened and too hard/glassy. [There are] lots of risk of splits with Antihydral. Plus, it is just nasty, toxic stuff. Iontophoresis seems to produce more natural-feeling dry skin. Essentially, it gives someone with naturally soft/moist skin the ability to adjust their skin to be more like someone with naturally dry skin. My skin with iontophoresis does not have the thick, dead feeling that Antihydral gives it. Instead, it feels tough but pliable, and does not get sweaty/clammy. It does seem to perform better on smaller holds, in terms of both grip and durability, and it holds chalk better.” – Jon Moen
[**I’ve only used Iontophoresis in conjunction with sanding]
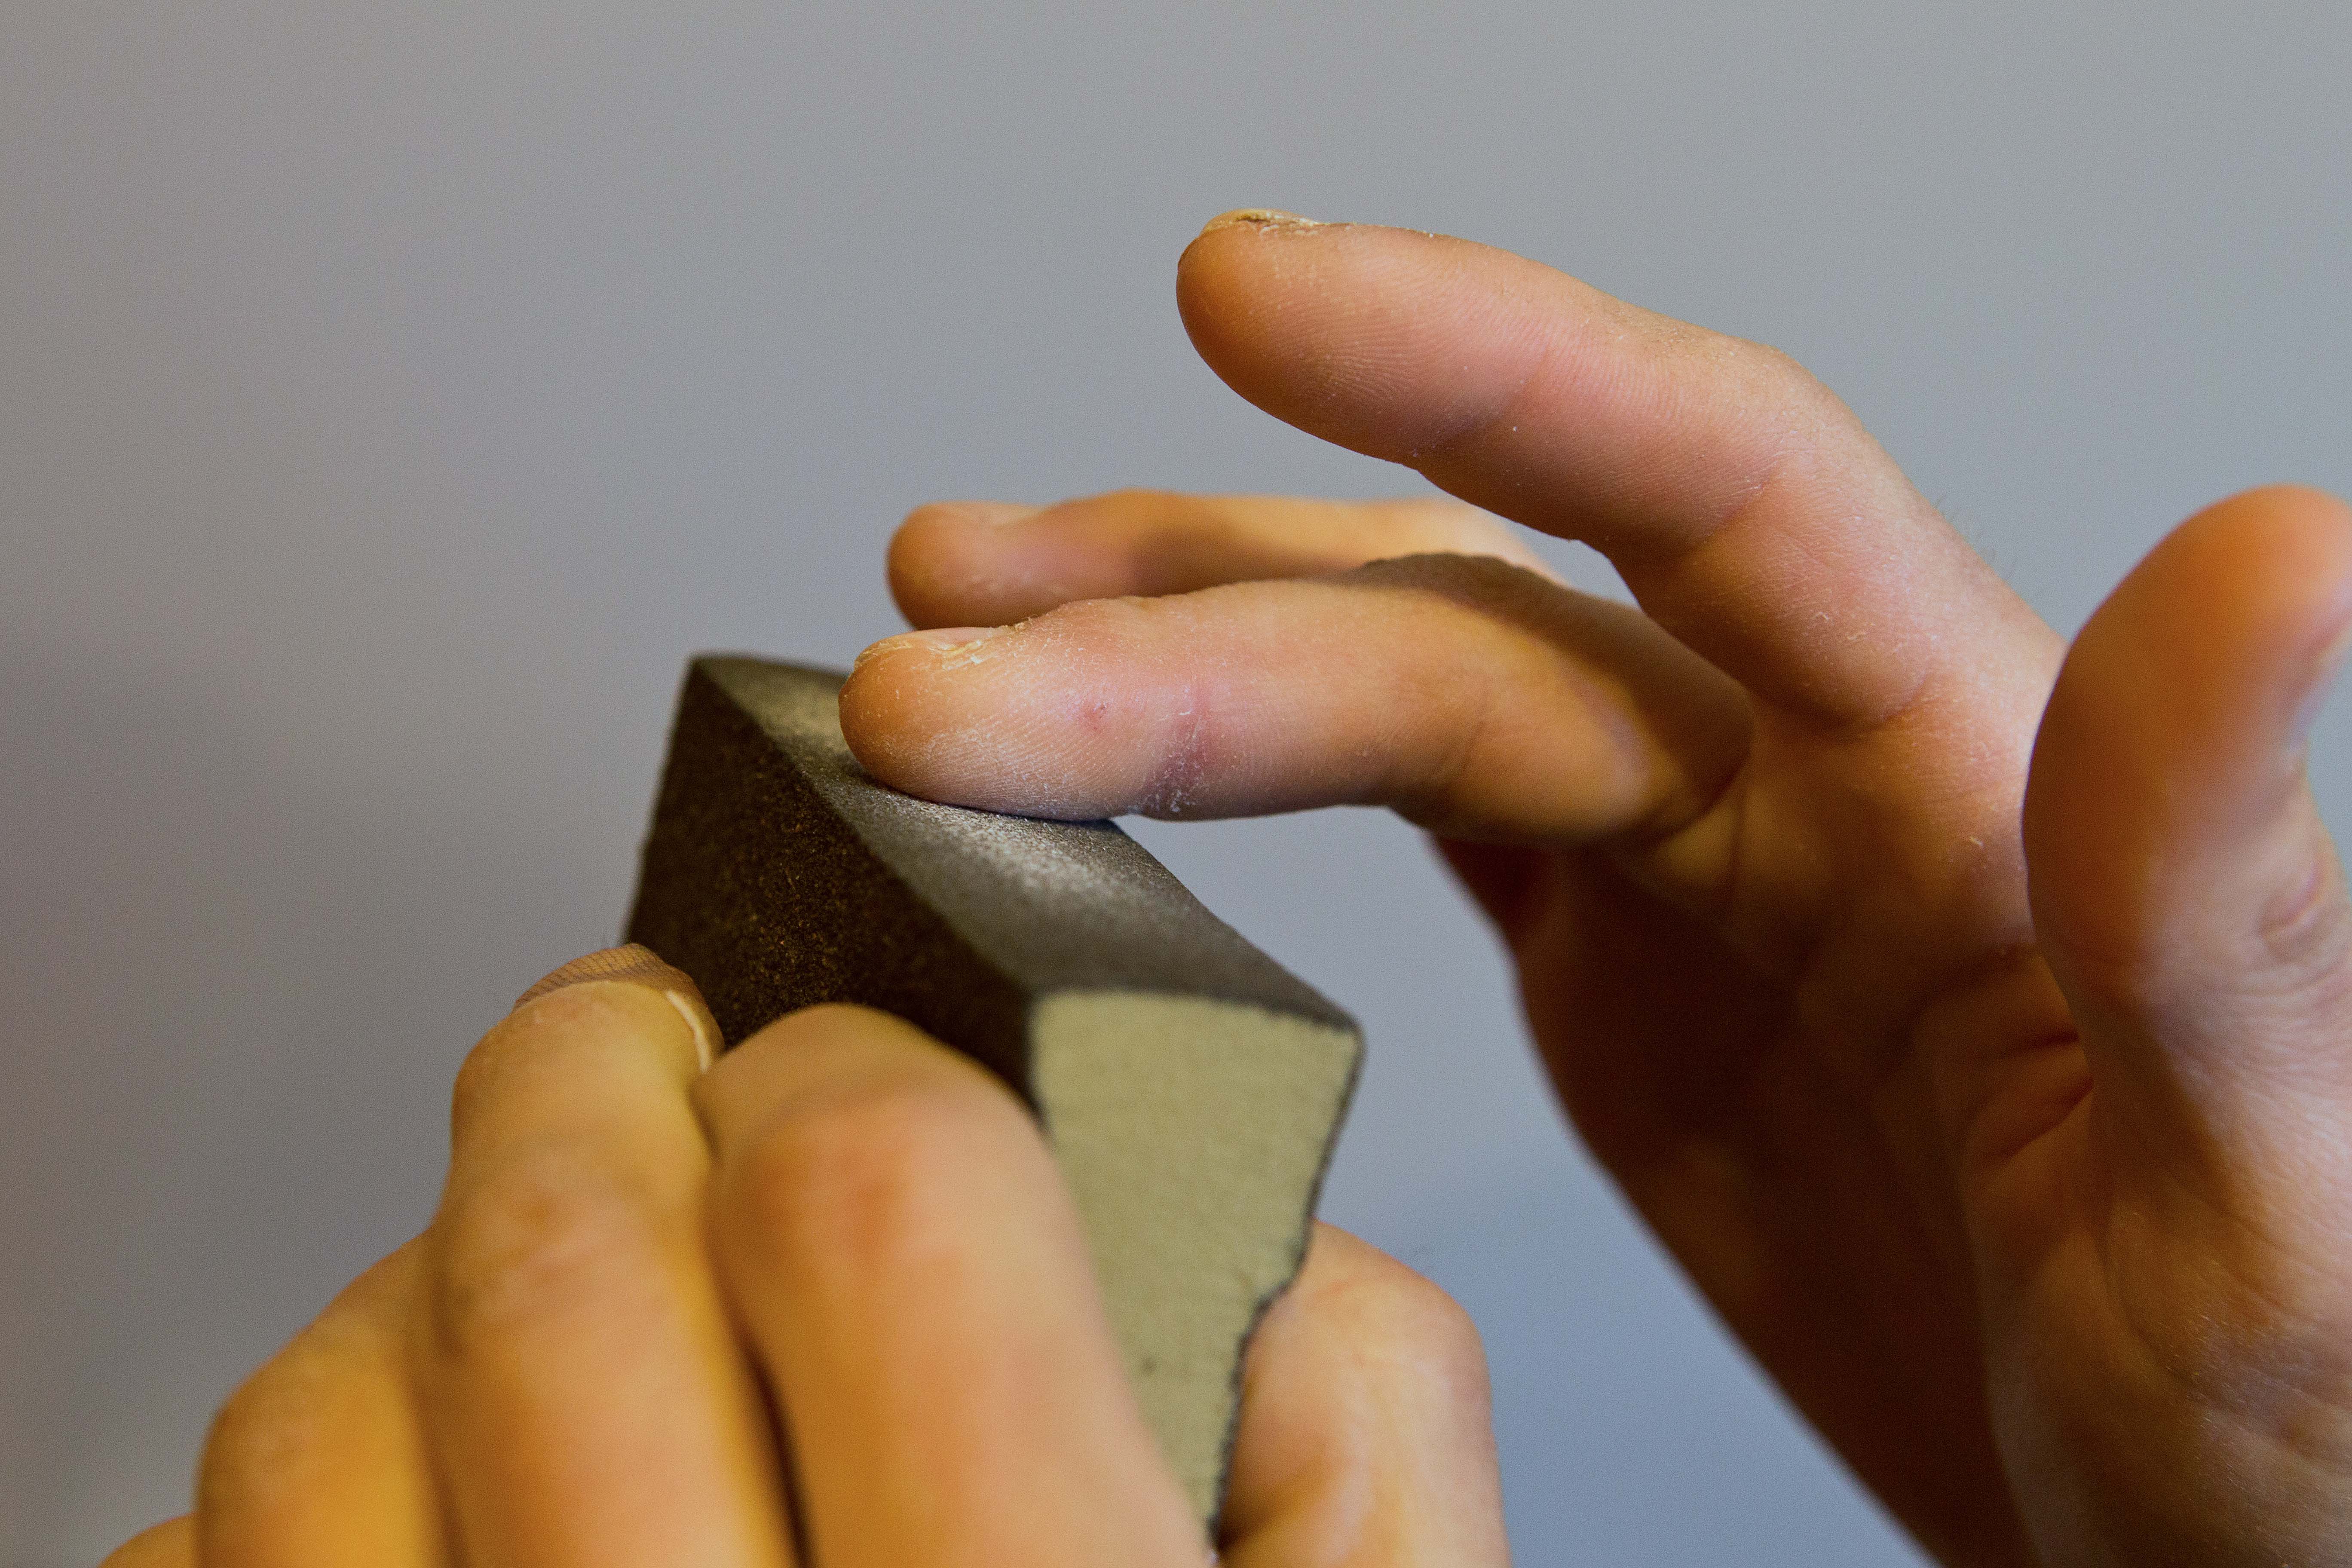
Sanding is a tried-and-true method of toughening finger skin, but it has limitations.
Of course, there are downsides, most obvious of which is that YOU ARE RUNNING ELECTRICAL CURRENT THROUGH YOUR BODY! I would never advise anyone to run electrical current through their body on purpose without the supervision of a trained medical provider. That would be just plain crazy. Beyond that, the downsides are fairly minimal, including:
-Logistical complexity which doesn’t travel super well, especially on airplanes (Good luck explaining to TSA why you have a salt shaker, a nest of electrical wires, and a bag full of lantern batteries in your luggage. If you DO have to explain this to TSA, please don’t mention my name.)
-The process can be mildly painful
-The process can make open wounds worse (or at least significantly slow healing)
-Normal people will think you’re crazy (although, according to one regular user’s significant other: “on the list of strange things [he does], this barely even registers”)
That said, if, for some reason you want to electrocute yourself periodically for the sake of rock climbing, you are not alone. It is possible to buy a fancy, FDA-approved Iontophoresis machine for several hundred dollars. If you’re interested in a commercial model, I recommend this website which offers a lot of great iontophoresis beta, including links to studies, equipment, and recommended treatment methods. If you purchase a commercial unit, read and heed all the instructions, and disregard whatever nonsense you read here.
Alternatively, cheapskates like me can make an iontophoresis “machine” themselves for about $20. This website or its sponsors would NEVER recommend performing iontophoresis without FDA-approved equipment. But the following information is provided for entertainment purposes….
The following hardware is needed to build a home-made iontophoresis machine:
-2 metal tins. Pie tins work ok, but for full-hand immersion, I recommend something larger and deeper like disposable aluminum baking pan(s).
-2-5 Electrical wires with “alligator clips” on each end
-2-4 6v lantern batteries
-A pinch or two of salt
-Tap water
-(Optional) Non-conductive spacers, such as a plastic tupperware lids or cotton shirts—see tip #8 below
Setup and Treatment
The standard, most common method of iontophoresis is performed by assembling these items as shown in the photo and wiring diagram (note that the system in this photo uses 4, 6v batteries, for a total of 24v. DO NOT start with 24v! See “Frequency and Intensity” below for more on this). Take special care to wire the batteries correctly. You want them wired in series, such that the negative terminal of the 1st battery is connected to the positive terminal of the 2nd, the negative terminal of the 2nd battery is connected to the positive terminal of the 3rd, and so on. One tin will be wired to the 1st battery’s positive terminal, and the other tin will be wired to the last battery’s negative terminal. Note that the alligator clips attached to the pans are located as near as possible to the tips of my fingers. It seems to help to keep the fingers oriented toward the current sources.
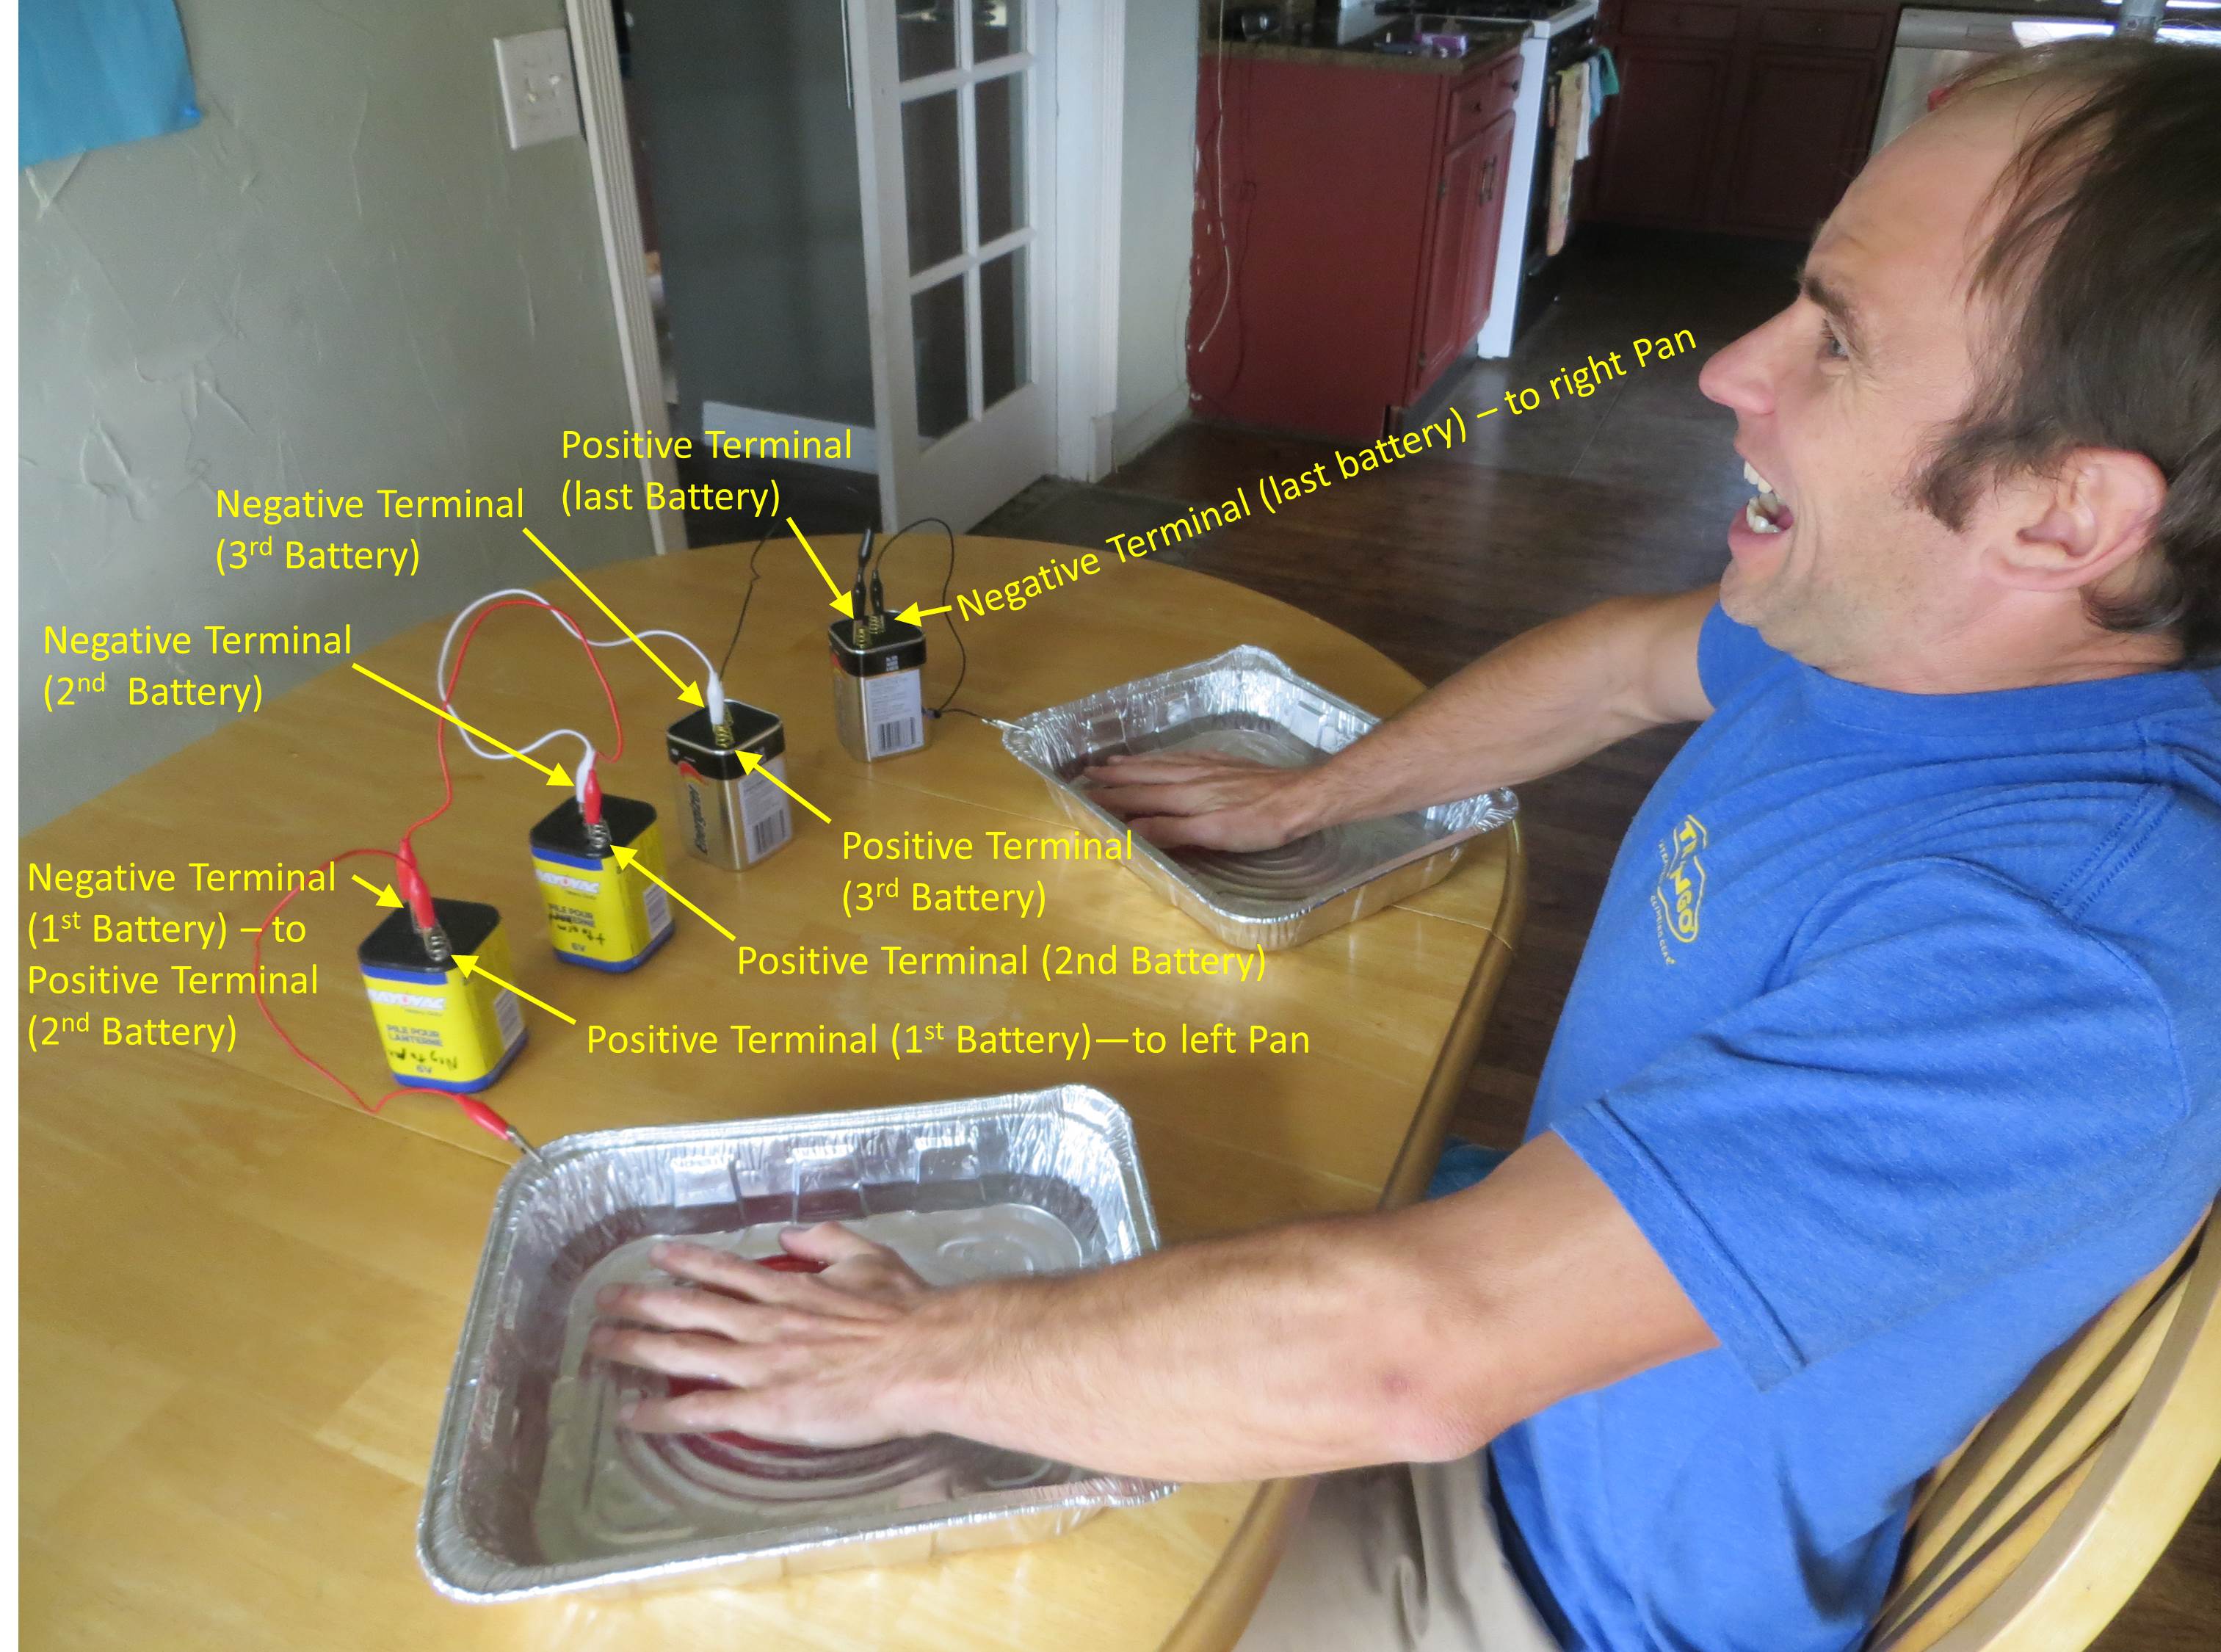
Wire the system as shown in this pic and the following diagram. Note that this pic shows 4, 6v-batteries wired in series for a total of 24v. Don’t start with 24v!

Immerse one hand in each pan for ~10 minutes, then remove your hands, reverse the polarity, and immerse your hands for another ~10 minutes. (Reverse the polarity by unclipping the alligator clips from the pans, rotating the batteries, and clipping them back into the opposite pan, so that if you started with the negative pole to the right pan & the positive pole to the left pan, you would switch it so the positive pole goes to the right pan and the negative pole goes to the left pan.) You will feel a tingling sensation and/or slight shock when you close the circuit (by submerging your second hand). Perform 2-3 times per week until you reach the desired skin toughness, and then reduce to 2-4 times per month for maintenance. These parameters will vary between people—see Frequency and Intensity below.
Iontophoresis has been shown to improve hyperhidrosis with just plain tap water, but some folks add salt to the water. In both cases, charged ions in the water apparently help facilitate the desired drying effect. If your tap water is relatively “soft”, it may not contain enough charged ions to produce a significant drying effect. I’ve found I need to add salt, but it depends on the chemistry of your water. Best to start without salt and see how it goes.
Frequency and Intensity
The amount and intensity of treatment will vary greatly between people. Iontophoresis is NOT for everybody. How much effect you need depends on your pre-existing skin condition, propensity for sweating, and the environment where you live and climb (Jon, for example, used to live in Colorado, where the climate is dry, and never had much use for iontophoresis. Once he moved to the humid Pacific Northwest, iontophoresis was extremely helpful). If your skin is already relatively dry, further drying may make matters worse, even catastrophically so.
How much effect you receive depends on several variables inherent to your iontophoresis setup and methodology:
- The voltage. Most folks operate between 12v and 24v. The greater the voltage, the greater the effect (and the greater the shock pain upon entering/exiting the water)
- The amount of salt in the water. Iontophoresis will work with no salt, assuming your tap water is sufficiently “hard”, but adding salt is the easiest way to vary the intensity. If you find you are not getting a sufficient response, add salt. The more salt, the greater the effect (and the greater the shock pain upon entering/exiting the water). You should feel some tingling and a slight shock when you close the circuit. If you don’t feel these effects, add a pinch of salt, check again, and repeat as necessary. If you feel so much tingling that you can’t stand it for 10 minutes (or a shock that causes an involuntary reflex), use less salt. (Also, I’ve heard baking soda works too, but I haven’t tried it.)
- The duration of iontophoresis sessions. Longer session = greater effect
- The frequency of iontophoresis sessions. More sessions = greater effect. Climbers have had success with fewer, longer sessions (up to 20 minutes per hand, 1-2 times per week) as well as more, shorter sessions (such as 6-8 minutes per hand every other day).
Keep in mind, finger skin is fragile and pivotal, and it is very easy to go too far with any maintenance routine. More is not always better. As with any voodoo experiment you have elected to perform on yourself, start out low and slow, see how it goes, and then make adjustments as you learn how your body responds. That is, start during the off-season, with minimal voltage, no salt and few, short sessions. Slowly ramp up if you feel like you need more of any variable. Expect to lose the benefits of iontophoresis within about 3 weeks after you stop doing it.
Iontophoresis Tips:
- Do this at your own risk.
- Talk to your doctor before electrocuting yourself.
- Please don’t do this if you are pregnant, have a pacemaker, or any other metal implants in the path of the current flow.
- Definitely don’t do this if you have a heart condition, epilepsy, or other medical condition that responds poorly to electricity.
- Probably, just don’t do this.
- It’s nice to have the pans located at a comfortable height, relative to your seated height. I find around butt-level works best for me.
- Have a towel handy to clean up spilled water and dry your hands at the end.
- It’s probably wise to avoid touching the metal pans. The water helps diffuse the electric current, and touching the pans could “short” the system, which could be painful and, more importantly, defeat the purpose of the activity. I place a plastic Tupperware lid in the bottom of each tin that I rest my palm(s) on to keep my skin out of contact with the metal tin. A cotton shirt or rag could be used for the same purpose (and theoretically still allow current to flow through to your palm). Others recommend using deep cook pots so you can immerse your enter hand, up to the wrist, without contacting the pans (this can also reduce redness and discomfort on the backs of the hands—see Tip #12 below).
- I’ve seen various battery configurations online. It seems the voltage is the key parameter, but I’m not an electrician (or a cardiologist) so don’t listen to me. I know 6v lantern batteries wired in series work. If you use anything else, you’re on your own. Smaller batteries will presumably run out of juice more quickly, but eventually all batteries will run out of juice, and need to be replaced or recharged. I haven’t gotten to that point yet with my 6v lantern batteries. DO NOT use a 12v car battery.
- Remove any metal jewelry in the current path
- Avoid submerging any open wounds or abrasions. I like to adjust the water-level in the pan such that the back of my hand, which frequently sports various gobies, is not submerged. If you must submerge a wound, it will help to cover it with a non-conductive cream like Climb On skin balm or Vaseline. Jon Moen has reported good success with cutting off bits of Climb On and packing it into any open wounds to protect them. Note that areas covered thusly will not receive a drying effect.
- You may notice skin redness in the vicinity of the water line of the metal tin(s). This is “normal” (within the context of submerging your body in electrically charged buckets of water), and seems to fade within a couple hours.
- It’s a good idea to have some skin-moisturizing balm(s) on-hand to counter-act the drying effect in case you go too far.
- If your skin gets too dry, stop doing this.
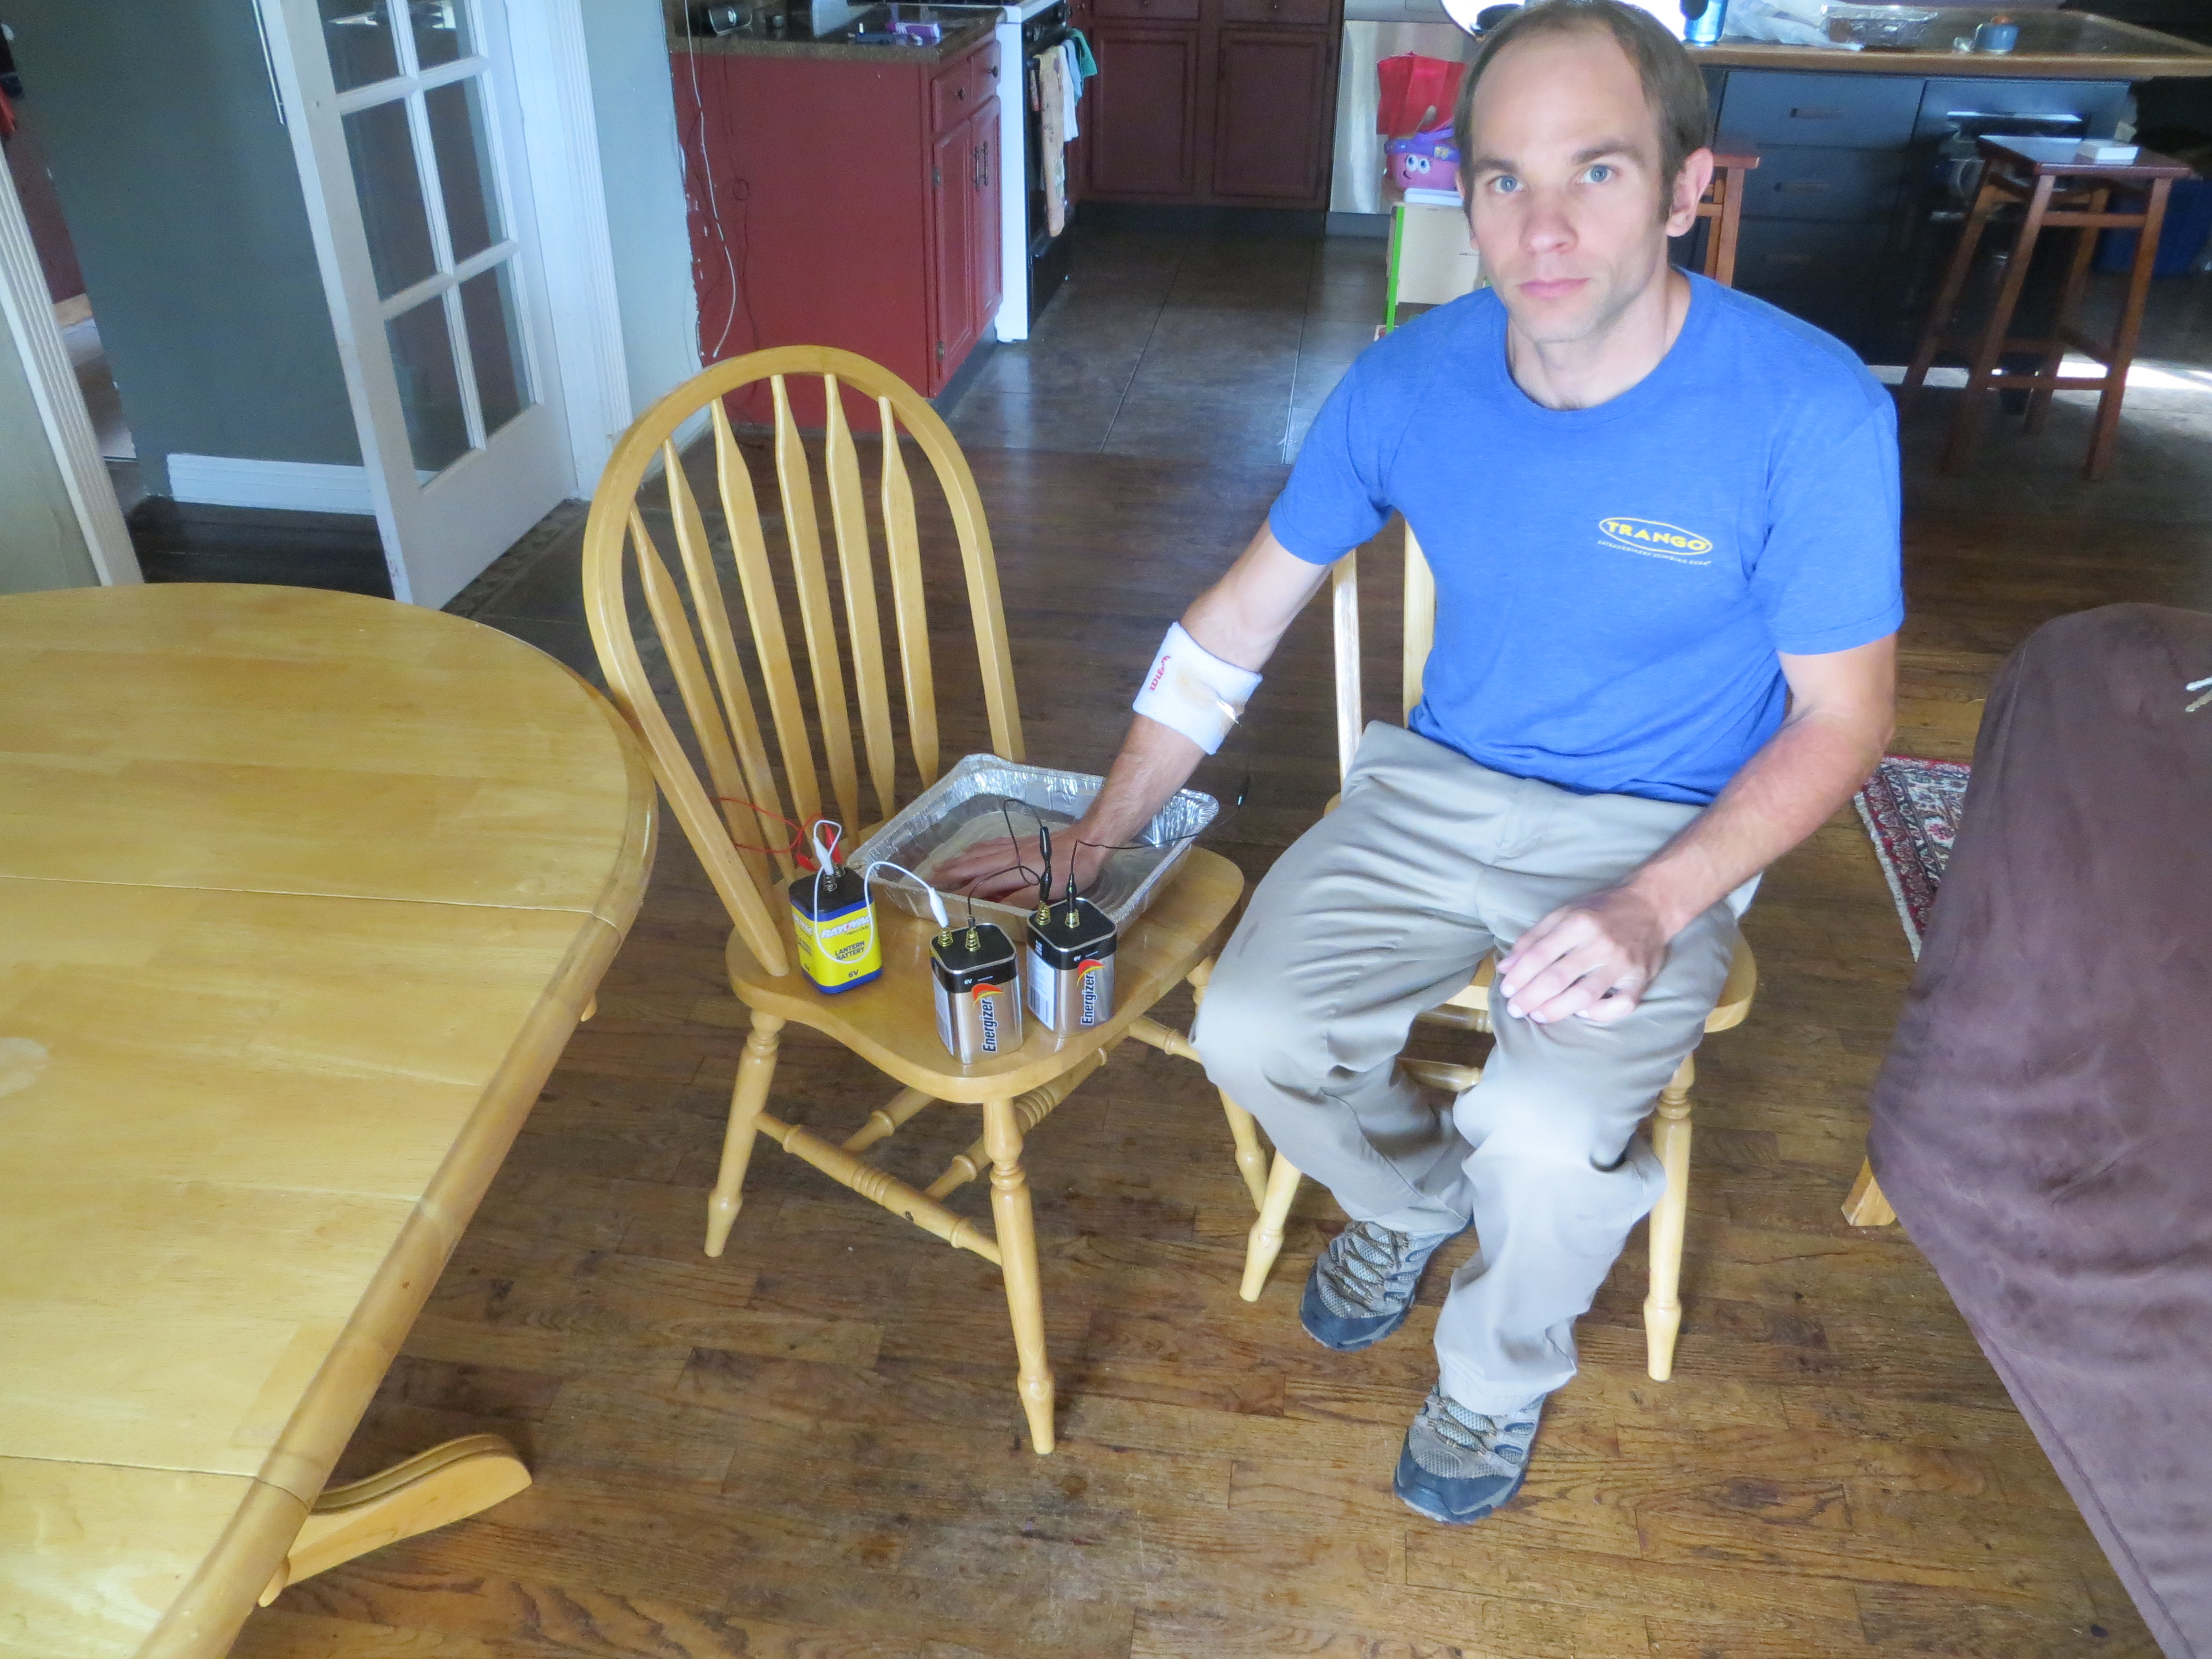
I find it more comfortable to position the pan(s) around butt-height. Check back here soon for a detailed description of the 1-Tin Method I’m using in this photo.
Now that I’ve covered the basics, in a couple weeks I will describe an appealing variation to the standard method of iontophoresis and provide some resources for those with more questions on the science and practical methodology.

Oh you’ve truly gone off the deep end here!! 🙂
LikeLike
Hahaha!!! I can’t believe you actually made this post! You’re nuts! Then again, I said the same thing about Mike’s hangboard bubble but have since built my own (and love it). Regardless, I’m really interested to hear how you feel this compares to sanding.
LikeLike
I don’t know if I will ever try this because sanding has always worked well for me, BUT I am so happy this information exists haha!
LikeLike
Pingback: Iontophoresis Part II | The Rock Climber's Training Manual
rather than re-wire the pans, could you just cross your arms and trade hands?
LikeLike
Yes, but I imagine that would get pretty uncomfortable after a couple minutes.
LikeLike
You could just move to the other side of the table.
LikeLike
Pingback: Sweaty to dry fingers for climbing: iontophoresis and antihydral experiments – Steven Low
Now might be the right time for an intervention.
LikeLike
Pingback: How I Solved My Sweaty Skin Problems – 5.12 And Beyond